Как произвести чистую установку macos high sierra
Содержание:
- Step #2. Setup Parts of Your Motherboard’s BIOS or UEFI
- Создание загрузочной флешки OS X с помощью DiskMaker X
- Step #1. Create Bootable USB Installer For macOS Sierra
- How to Make a Bootable USB Installer for macOS High Sierra
- Step #8. Perform a clean Installation of macOS Sierra
- Как создать загрузочную UEFI флешку
- Development and release
- Как обновиться до новой операционной системы macOS High Sierra максимально корректно?
- New features
- Редактирование файла Config.plist
- About Macintosh OS Server 1.0
- Reviews from the users
Step #2. Setup Parts of Your Motherboard’s BIOS or UEFI
Now after downloading and creating bootable USB installer for macOS Sierra. Then here you will need to setup parts of your motherboard’s BIOS or UEFI. This step will let and make the USB installer to boot into clover menu. It’s so important to do this step correctly and carefully because if no then without doing this stuffs, you won’t be able to go forward and make a Hackintosh macOS Sierra 10.12.
#1. Press the BIOS Menu Button from your keyboard(F12, F10, F8, F2) depending on your system if can’t find then do a google search or comment as below your systems details. For Lenovo laptops, press Novo button or one key recovery then select BIOS Setup and hit enter from your keyboard.
BIOS Setup
#2. Now from BIOS, Set The SATA Controller Mode to (AHCI).

SATA Controller Mode
#3. Then Go to Boot Label and Set the Boot Mode to (Legacy Support) and Set the Boot Priority to (UEFI First).
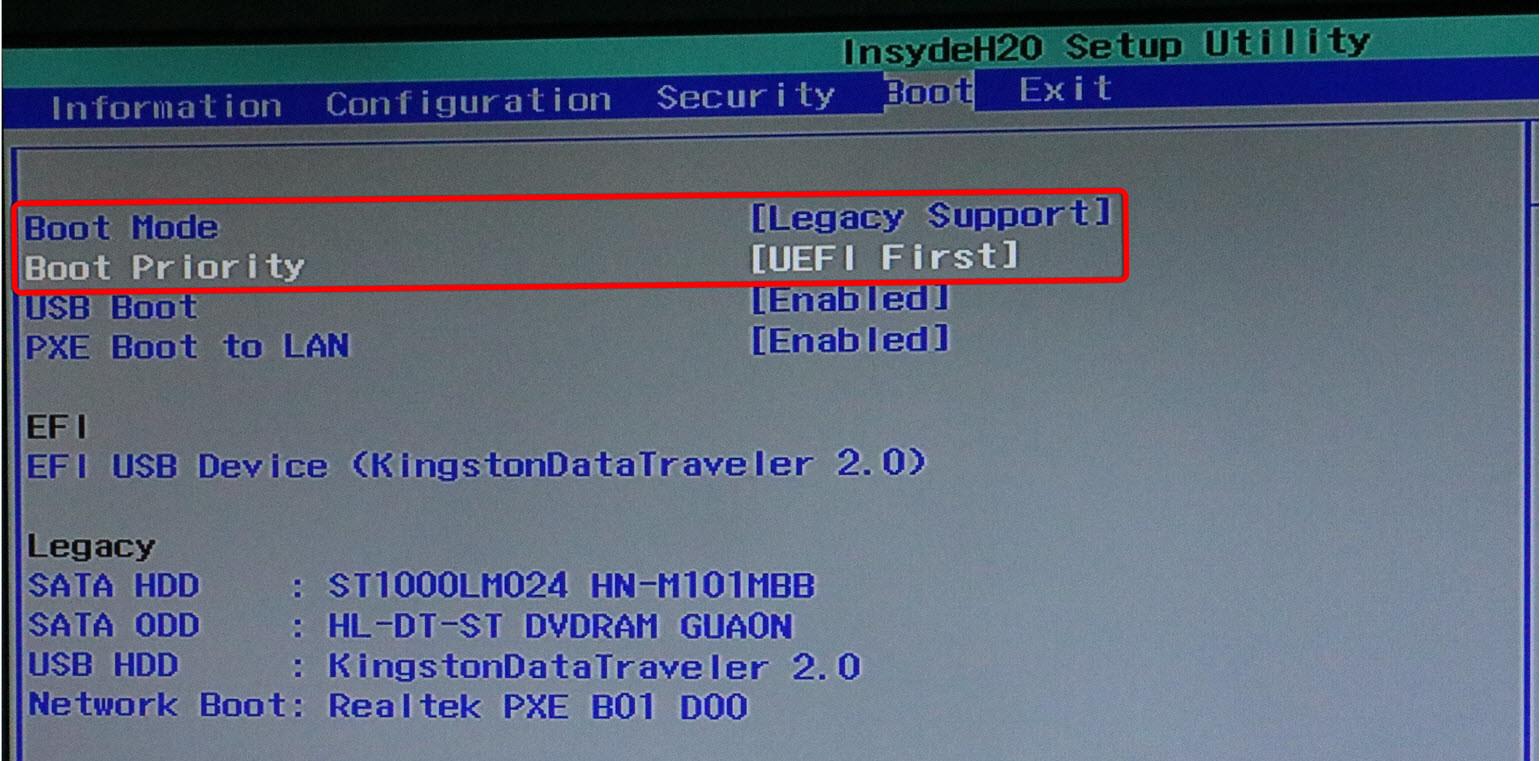
Boot UEFI Mode
#4. Then Exit and Save Changes.

Exit Saving Changes
Note: This works great on Lenovo based Computer. And this may not work for any other systems. So due to this, we highly recommend you to do the below guides for your system.
- Load Optimized Defaults
- Set The SATA Controller Mode to AHCI
- Set the Boot Priority to UEFI
- Set OS Type to Other OS
- If your CPU supports VT-d, disable it
- If your system has CFG-Lock, disable it
- If your system has Secure Boot Mode, disable it
- If you have a six series or x58 system with AWARD BIOS, disable USB 3.0
- Save and exit.
- If your system didn’t boot automatically, then go to Boot Manager and select the Bootable USB Installer that you create in step 1, Manually.

Boot From EFI USB Device
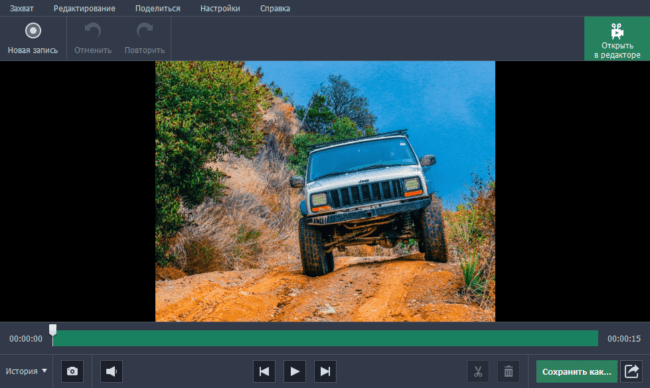
Создание загрузочной флешки OS X с помощью DiskMaker X
Все этапы по созданию флешки c macOS (OS X) одинаковы, и ничем не отличаются друг от друга, разница состоит лишь в версиях программ с помощью которых она делается. На примере, мы создадим загрузочную USB флешку для Yosemite.
Шаг 1 Скачиваем в официального сайта версию DiskMaker X 6, монтируем скачанный файл и перемещаем приложение в папку «Программы»
Шаг 2 Запускаем скопированную программу и нажимаем Открыть . Если Вы загрузили не последнюю версию программы, то перед вами появится окно с загрузкой последней версией. Нажимаем Not now, thanks , так как мы создаем флешку с OS X Yosemite, а в каждой версии программы DiskMaker X, можно выбрать только с трех последних macOS, а после Yosemite уже вышло 5
Шаг 3 Появится окно с выбором операционной системы, которую мы можем загрузить на флешку. В зависимости от версии программы DiskMaker X, выбор систем может меняться. В нашей версии это Yosemite (10.10), El Capitan (10.11) и Sierra (10.12). Выбираем Yosemite (10.10)
Шаг 4 Укажите, где находиться сам образ системы, если Вы скачали ее из Mac App Store, то она будет у вас находиться в папке «Программы» и DiskMaker X сам его найдет и вам нужно будет только нажать Use this copy
а если же OS X скачанная с Интернет, то нужно указать место, где она лежит, нажав на кнопку Select an OS X Instalation App... или Select an macOS Instalation App... (для новых версий) Не забудьте перед выбором смонтировать файл .dmg и скопировать из него файл с macOS (OS X), так как если Вы попытаетесь выбрать образ системы в формате .dmg, то у вас программа его просто не выберет
Шаг 5 Если у вас флешка объемом 8 Гб, выбираем An 8 GB USB thumb drive , иначе Another kind of disk
Шаг 6 Выбираем непосредственно флешку, на которую собираемся проводить запись и нажимаем кнопку Choose this disk
Шаг 7 Соглашаемся, что наш диск будет полностью стерт
Шаг 8 Далее нажимаем клавишу Continue и вводим наш пароль администратора компьютера
Шаг 9 После этого начнется процесс создания загрузочной флешки, который займет от 10 до 20 минут, после чего Вы будете уведомлены сообщением
Поздравляем. Загрузочная флешка Mac OS X готова!
Step #1. Create Bootable USB Installer For macOS Sierra
In this step, you have to download and create a bootable USB installer for macOS Sierra using UniBeast on Macbook or create bootable USB Installer on Windows. This step will help you to Boot with the USB installer and create a partition for mac and finally installs the Mac from the USB Installer to OS X Extended (Journaled) partition. It’s a bit long, so due to this, we have managed 2 articles and different methods for it check the articles and follow step by step the article to bootable create USB Installer.
- How to Create Bootable USB Installer for macOS Sierra Using UniBeast?
- How to Create macOS Sierra Bootable USB Installer on Windows 10?
How to Make a Bootable USB Installer for macOS High Sierra
- Connect the USB flash drive to the Mac, if you need to format it go ahead and do so
- Download macOS High Sierra installer application from the App Store* and be sure the complete installer is located in the /Applications/ directory
- When the installer has completed downloading, it will automatically launch – quit out of the installer when this occurs
- Open the “Terminal” application found in /Applications/Utilities/ directory on the Mac
- Enter the following command syntax at the command line, replacing “UNTITLED” with your USB drive name if necessary:
Confirm the syntax is exactly as written, then hit the RETURN key and enter the administrator password to start making the High Sierra installer drive *
Let the installer complete, when finished you will be informed that the process has completed
Once you have created the USB boot installer drive for macOS High Sierra, you can either launch it immediately to install macOS High Sierra on the current Mac, reboot and startup from the USB installer drive, or eject it and use it on another Mac.
* Note: if you are getting a “command not found” error and you are certain your syntax is correct, be sure to check the file size of the “Install macOS High Sierra.app” as found in the /Applications folder. If the file size of the High Sierra installer is not over 5GB then you have the incomplete installer and will need to download the complete macOS High Sierra installer application as described here in order to create a bootable installer drive.
Booting from the macOS High Sierra USB Installer Drive
With the newly created macOS High Sierra USB installer drive connected to the Mac, reboot the computer. Immediately on reboot, start holding down the “OPTION” (ALT) key to load the boot menu. Select the High Sierra installer at this screen.
Once booted from the USB drive you can proceed with installing macOS High Sierra, using the Disk Utility tools to format or erase a volume, work with Time Machine, and other similar tasks.
If you had previously created a boot installer for the High Sierra beta you may notice the syntax is different for createinstallmedia is different with the final version, part of that is to accommodate the new file name of the application installer, and the remainder removes the necessity of the –applicationpath flag and directive.
Keep in mind that macOS High Sierra can only be installed onto supported hardware, if you’re uncertain whether or not a particular computer supports the release you can check this list of macOS High Sierra compatible Macs.
Do you know of another approach to making a macOS High Sierra bootable install drive? Do you have an easier method, or do you have any particular tricks related to this process? Let us know in the comments.
Step #8. Perform a clean Installation of macOS Sierra
Now in the previous steps, if you have installed macOS Sierra from the USB Installer to the partition that you created for macOS Sierra 10.12, then after booting from that partition that macOS Sierra is installed on it. Here it’s time to set up and performing a clean installation of macOS Sierra. Well, we have another article also this for further information visit the link below to perform a clean installation of macOS Sierra or keep following this article below to perform a clean installation of macOS Sierra.
How to perform a clean installation of macOS Sierra?
#1. Choose your Country and click Continue.
Choose Language
#2. Choose a keyboard Layout and click on Continue.
Select Your Keyboard
#3. Now select your method to transfer information to this mac and click on Continue.
Transfer information to this Mac
#4. Enable location services and click on Continue.
Diagnostics & Usage
#5. In this step, you have to Sign in with your Apple ID. If you have one, then create a free Apple ID to the article, how to create an Apple ID on iPhone, iPad or iPod Touch. If you don’t want to sign in with Apple ID or don’t want to create Apple ID, then Choose Don’t Sign in and Click on Continue.
#6. Agree tothe Terms and Conditions.
Agree to Terms and Conditions
#7. Fill out the Full name, Account name, Password, Hint and check the box of Set time zone based on Current location. Then finally click on Continue to create your user account for macOS Sierra, that will be installed on your PC.
Create a Computer Account Hackintosh
#8. Select the options for Diagnostics & usage and click on Continue.
#9. Wait a little while to Setting Up Your Mac. Then it will run to the desktop of macOS Sierra.
Как создать загрузочную UEFI флешку
Привет друзья! Если у вас появится необходимость загрузить новый ноутбук с загрузочной флешки или диска с каким-либо софтом, то у вас наверняка ничего не выйдет, придётся лезть в BIOS и переключать интерфейс UEFI в режим расширенной загрузки «Legacy», затем отключать протокол безопасной загрузки Secure Boot, иначе ноутбук просто не увидит среди загрузочных устройств вашу флешку.
Не отключая интерфейс UEFI и Secure Boot загрузить современный ноутбук можно только с установочной флешки Windows 8.1 (подготовленной специальной утилитой) и Windows 10.
Насчёт создания загрузочной флешки с каким-либо софтом скажу, только самые известные производители программного обеспечения, например, Acronis, Paragon, AOMEI, Lazesoft и некоторые другие позволяют создать в своей программе загрузочную флешку, с которой можно загрузить ноутбук с интерфейсом UEFI.
Почему всё так сложно? Друзья, про БИОС UEFI уже написано множество статей, в том числе и на нашем сайте, в двух словах скажу, интерфейс UEFI призван заменить устаревший BIOS и защитить последние операционные системы Майкрософт (Windows 8.1, 10) от особого вида вредоносного программного обеспечения — буткитов (вирус поражающий загрузочный сектор MBR). Основным защитником выступает протокол безопасной загрузки Secure Boot. Пройти данный протокол может программа или операционная система имеющая специальные сертификаты соответствия стандарту Unified Extensible Firmware Interface (UEFI), на данный момент такие сертификаты имеют только Win 8.1 и Win 10.
Скажу больше, операционные системы от Майкрософт отныне будут продаваться только на устройствах с интерфейсом UEFI и если вы являетесь производителем компьютерных устройств и хотите продавать ваше изделие с установленной Windows 8.1, то обязаны, по условию соглашения с Майкрософт, включить опцию Secure Boot по умолчанию, вот и всё.
В сегодняшней статье мы узнаем как создать загрузочную UEFI флешку с операционной системой Windows 8.1, Windows 7 тремя способами, что касается Windows 10, то на эту тему написана отдельная статья. Далее я приведу Вам ссылки на свои статьи, в которых пошагово объясняю процесс создания загрузочных флешек UEFI в различных программах. Ещё покажу как создать свой собственный LiveCD на базе Win 8.1.
1 способ
Во первых, создать UEFI флешку с Windows 8.1 можно с помощью утилиты mediacreationtool.exe. Скачиваете, запускаете, выбираете Язык, Выпуск и Архитектуру нужной вам Win 8.1, затем отмечаете пункт USB-устройство флеш-памяти, жмёте Далее и начинается процесс создания UEFI флешки, не нужен даже дистрибутив системы.
2 способ
Для создания загрузочной UEFI флешки Windows 8.1 также подойдёт очень простая утилита Rufus
1. В главном окне программы в пункте «Устройство» выберите вашу флешку.
2. Схема раздела и тип системного интерфейса. GPT для компьютеров с интерфейсом UEFI.
3. Файловую систему выберите «FAT32″»
4. Щёлкните на кнопке вызова проводника и выберите ISO образ с Windows 8.1.
Жмите Старт и через несколько минут флешка готова.
3 способ
Если хотите, создайте UEFI флешку в командной строке.
Для создания загрузочной UEFI флешки Windows 7 я бы использовал программу WinSetupFromUSB.
Отличную загрузочную UEFI флешку LiveCD на базе Windows 8.1 можно создать самостоятельно и даже интегрировать в неё программы, читайте информацию здесь.
Также вы можете создать UEFI флешку с программами:
Development and release
Apple’s new version of macOS is called High Sierra
Presented by Craig Federighi at WWDC 2017.
The first beta of macOS High Sierra was released to developers shortly after the keynote of the 2017 Worldwide Developers Conference on June 5. The new features were presented by Craig Federighi, the senior VP of software engineering. When discussing how the «crack marketing team» came up with the name High Sierra while traveling in their minibus, he joked that they «assured us this name is fully baked.»
The first public beta was made available in July 2017. macOS High Sierra was officially launched on September 25, 2017, as a free downloadable upgrade through the Mac App Store. There is no physical retail version from Apple, though it is possible to create a bootable drive of the installer.
Как обновиться до новой операционной системы macOS High Sierra максимально корректно?
Для этого необходимо подготовить установочную флешку macOS High Sierra.
К сожалению, в интернете нигде не нашёл работающей инструкции для этой процедуры.
Поэтому собрал здесь максимально проверенный вариант.
Итак, нужна флешка от 8 ГГб, которую не жалко отформатировать.
Открываем Disk Utility, выбираем флешку, нажимаем кнопку «Erase», выбираем схему GUID, даём название Untitled, форматируем флешку под Mac OS Extended (журнальный) и нажимаем «Erase».
Теперь самое главное.
В операционных системах Мак (как и в любых других), вам нужны 2 учётных записи. Одна с правами админа и одна минимум с правами обычного пользователя, под которым вы собственно и будете работать (вы ведь так и делаете)?
Так вот, всё далее будет описано для заботящихся о безопасности владельцев, которые сидят под обычным пользователем.
Скачиваем дистрибьютив из AppStore — его там легко найти на главной странице. Качать придётся более 5 гигабайт.
Когда загрузка завершена, в папке Applications у вас появится Install macOS High Sierra.app
Это и есть дистрибьютив.
Далее — самое важное
New features
The High Sierra desktop
The following is a partial list:
- New APFS file system, also introduced in iOS 10, replaces the decades-old HFS+ drive format with a modern replacement.
- HEVC, adds support for a much more efficient H.265 video codec.
- Metal 2, adds a newer version of the graphics display system, which supports VR and extended GPU functionality at higher speeds.
- Integrated VR support, contains support for creating, editing and interacting with VR media.
- Photos, adds an expanded sidebar, improved organization tools, integrates with advanced editing tools, supports more Memories modules and live photo editing tools, and included People/Faces.
- Safari, now contains Intelligent Tracking Prevention, the ability to disable autoplay, site-based browser settings, site-based always-on reader view.
- Siri, supports preference learning for music and is more tightly integrated with iTunes, and text to speech is improved.
- Spotlight, adds flight tracking features.
- Mail Search, is improved with more options.
- FaceTime, supports capture of Live Photos from streaming video.
- Notes, adds pins and tables.
Редактирование файла Config.plist
После успешного создания загрузочной флешки останется заменить конфигурационный файл «Config.plist» на тот, который соответствует вашему графическому процессору.
Шаг 1 Разархивируйте скачанный файл «Config package»
Шаг 2 Перейдите в папку «Desktops» или «Notebooks» в зависимости от того, на настольный компьютер или ноутбук Вы собираетесь ставить хакинтош
Шаг 3 Отыщите «Config.plist» для своего графического процессора на базе Intel, AMD или NVIDIA
Обратите внимание на то, что если Вы не найдёте точную версию своей видеокарты, то можете спокойно выбирать ближайшую. Например, на нашем ноутбуке Acer Aspire 7745G стоит мобильная видеокарта ATI Mobility Radeon HD5850
Прохожу в папку «Notebooks» и копирую файл «Config.plist» из папки «HD5500». Если вас терзают сомнения, то можете отыскать этот файл в сети
Например, на нашем ноутбуке Acer Aspire 7745G стоит мобильная видеокарта ATI Mobility Radeon HD5850. Прохожу в папку «Notebooks» и копирую файл «Config.plist» из папки «HD5500». Если вас терзают сомнения, то можете отыскать этот файл в сети.
Шаг 4 Откройте созданный загрузочный USB-накопитель и перейдите в папку EVI → CLOVER
Шаг 5 Замените лежащий в корне файл «Config.plist» на тот, который Вы отыскали в «Config package» («Заменить файл в папке назначения»)
Готово! Теперь Вы можете приступать к установке macOS на компьютер или на ноутбук под управлением ОС Windows.
Обратите внимание на то, что размер отформатированной под загрузочную macOS Sierra флешки стал равен всего 200 МБ. Беспокоится не стоит
Необходимый раздел с образом попросту скрыт (его размер составляет чуть больше 6 ГБ)
Для того чтобы вернуть флешку к исходному виду необходимо воспользоваться сторонними программами вроде Acronis Disk Direct Suite.
About Macintosh OS Server 1.0
Macintosh OS Server 1.0- 1.2v3 based on Rhapsody which is half and half of OPENSTEP from NeXT Computer and Mac OS 8.5.1. The GUI looks like the blend of MAC OS 8’s Platinum appearance with OPENSTEP’s NeXT based interface. This Blue box is for running inheritance MAC OS based applications which have a different window. There was a discussion of the ‘straightforward blue box’. MAC OS X Server 1.0- 1.2v3 are Incorporated with the following:
Mac OS High Sierra 10.13 ISO/DMG file Direct Download
- Apple File Service.
- Macintosh Manager.
- Quick Time Streaming Server.
- Web objects.
- NeetBoot.
To use these servers it cannot be used up the FireWire gadgets. To copy a quote or image for video copy is very easy from one device to another device operating system. Users must be copied and pasted between the devices with a universal clipboard. Users must access their file on the Mac from the iPhone with iCloud Desktop and documents. Users must save all the files on the desktop or share them on iCloud. Users may keep the same file on their desktop also and documents folder on another Mac. Users may easily optimize their Mac by optimizing, storing, and freeing up space.
Users may rediscover the meaning of full moments of the photos in their gallery. They also enjoy memorable moments. Users may display their images using face recognition technology for the same group photo slideshow together. Users may search their photo with the keyboard like a beach dog or concert. For this user may thank for the smart search. Users may enjoy the convenience and security of the Apple pay when the user may focus on the Apple store and they may use Apple pay easily.
Reviews from the users
During this period new macOS were also introduced but people didn’t stop selecting High Sierra as it was the best software macOS ever had. macOS High Sierra was a tremendous hit even after macOS Catalina was launched during the days. In 2020, macOS High Sierra is available on both Mac computers and Windows computers. Both the segment users can get the benefit of using the same software. After macOS High Sierra macOS Mojave was introduced but it wasn’t as popular as High Sierra.
According to folks, macOS High Sierra does have better performance than traditional macOS versions. Apple is consistently showing its creativity and raising its standards by introducing new computers and laptop devices. In every update, they have been impressively consistent enough in showing innovations with new features and functional settings, formats, and more. The users can easily use, download, and install on new Macs and get the benefits of the updates. Through macOS, the users can really learn about other applications’ performances and stability.
Mac OS High Sierra 10.13 ISO & DMG file Download for free
The fourteenth significant arrival of macOS and Apple Inc’s is the macOS High Sierra which has a variant 10.13. The framework was working for Macintosh PCs by the work area. macOS Sierra was declared at a mega event named WWDC which was scheduled on June 5, 2017. On 25, 2017 the preceding being discharged, and on September 24, 2018, its successor macOS Mojave was discharged.
Price Currency:
USD
Operating System:
Mac OS High Sierra 10.13
Application Category:
OS
Editor’s Rating:4.9