Как использовать «монитор ресурсов» в windows 7 для диагностики
Содержание:
- The graphs
- Learn how Windows uses the Memory
- Resource Monitor in Windows 10
- Processes
- What are the best tools to monitor system resources on Windows 10?
- What is holding the Disk? Monitor the Disk activity
- Основные сведения об инструменте
- Гаджеты другое для Windows 7:8
- Network Activity
- Open Resource Monitor using search (all Windows versions)
- Какой инструмент выбрать для диагностики ПК в реальном времени в Windows 10
- Монитор ресурсов не работает
- Taking a look around
- Значение монитора производительности?
- Причины мониторинга производительности?
- Memory
- Просмотр активности на компьютере с помощью монитора ресурсов
- Filtering
- Processes section
The graphs
The right side of the window has a number of graphs, each depicting CPU-related performance metrics.
CPU — Total
On this graph, you will see two metrics depicted by blue lines and a green area graph. The blue line shows the total processing power (CPU frequency) available to the system, and the green area shows the current utilization of those available resources. Resource Monitor runs on many different versions of Windows, and many computers these days have processors that can step down their clock speed as a way to conserve power or lower temperature. When this happens, the blue line changes to reflect the change in CPU frequency, and the green area adjusts to meet this new reality.
CPU 0 — CPU 3 (some parked)
For each CPU core, how much of the CPU is in use? Some CPU are marked as being Parked, which means they are shut down temporarily because there is nothing for them to do at present. These screenshots in this article were taken during off hours and when students are not on campus, so the Exchange server is basically twiddling its thumbs for a couple of months.
Learn how Windows uses the Memory
Next, click or tap on the Memory tab. At the top, you see a list of the programs and processes that are using memory space, and at the bottom, a bar graph showing you where and how your available memory is in use. The columns are labeled Hard Faults/sec, Commit, Working Set, Shareable, and Private, each followed by (KB) — meaning memory space in kilobytes.
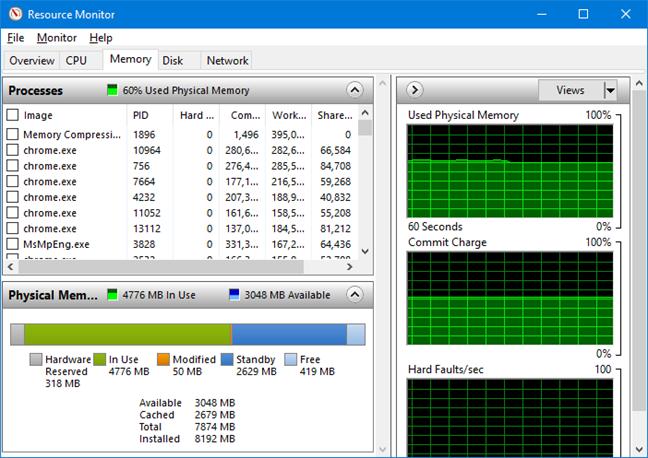
The Memory tab in Resource Monitor
You probably do not see anything but zeroes in the Hard Faults/sec column. The term «hard fault» is somewhat misleading — it’s not really a «fault» in the memory, it’s an instance where Windows ran out of space in RAM and had to use the swap file (hard drive space that’s set aside by Windows to be used when physical memory runs out). If you do see a lot of hard faults, it’s a good indication that you need to buy some more RAM for your computer.
The Commit column shows you how much memory space Windows allocates for each program by default. The program may or may not be using all of that space. If your columns are not already sorted, click on this one to show you what’s using up the most memory.
The Working Set column shows you how much memory each program is using at the moment.
The Shareable column shows you how much of the memory allocated to each program can be shared by other programs, and the Private column shows how much of the memory allocated to each program can be used only by that program. If a program shows up as using way too much memory, you can decide to close it.
The bar graph of memory use is self-explanatory, and so are the graphs that are shown on the right side of the Resource Monitor window.
Resource Monitor in Windows 10
Resource Monitor or Resmon lets you easily monitor your CPU usage, memory usage, Disk Activity, Network Activity and more. Like the Reliability Monitor or the Performance Monitor, the Resource Monitor too is a useful built-in tool in Windows.
To launch Resource Monitor, type resmon in Start Search and hit Enter. When you first launch the application, an ‘Overview’ tab gets displayed.
Overview tab
As the name suggests, the Overview tab displays basic system resource usage information of other four main tabs:
- CPU
- Memory
- Disk
- Network
You can take a look at the base graphs for each of the four categories. It offers at-a-glance, basic overview of your system’s current status.
As you can see, the CPU graph displays the total percentage of CPU capacity currently in use (green curves along the graph)with blue color indicating the maximum CPU Frequency. Alongside it, there’s a Disk graph displaying the total current I/O in green and the highest active time percentage in blue. Similar findings related to the Network graph and Memory graph are also displayed. For Memory, the current Hard Faults per second can be seen in green and the percentage of physical memory in use in blue.
If you are interested in knowing more details about a particular tab, just select the associated tab.
CPU
Under the CPU tab, it is possible to filter each view of the given tabs by the process. Simply check the box for that process, and the bottom window will only show the activity for that process. With no processes selected, the bottom windows will transform into an activity page for all active processes. The numeric scale for the graphs on the right will change as activity changes. On the right side, you will see the usage graphs that will help you monitor the CPUs.
Memory tab
The memory tab shows the memory being consumed by each of the running processes, along with graphs on the right side. This gives us a quick view of what physical memory is being used for. One can easily view the total physical memory and what it is actively used, along with showing what is hardware-reserved. Hardware Reserved represents physical memory addresses that have been reserved by hardware and is not available for Windows to use.
Disk tab
Under the ‘Disk’ tab you will find those processes that are engaged in some Disk activity. At the time you may find some process engaged in a lot of Read-Write activity. Right-clicking on any process will give you the option to End the process, End the complete process tree, etc.
Network tab
Under the Network tab, you can find which programs are accessing the network and which IP address it is connected to. This helps in narrowing down the problem if you find unusually high network activity.
Thus, the Resource Monitor offers many advantages over previous individual tools like System Monitor, Performance Logs and Alerts, and Server Performance Advisor in a way that it combines the functionality of those tools into a single interface. Besides, it provides a much more in-depth view of system activity and resource usage than previous tools like Task Manager.
See this post if the Resource Monitor is not working.
Tags: Features
Processes
This section of the window is a list of all of the running processes that are using CPU resources. You are shown the name of the executable and a number of performance statistics.
- Name. Process executable file name. This is the name of the process that is consuming CPU resources.
- PID. The ID number associated with the process. This is useful if you want to use other utilities to manage processes, or if you want to easily match up processes with Task Manager.
- Description. A short description that details the purpose of the process.
- Status. Process execution status. The process might be running, as most are, or might be listed as terminated if it’s not running anymore.
- Threads. Number of active threads. A thread is a single processing instance.
- CPU. Current percent of CPU consumption by the process, or how much of the system’s processing power is being devoted to this specific process.
- Average CPU. This is average CPU consumption by the process over the past 60 seconds. This gives you a real-time look at what’s happening on the system right now and for the past minute.
Figure BFigure CFigure B
Troubleshoot process issues
Figure C
The results of the analysis (Click the image to enlarge.)
What are the best tools to monitor system resources on Windows 10?
AIDA64 Extreme (recommended)
AIDA64 Extreme is a comprehensive system analyzer and benchmark tool which including some powerful features as CPU, RAM , GPU and system functionalities monitoring. It can also offer benchmarks and can provide a detailed audit of your system resources.
Its interface is very intuitive and similar to Microsoft Console Management. You can consult a large number of activity indicators.
This software also allows you to stress test all your components in a large variety of combinations. You will also have a great support from AIDA’s team at your disposal. Download and give it a try.
Wise System Monitor
Wise System Monitor is another useful tool that can help you monitor system resources. The main tool allows you to see all your running processes and see how much of computer resources they use. There’s also a Hardware monitor included that allows you to see all hardware related information. You can see the detailed information about your , CPU, graphics card, memory, etc. If you want, you can also see relevant information about your operating system.
As for resource monitor, it a in the bottom right corner just above your Taskbar. The tool will display information such as download and upload speed, RAM and CPU usage, as well as CPU temperature. If you want to see detailed information, you just need to click a certain field and you’ll see which applications are using most of that resource.
Wise System Monitor is a decent tool for monitoring your system resources. The tool keeps all information easily accessible, so it’s perfect for basic users.
Wise System Monitor also allows you to see your system information which can be rather useful for some users. This is a free and simple application, and the only flaw might be the lack of any customization.
If you’re looking for a straightforward application to monitor system resources, be sure to check Wise System Monitor.
Download now Wise System Monitor from the official website
Rainmeter
Rainmeter is a simple open source tool that lets you monitor your system resources. The tool will display small on your desktop so you can easily monitor your CPU and RAM usage. In addition, you can monitor your space as well as upload and download speed.
You can easily choose which gadgets you want to display, and you can easily move the gadgets anywhere on your screen.
Although Rainmeter is simple to use, it offers an extensive support for customization. By customizing this tool you can add new skins and new feature to the application. If you’re not a developer, there’s an active community that is constantly developing new skins and features.
This is a simple and free tool for monitoring system resources. Rainmaker is available in a portable version, so there’s no need to install it on your PC right-clicking run it.
The tool offers all the basic features that you need, but if you want to use the full potential of Rainmaker, we strongly suggest that you try using different skins for Rainmeter.
This is a great tool for system monitoring, but basic users might be turned away by extensive customization.
Read also:
Performance Monitor
If you’re looking for a portable and free tool to monitor your system resources, Performance Monitor might be what you need. The tool allows you to monitor disk, CPU, RAM and network usage using four graphs.
Each of four graphs can be positioned anywhere on the screen and you can customize its color, size and style. If you want to see more information about your system resources, simply hover over a certain graph and all necessary information will be revealed. We also have to mention that you can lock the panels so you won’t accidentally click them on your Desktop.
READ ALSO:
If you want, you can also show panels on your Desktop or in the Taskbar. Unfortunately, the panels in the Taskbar aren’t grouped, so they can sometimes take a lot of space, especially if you enable all of them.
Performance Monitor is a simple and portable application that will allow you to monitor your system resources. If you’re a basic user and you want to keep track of your resources, Performance Monitor might be just what you need.
What is holding the Disk? Monitor the Disk activity
The Disk section, as you may guess, shows you what is using hard drive resources. It can be useful if your hard drive light stays on and you are not sure why. There are three windows labeled Processes with Disk Activity, Disk Activity, and Storage. Expand them all and take a look. You probably also want to expand the column headings so you can see the whole title. In the column headings, «B/sec» stands for «bytes per second.»
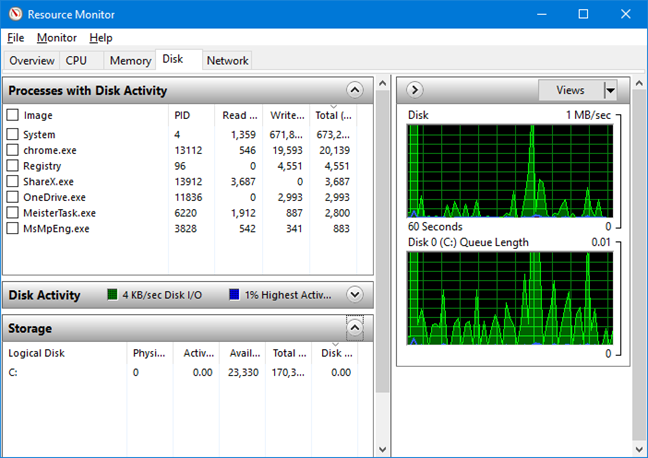
The Disk tab in Resource Monitor
There is not a lot you can (or should) do with the information in this section. You might be surprised to see how much disk activity your favorite programs require, but again, since Windows programs are usually well behaved, it would be uncommon for you to see something going crazy and making your hard drive keep churning away, except for programs used to download files. As with the other Resource Monitor sections, you can right-click (tap and hold) on any name you do not know, and click/tap Search online to get an explanation (this works in the Processes with Disk Activity section only). You can also end those processes from the same right-click menu, but again, that is not recommended unless you know what you are doing. In the Disk Activity section, right-clicking on the names does nothing, so if you are curious about those, you have to look them up on your own.
The bottom section, Storage, shows a list of your drives with information on Logical Disk, Physical Disk, Active Time, Available Space, Total Space, and Disk Queue Length.
Storage section in Resource Monitor
The first few are self-explanatory. «Disk Queue Length» is an indication of how many requests for disk space are waiting to be fulfilled. Unless you are doing something out of the ordinary or you have software that’s seriously misbehaving, this column’s data is mostly zeroes.
Основные сведения об инструменте
Итак, «Монитор ресурсов» в Windows 7 служит для слежения за общим состоянием компьютера и управлением различными опциями ОС. В мониторе отображается вся необходимая информация об использовании системой ресурсов компьютера. Причем все отображено в весьма понятном графическом виде. Пользователь точно сможет понять, сколько оперативной памяти расходуется на каждый процесс. Такое отображение необходимых сведений призвано помочь контролировать общее состояние компьютера. Также можно оперативно решить возникающие проблемы. Управлять этим инструментом очень легко. Но об этом мы поговорим в последующих главах. «Монитор ресурсов» в Windows 7 — это уникальное служебное приложение для контроля работы компьютера или ноутбука. А теперь рассмотрим, как пользоваться этим самым приложением. Начнем с самого простого.
Вам будет интересно:Загрузка Adobe Flash Player. Особенности установки онлайн и офлайн версий
Гаджеты другое для Windows 7:8
Категория гаджетов другое для Windows 7 и 8 включает в себя гаджеты для рабочего стола компьютера с нестандартными, но полезными функциями. В их число вошли: гаджет отслеживающий действия мыши, гаджет для создания ярлыков, гаджет контролирующий рабочее время за компьютером, гаджет безопасного извлечения дисков и многие другие. Проводя немало рабочего времени или большую часть досуга за компьютером, большинство пользователей стремится сделать это времяпровождение максимально комфортным, упорядоченным и необременительным. Именно для этого мы собрали в нашей коллекции приложений нестандартные и необычные гаджеты-мониторы ресурсов Windows 7. Безусловно, без этих приложений вполне можно обойтись, они не являются обязательными составляющими стабильной работы операционной системы. Но с ними у вас получится действовать с большей скоростью и удобством.
В частности, это мини-программы, которые отследят функционирование вашей мыши, сообщат пройденное ею за определенный период времени расстояние или количество кликов правой и левой кнопкой. Не менее удобен гаджет, позволяющий одним кликом корректно извлечь из устройства съемные CD/DVD диски. А утилита, контролирующая время, проведенное перед экраном монитора, и продолжительность работы системы с момента ее последнего включения сыграют значимую роль в организации рабочего графика или режима дня. Информативный гаджет погоды также можно отнести к этой категории. В принципе, погоду за окном можно отследить и без помощи компьютера, но с участием этого приложения появляется возможность узнать подробный прогноз на ближайшее время и погоду в других регионах. Тем, кто пытается освоить метод скоростного набора текста, разработчики предлагают воспользоваться функционалом виджета-монитора клавиатуры. Он считает, запоминает и выводит на экран показатели максимальной и средней скорости набора, количества знаков в секунду и количества нажатия клавиш. Сравнение двух последних показателей поможет оценить не только скорость, но и точность печати, то есть, сколько раз вы нажимали клавиши удаления символов для исправления допущенных ошибок. Очень интересный монитор ресурсов Windows 7 – гаджет, выделяющий запущенные процессы, нагружающие систему и снижающие ее быстродействие. Для тех, у кого в трее висит программа, не используемая в работе со вчерашнего дня, которую пользователь просто забыл закрыть, это мини-проложение станет отличным дисциплинирующим помощником. Есть в коллекции и многие другие гаджеты комфортного пользования – регулировка яркости монитора, его быстрое отключение, утилита создания ярлыков, приложение для быстрого перехода от одного окна к другому, виджет сортировки файлов по типам и прочие. Также к мониторам ресурсов можно отнести полезный гаджет температуры процессора для Windows 7 и его загрузки по ядрам, температуры видеокарты, состояния жестких дисков, оперативной памяти и прочие им подобные, контролирующие работу компьютерного устройства и минимизирующие риск возникновения различных проблем.
Network Activity
This section of the Resource Monitor window provides more useful troubleshooting information. In particular, the two boxes next to the heading offer the most impactful, immediately useful metrics.
- Network I/O. This box shows the current total network utilization in Mbps (megabits per second). This is a useful data point, but the metric next to it is the one that provides you with really good information.
- Network Utilization. This metric wraps up all total utilization into a single, easily accessible metric that can help you determine exactly how loaded your network really is. If this number is approaching 100% and stays there on a regular basis, you likely have network congestion issues and should add more network capacity.
Below this header information, you will find the following new metric:
Address. This is the name or IP address with which the process is communicating.
The remaining metrics in this section repeat the information from the previous section.
Open Resource Monitor using search (all Windows versions)
In Windows 10 and Windows 7, you can search using the full name of the tool Resource Monitor. In all Windows versions, you can search by the name of its executable file: resmon.
In Windows 10, click or tap the search field on your taskbar, type «Resource Monitor» or resmon, and click or tap the result with the same name.

Search for Resource Monitor in Windows 10
In Windows 8.1 start typing «resmon» on the Start screen. The typing activates the search function and, in the results that appear, click or tap resmon.
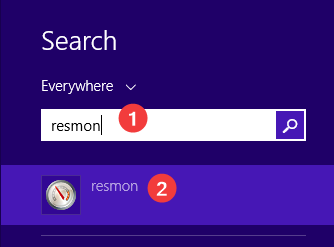
Search for resmon in Windows 8.1
In Windows 7, open the Start Menu and type «Resource Monitor» in its search field. In the list of results, click on Resource Monitor.
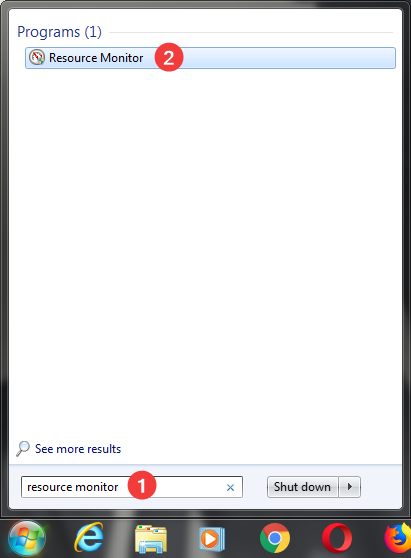
Search for Resource Monitor in Windows 7
Какой инструмент выбрать для диагностики ПК в реальном времени в Windows 10
Существует большое количество программ, нацеленных на слежение за состоянием компьютера. Некоторые из них отличаются только интерфейсом, а некоторые и по функционалу. Тем не менее не существует единственно верного выбора. Если вы хотите иметь базовое представление о жизни своего ПК, вам вполне хватит программы Speccy, если же хотите иметь подробный отчет о каждой детали — AIDA64. Выберите лучшее для себя приложение и наслаждайтесь работой за ПК без единого сбоя!
Надеемся, статья оказалась для вас полезной и помогла определиться в выборе программы для мониторинга состояния вашего компьютера.
Монитор ресурсов не работает
Шаг 1. Если вы обнаружили, что не можете получить доступ к Resource Monitor на своем компьютере, то первым шагом к исправлению будет запуск Resource Monitor вручную. Нажмите «Win + R» и введите « resmon.exe », чтобы запустить Resource Monitor. Кроме того, вы можете перейти к «C: \ Windows \ System32» и найти исполняемый файл с именем «resmon.exe». Нажмите здесь.
Шаг 2 . Если это не помогло вам, вы можете выполнить эти шаги для исправления монитора ресурсов. Если вы работаете в Windows 7 и используете любую другую тему, кроме темы Windows 7 Aero, вернитесь к Aero theme и установите флажок «Монитор ресурсов». Если это решило вашу проблему, вам, возможно, придется переключать свои темы обратно каждый раз, когда вы захотите использовать Resource Monitor.
Шаг 3 . Следующим шагом в списке будет изменение настроек DPI . Щелкните правой кнопкой мыши на рабочем столе и выберите «Настройки дисплея».
В настройках «Scale and Layout» попытайтесь отрегулировать процент и проверить, возникла ли проблема с Resource Monitor.
Шаг 4 . Если вы все еще сталкиваетесь с этой проблемой. Возможно, вам придется устранить проблему в чистом состоянии загрузки. Чистая загрузка — это состояние системы, когда Windows загружается с минимальным набором драйверов и служб. Если вы можете запустить Resource Monitor в этом состоянии, это означает, что какой-то сервис или драйвер вмешивается в Resource Monitor.
Шаг 5 . Если ничего не помогает, попробуйте создать новую учетную запись локального администратора в Windows и проверьте, работает ли Resource Monitor с новой учетной записью пользователя. Если это так, то есть вероятность, что проблема была с вашей учетной записью профиля пользователя. Сделайте резервную копию своих данных, удалите существующую учетную запись и войдите в эту новую учетную запись пользователя , используя свои учетные данные Microsoft.
Шаг 6. Если вы недавно обнаружили эту проблему на своем компьютере и подозреваете, что проблема возникла после недавнего обновления, вы можете удалить последние обновления с вашего компьютера.
Откройте « Настройки» и перейдите в «Обновление и безопасность» . В этом разделе нажмите « Просмотреть историю установленных обновлений» . Теперь нажмите Удалить обновление , и он откроет список последних обновлений, которые можно удалить. Попробуйте удалить последние обновления и проверьте монитор ресурсов.
Шаг 7 . Теперь настало время проверить, не повреждены ли в вашей копии Windows некоторые файлы. В комплект поставки Windows входит встроенный инструмент «Проверка системных файлов», который может сканировать вашу систему на наличие поврежденных файлов, а также восстанавливать их. Запустите его и посмотрите, поможет ли это.
Шаг 8 . Если SFC не удалось исправить повреждения в вашей системе, попробуйте DISM для восстановления файла образа Windows. Запустите окно командной строки с повышенными правами и выполните следующую команду:
DISM/Online/Cleanup-Image/CheckHealth
Это были некоторые шаги, которые могли бы помочь вам в восстановлении монитора ресурсов в Windows 10.
Всего наилучшего!
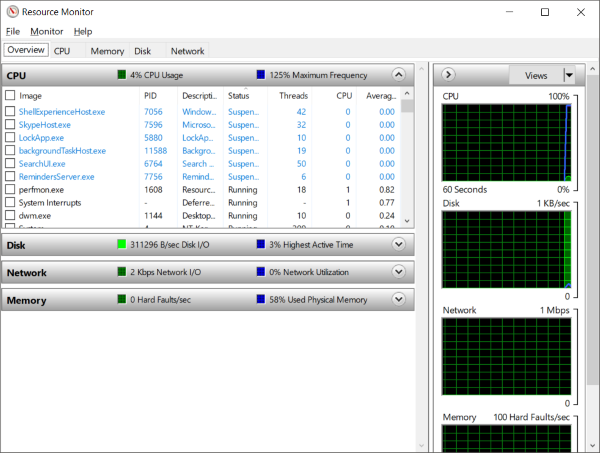
Taking a look around
As you can see in Figure A, the Overview tab displays basic system resource usage information from the four main tabs: CPU, Memory, Disk, and Network. You’ll also see base graphs for each of the four categories. As its name implies, the Overview tab provides you with an at-a-glance, basic overview of your system’s current status.
As you can see, the CPU graph displays the total percentage of CPU capacity currently in use in green and the CPU Maximum Frequency in blue. The Disk graph displays the total current I/O in green and the highest active time percentage in blue. The Network graph displays the current total network traffic (in Kbps) in green and the percentage of network capacity in use in blue. The Memory graph displays the current Hard Faults per second in green and the percentage of physical memory currently in use in blue.
If you are seeking more detailed data from a specific component, just select the associated tab.
Значение монитора производительности?
Performance Monitor — это имя ошибки, содержащее сведения об ошибке, в том числе причины, по которым произошел сбой, какой системный компонент или приложение вышло из строя, чтобы вызвать эту ошибку вместе с некоторой другой информацией. Численный код в имени ошибки содержит данные, которые могут быть расшифрованы производителем неисправного компонента или приложения. Ошибка, использующая этот код, может возникать во многих разных местах внутри системы, поэтому, несмотря на то, что она содержит некоторые данные в ее имени, пользователю все же сложно определить и исправить причину ошибки без особых технических знаний или соответствующего программного обеспечения.
Причины мониторинга производительности?
Если вы получили эту ошибку на своем ПК, это означает, что произошла сбой в работе вашей системы. Общие причины включают неправильную или неудачную установку или удаление программного обеспечения, которое может привести к недействительным записям в вашем реестре Windows, последствиям атаки вирусов или вредоносных программ, неправильному отключению системы из-за сбоя питания или другого фактора, кто-то с небольшими техническими знаниями, случайно удалив необходимый системный файл или запись в реестре, а также ряд других причин. Непосредственной причиной ошибки «Монитор производительности» является неспособность правильно выполнить одну из своих обычных операций с помощью системного или прикладного компонента.
Memory
The Memory section shows you the processes that are using physical memory (RAM). Sort by Commit to see which programs are most memory-intensive. The higher the percentage of used physical memory is, the more likely you’ll be to see high numbers of Hard Faults/sec. A hard fault occurs when Windows has to access the swap file—reserved hard disk space used when RAM runs out. Despite their name, hard faults are not errors. But if your system is experiencing hundreds of hard faults per second, either you need a RAM upgrade or a process is hogging resources.
Follow these steps and you’ll soon be using the Resource Monitor with aplomb. Be sure to check back every few months and repeat the process to ensure that your PC is running error-free at optimum efficiency.
Note: When you purchase something after clicking links in our articles, we may earn a small commission. Read our affiliate link policy for more details.
Просмотр активности на компьютере с помощью монитора ресурсов
Многие, даже начинающие пользователи, сносно ориентируются в диспетчере задач Windows и умеют найти процесс, который тормозит систему, или который выглядит подозрительным. Монитор ресурсов Windows позволяет увидеть еще больше подробностей, которые могут потребоваться для решения возникших с компьютером проблем.
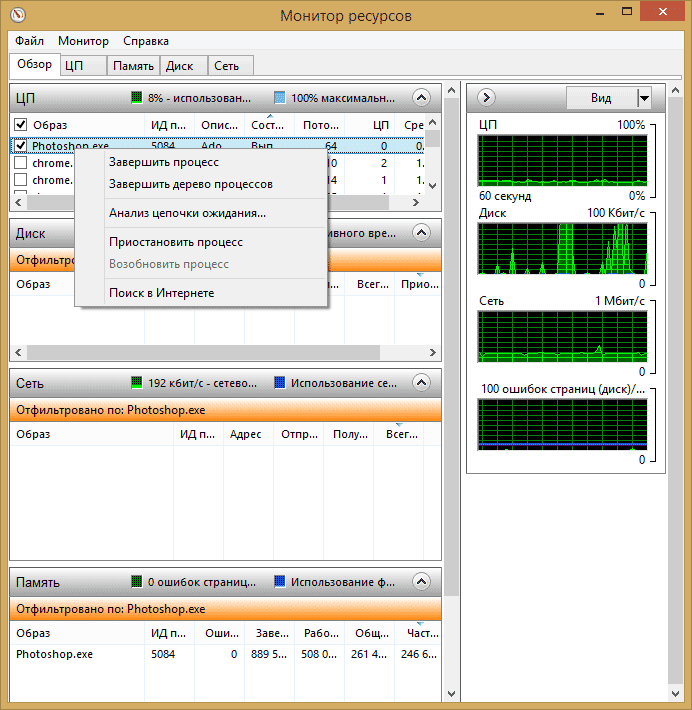
На главном экране вы увидите список запущенных процессов. Если отметить любой из них, внизу, в разделах «Диск», «Сеть» и «Память» отобразятся активности только выбранных процессов (используйте кнопку со стрелкой для того, чтобы открыть или свернуть любую из панелей в утилите). В правой части находится графическое отображение использования ресурсов компьютера, хотя на мой взгляд, лучше свернуть эти графики и опираться на цифры в таблицах.
Нажатие правой кнопкой мыши по любому процессу позволяет завершить его, а также все связанные процессы, приостановить или же найти информацию о данном файле в Интернете.
Использование центрального процессора
На вкладке «ЦП» вы можете получить более подробную информацию об использовании процессора компьютера.
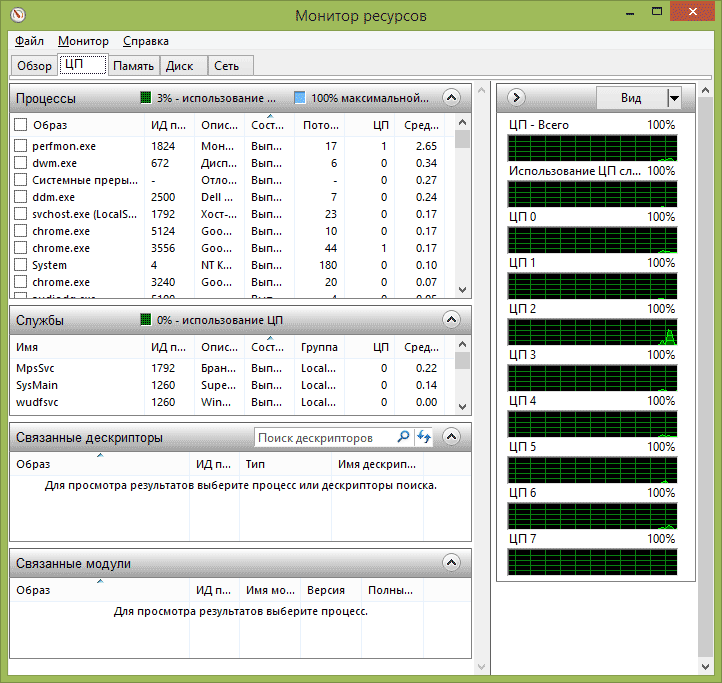
Также, как и в главном окне, вы можете получить полные сведения только об интересующей вас запущенной программе — например, в разделе «Связанные дескрипторы» отображается информация об элементах системы, которые использует выбранный процесс. И, если к примеру, файл на компьютере не удаляется, так как занят каким-либо процессом, вы можете отметить все процессы в мониторе ресурсов, ввести имя файла в поле «Поиск дескрипторов» и узнать, какой именно процесс его использует.
Использование оперативной памяти компьютера
На вкладке «Память» в нижней части вы увидите график, отображающий использование оперативной памяти RAM на вашем компьютере
Обратите внимание, что если вы увидите «Свободно 0 мегабайт», не стоит переживать по этому поводу — это нормальная ситуация и в действительности, память, отображенная на графике в графе «Ожидание» — это тоже своего рода свободная память

В верхней части — все тот же список процессов с подробной информацией по использованию ими памятью:
-
Ошибки
— под ними понимаются ошибки, когда процесс обращается к оперативной памяти, но не находит там чего-то, что нужно, так как информация была перемещена в файл подкачки из-за недостатка RAM. Это не страшно, но если вы видите много таких ошибок, следует задуматься об увеличении количества оперативной памяти на компьютере, это поможет оптимизировать скорость работы. -
Завершено
— эта колонка показывает, какой объем файла подкачки был использован процессом за все время его работы после текущего запуска. Цифры там будут достаточно большие при любом количестве установленной памяти. -
Рабочий набор
— количество памяти, используемое процессом в настоящий момент времени. -
Частный набор и общий набор
— под общим объемом подразумевается тот, который может быть освобожден для другого процесса, если ему станет не хватать RAM. Частный набор — память, строго отведенная конкретному процессу и которая не будет передана другому.
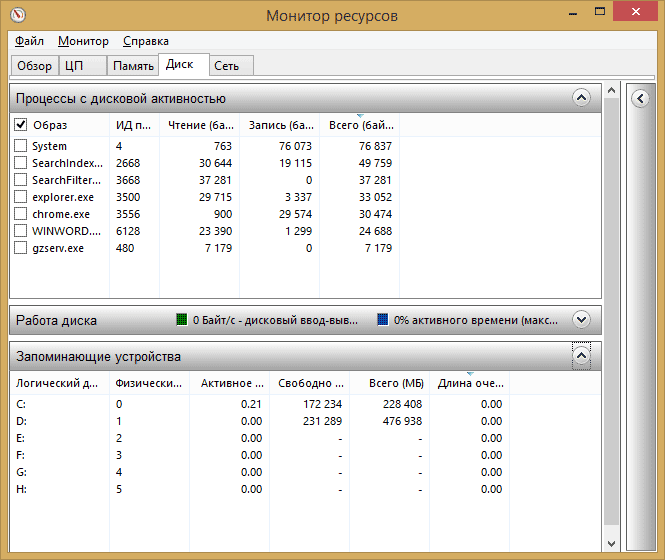
Вкладка Диск
На данной вкладке вы можете просмотреть скорость операций чтения записи каждого процесса (и суммарный поток), а также увидеть список всех запоминающих устройств, а также свободного места на них.
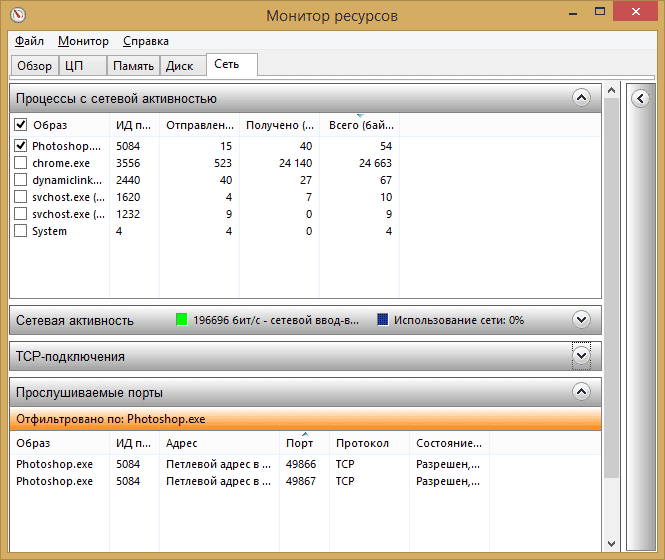
С помощью вкладки «Сеть» монитора ресурсов вы можете просмотреть открытые порты различных процессов и программ, адреса, по которым они обращаются, а также узнать, разрешено ли данное соединение брандмауэром. Если вам кажется, что какая-то программа вызывает подозрительную сетевую активность, кое-какую полезную информацию можно почерпнуть именно на этой вкладке.
Filtering
When you’re tracking down a specific problem, you can use the Filtering features to highlight certain processes or services. When you select a process, all other processes are filtered out so that it is easy to see where and how the selected process is coming into play. This makes it easier to focus on tracking and ultimately solving the problem at hand. In the key table on each tab, you’ll notice that there are check boxes adjacent to each of the listed processes. If you select a process, each place that particular process occurs will be highlighted in orange on all of the tabs where the process or service comes into play.
Figure E

When you select a process, all other processes are filtered out so that it is easy to see where and how the selected process is coming into play.
Processes section
The Memory tab’s Processes section displays key metrics related to how the system’s processes use memory. Here’s information about the metrics:
- Image. Process executable file name. This is the name of the process that is actively using the disk.
- PID. Process ID. This is the ID number associated with the process; it is useful if you want to use other utilities to manage processes, or if you want to easily match up processes with Task Manager.
- Hard Faults/sec. A hard fault doesn’t necessarily indicate a critical error condition, though it may indicate that the server is in need of more RAM. A hard fault occurs every time the system uses the swap file on the disk. This is important because disk storage is much, much slower than RAM, so each time the system uses disk-based virtual RAM, there is a significant performance penalty. If you see hard faults on a regular basis (especially if the numbers are large), you should consider adding more RAM to the server. Hard faults are sometimes referred to as Page Faults.
- Commit (KB). This is the total amount of physical and virtual memory (page file) that is committed to this specific process.
- Working Set (KB). This is the amount of physical memory that is committed to this particular process. This number should be the total of the next two metrics, which are its components.
- Shareable (KB). This is the total amount of physical memory that is committed to this particular process but that can also be shared with another process.
- Private (KB). This is the total amount of physical memory that is committed to this particular process but cannot be shared with another process.