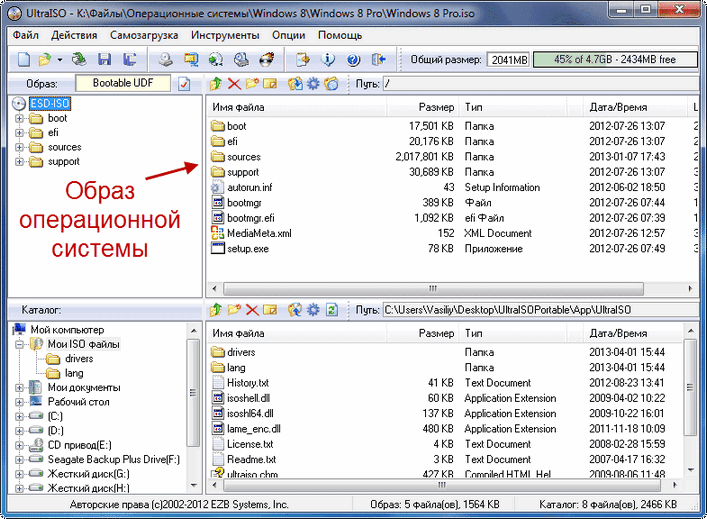
Как записать образ на флешку через ultraiso
Содержание:
- Solutions to make bootable partition in Windows 7
- The A/B Partition Scheme
- Как создать универсальную загрузочную флешку, совместимую как с Legacy, так и с UEFI, с помощью программы Bootice
- Causes of this Error
- Устранение проблемы
- Причины недопустимой таблицы разделов?
- Create the partition
- Создание EFI-раздела на пустом жёстком диске утилитой Bootice
- Причины
- Partitions on an Android device
- Causes of Hard Disk problem \ Invalid Signature in partition table?
- Need to make partition bootable in Windows 7
- Что такое «Invalid partition table»?
Solutions to make bootable partition in Windows 7
How to create boot partition in Windows 7? Here, three efficient methods are listed. Within your own circumstances, choose a solution that will be satisfying for you.
Solution 1. Use Diskpart to create boot partition
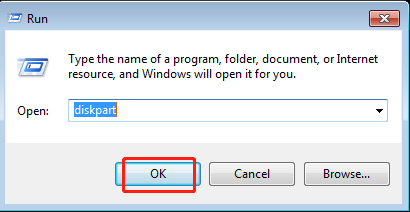
Step 1. Press Windows logo key + R to open Run box. Then type diskpart and click OK.
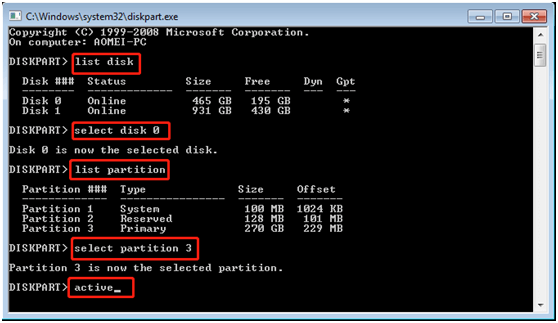
Step 2. Type the commands below into the Command Prompt one at a time and press Enter after each command.
-
list disk
-
select disk n (replacing n with the number assigned to the relevant drive)
-
list partition
-
select partition n (replacing n with number of the partition you want to set as active)
-
active
Step 3. Your partition is now active. Type exit, press Enter and then restart your computer.
Solution 2. Use Disk Management to set partition bootable
Step 1. Press Windows logo key + R to open Run box. Type diskmgmt.msc and then click OK.
Step 2. Right click the partition you want to set as active. Then choose Mark Partition as Active.

Step 3. Wait for the process to finish and then restart your computer.
Although the two methods noted above can make partition bootable in Windows 7, you must be very careful when using them, as data loss will occur if you make a mistake in the process. Moreover, you aren’t allowed to return to the previous step in the use process. For your data security, the third method is highly recommended.
Solution 3. Use the best partition manager to set partition active
Things get easier and safer when you use AOMEI Partition Assistant Professional. This is a comprehensive partition manager that enables you to make partition bootable in Windows 7/8/8.1/10/Vista/XP effortlessly.
It has a feature called Set Active Partition that allows you to mark a partition as active in 3 easy steps. Cancelling the current operations is also very simple to operate. By using this utility, you also can fix mark partition as active greyed out. Now, let’s look at the detailed steps.
Step 1. Right click the primary partition you want to set as active. Click Advanced and Set Active Partition subsequently.

Step 2. Click OK to continue.

Step 3. Confirm your operations and then click Apply and Proceed.

Tips:
-
Only a primary partition can be marked as active. Other partitions can’t be set as active. Otherwise, your computer will stop working. If there is no primary partition, you can convert logical partition to primary partition.
-
Make sure the partition contains the loader or boot files such as “boot.ini”, “ntldr”, “bootmgr” or “BCD” before marking it as active.
The A/B Partition Scheme
How updates work on devices with seamless updates
The very simple image I made below illustrates how an update is handled on a device with A/B partition support. The partition that is illustrated is the system partition, though other partitions such as boot and vendor may also be updated with any given OTA update from an OEM. This update process happens with not only major Android version updates but also security patch updates.

- We start with two system partitions, system_a and system_b, both on the same version of Android.
- Assuming that system_a is active, the OTA update will patch system_b, the inactive partition, in the background.
- system_a is set to inactive and system_b then becomes active once the user reboots.
- The now-inactive partition, system_a, will be updated when the next OTA update rolls out.
What are the benefits of this update process?
- If an update fails, the device will roll back to the working build on the other slot.
- Your data is kept perfectly intact, even if the update is borked, as there is only one partition (userdata) which houses your data.
- Update streaming: If your data partition is full, then the update can be downloaded and streamed to the inactive slot. It’s a pretty neat feature and means that you don’t have to waste any temporary storage on your updates. That’s why there’s no cache partition on A/B devices as they’re no longer needed.
What impact does the A/B partitioning scheme have on the storage of a device?
Does the fact that seamless updates result in a bunch of duplicated partitions mean you’re losing a bunch of storage space? Not at all. Google says that devices with seamless update support should only be down about a few hundred Megabytes thanks to removing the /cache and /recovery partitions. Removing both balances the cost of adding a second set of partitions. According to Google, the Pixel’s A/B system image is half the size of the A-only system image. Most of the additional storage usage actually comes from the addition of a second vendor partition. That makes sense as the vendor partition houses all of the proprietary binaries used by OEMs (part of Project Treble), so it’s expected to take up quite a bit of space. While Google doesn’t recommend having A/B partitioning on devices with 4GB of storage (as it’s nearly 10% of total available storage), they do recommend it on devices with 8GB and higher.
Here’s a breakdown of the storage space used on a Google Pixel with and without A/B partitions.
| Partition Sizes | A/B | A-only |
|---|---|---|
| Bootloader | 50MB*2 | 50MB |
| Boot | 32MB*2 | 32MB |
| Recovery | 32MB | |
| Cache | 100MB | |
| Radio | 70MB*2 | 70MB |
| Vendor | 300MB*2 | 300MB |
| System | 2048MB*2 | 4096MB |
| Total | 5000MB | 4680MB |
What happened to the recovery partition?
The underlying Linux kernel on Android devices is what lets Android recognize and use the hardware properly on a smartphone. On A-only Android devices, you generally have two versions of the kernel: One is packed inside of the recovery partition while the other is in the boot partition. On A/B devices supporting seamless updates, the recovery is now inside of the boot image along with the kernel. The recovery’s main function was to install updates, but since that’s handled by the system itself (update_engine) while Android is booted up the dedicated recovery partition is no longer needed.
To install a custom recovery on A/B devices, we thus need to modify the boot partition and replace the stock recovery with our own. This is why to install TWRP you need to use a fastboot command to boot a custom boot image first and then flash the TWRP installation script, as fastboot can’t patch partitions—only flash over them entirely. You could technically pre-patch your existing boot image with TWRP and then flash it via fastboot, but that’s more trouble than it’s worth. The TWRP installer script patches both the boot_a and boot_b partitions to install TWRP.
Fun fact: The Android update_engine which handles seamless updates is basically ripped straight from Chrome OS. Only recently were strings containing “Chrome OS” removed from update_engine’s log to avoid confusion for anyone who happens to check logcat.
Как создать универсальную загрузочную флешку, совместимую как с Legacy, так и с UEFI, с помощью программы Bootice
Привет всем! Меня зовут Владимир и я отвечу на этот вопрос. В статье «Как создать загрузочную флешку с Windows 10» админ написал, что для создания флешки достаточно скопировать файлы образа Windows 10 на накопитель и флешка автоматически станет загрузочной. Для компьютеров с включенным UEFI это так. Для компьютеров с обычным BIOS или выключенным интерфейсом UEFI это не так. Коротко объясняю почему, уверен, вы всё поймёте. Установку операционных систем Windows (от Vista до 10) запускает загрузчик BOOTMGR, который находится в, скопированном на флешку, дистрибутиве. Но флешку BIOS видит как HDD. И чтобы BIOS передал управление загрузкой нашему BOOTMGR, на флешке должна быть создана MBR c кодом загрузчика BOOTMGR (Windows NT 6.x) и активный раздел с PBR (загрузочной записью раздела) BOOTMGR.
При обычном форматировании флешки средствами Windows (в файловую систему NTFS или FAT32) PBR станет BOOTMGR, а MBR какой была до форматирования такой и останется (то есть новая флешка не будет загрузочной после простого копирования на неё файлов Windows 10). У админа получилось потому, что он всё проделал на старой флешке, когда-то уже бывшей загрузочной и на ней были ранее установлен нужный код и раздел был активный. Обновить коды и сделать раздел на флешке активным можно и после копирования файлов Windows на флешку. Сделать это можно двумя способами: с помощью утилиты Bootice, а также командной строки. Показываю оба способа.
Обновляем коды и делаем раздел на флешке активным с помощью утилиты BOOTICE
Итак, поставим себя на место нашего читателя. Подсоединяем новую флешку к компьютеру и форматируем её в файловую систему FAT32,
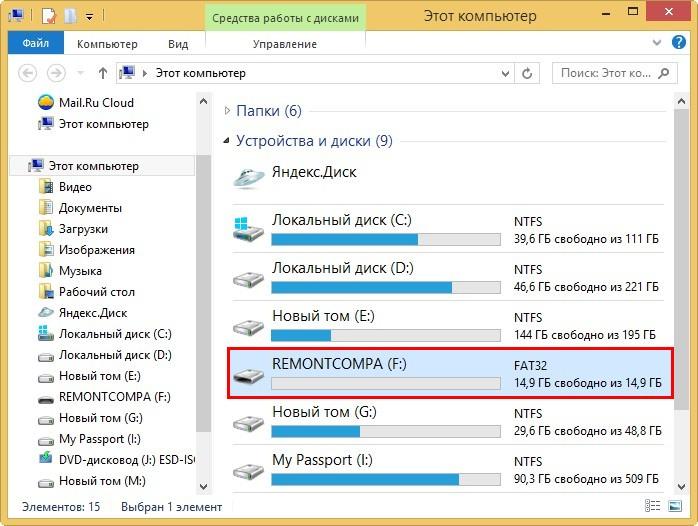
затем копируем на неё содержимое ISO-образа Windows 10.
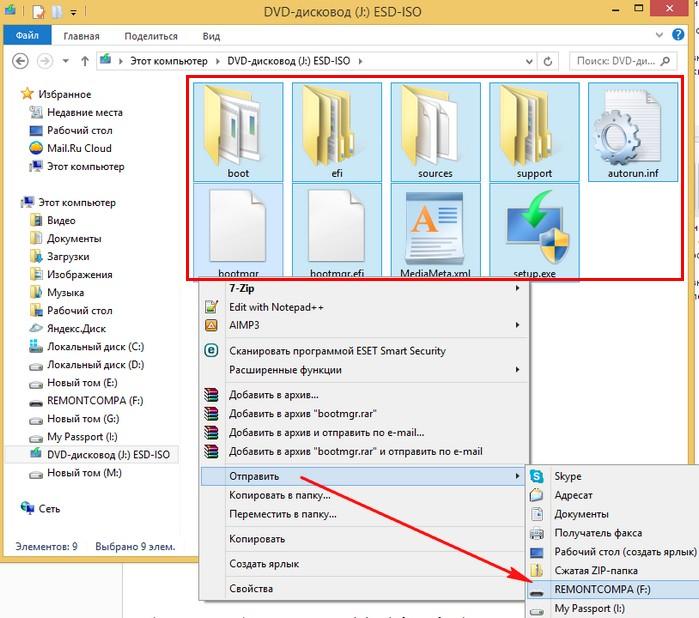
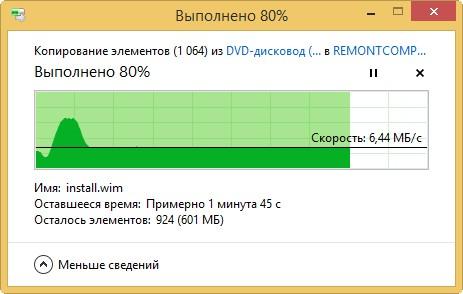
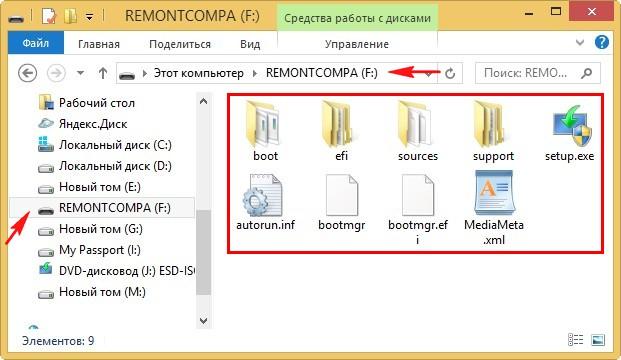
Файлы Windows скопированы на флешку.
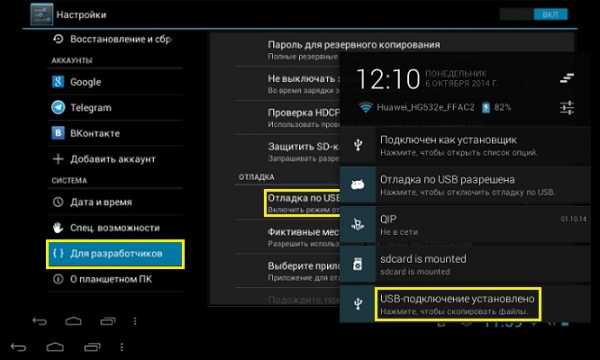
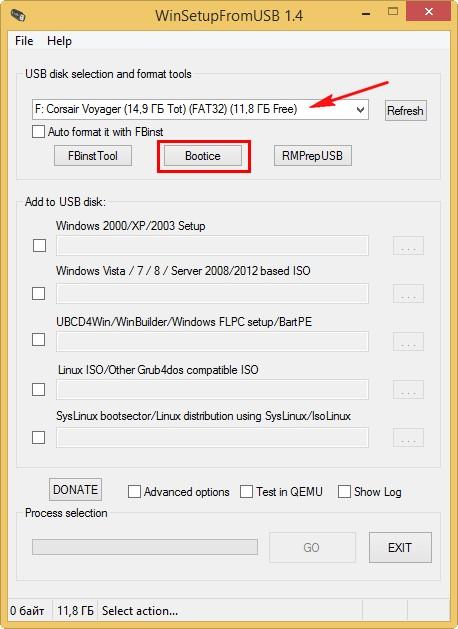
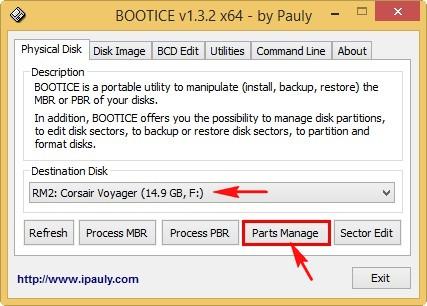
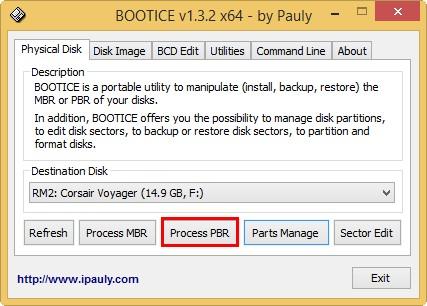
Если у вас новый ноутбук с включенным интерфейсом UEFI, то ноутбук прекрасно загрузится с этой флешки, но если UEFI отключен или вы пытаетесь загрузить обычный компьютер с простым BIOS, то появится ошибка при загрузке «No bootable device insert boot disk and press any key». Открываем утилиту WinSetupFromUSB
выбираем в списке накопителей нашу флешку и жмём на кнопку Bootice.
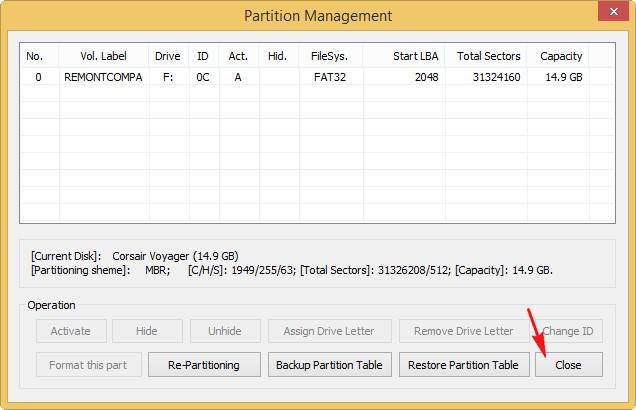
Выбираем в списке нашу флешку. Жмём Parts Manage.
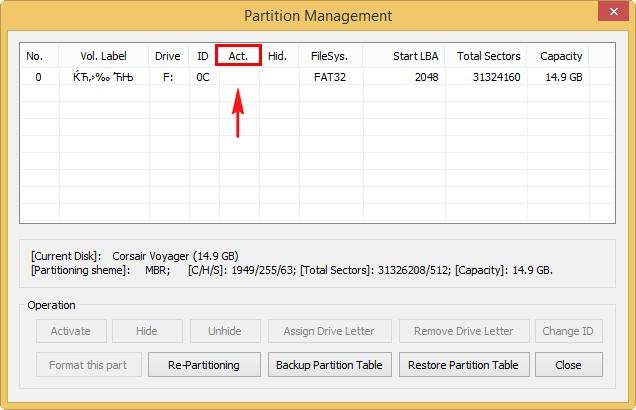
Как видим, на флешке нет активного раздела (в пункте Act. отсутствует буква A).
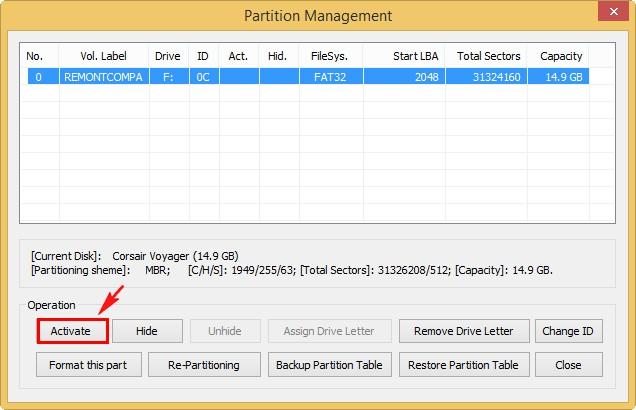
Создаём активный раздел на флешке. Выделяем флешку левой мышью и жмём кнопку Activate.
В пункте Act. появляется буква A).
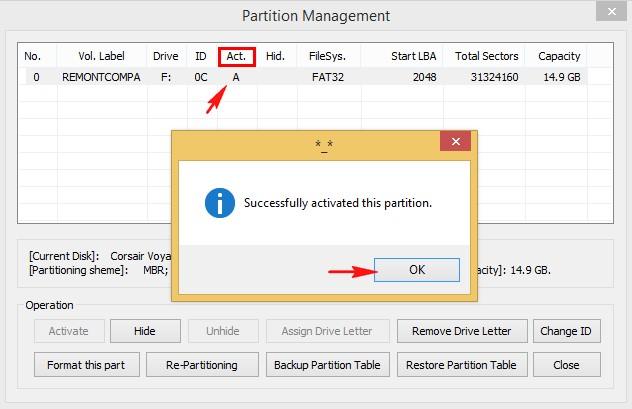
Close
Жмём Process PBR.
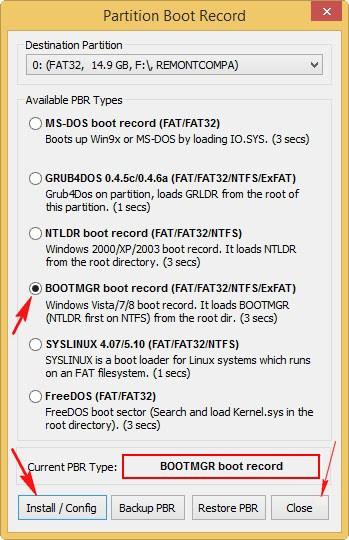
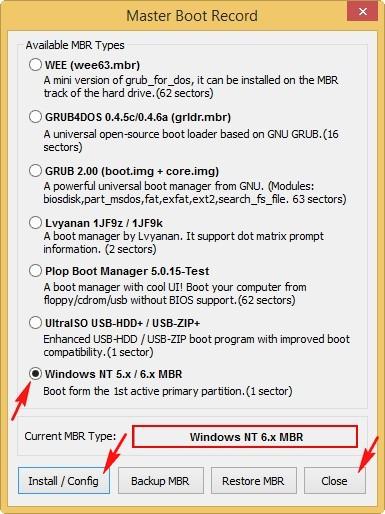
На флешке должен быть активный раздел с PBR (загрузочной записью раздела) BOOTMGR. Отмечаем пункт BOOTMGR boot record, нажимаем Install /Config Close.
Жмём Process MBR
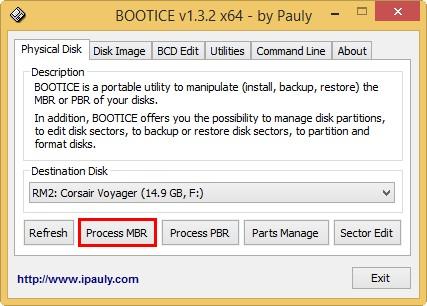
На флешке должен быть активный раздел с MBR c кодом загрузчика BOOTMGR (Windows NT 6.x). Отмечаем пункт Windows NT 5.x/6.x MBR, нажимаем Install /Config Close.
Exit
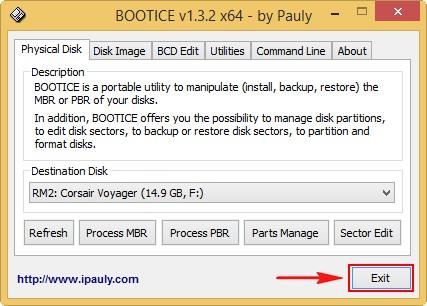
Всё! Теперь с этой универсальной флешки можно загрузить любой компьютер или ноутбук с включенным интерфейсом UEFI или простым BIOS.
Альтернативный способ с использованием вместо Bootice командной строки
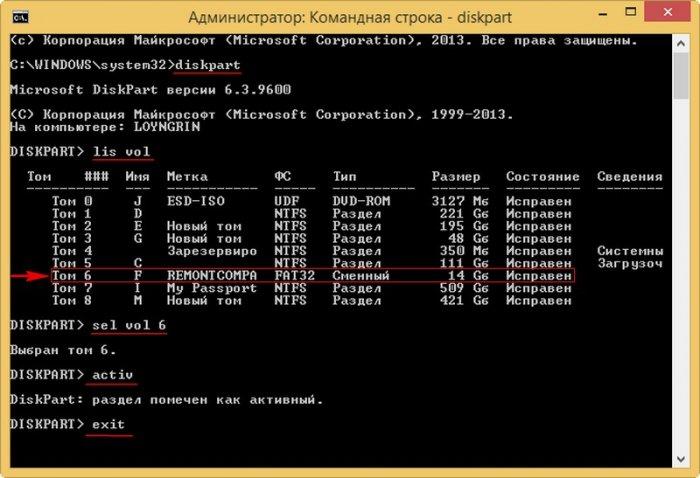
Обновляем коды и делаем раздел на флешке активным с помощью командной строки. Активным раздел делается с помощью diskpart:
diskpart
lis vol
sel vol 6 (6 номер тома флешки, в вашем случае может быть другим).
active
Ещё загрузочные коды можно обновить с помощью консольной bootsect:
bootsect /nt60 x: /mbr
x буква флешки
В Windows 7 запустить утилиту можно из дистрибутива смонтированного в виртуальный привод, команда:
y:\boot\bootsect /nt60 x: /mbr
y буква привода.
Можно использовать и команду:
x:\boot\bootsect /nt60 x: /mbr
Коды будут обновлены, но будет сообщение что код обновлён ненадёжно, так как при обновлении кода не был отключён диск.
Вот и всё.
Causes of this Error
This error has been known to occur as a result of one of the following causes:
Cause 1: Partition table is damaged
The most frequent cause of this error is a damaged partition table. It is located in the MBR(Master Boot Record) of the boot sector, which holds the information on how the logical partitions, containing file systems, are organized on that medium. The most common cause of that error is a failing hard drive, or a disk write error.
Cause 2: Two partitions are marked as active
Among all partitions available on the hard drive, only one should be set an active to indicate that this is the partition to boot from. If MBR detects two active partition on the current disk, then the system loading process halts. This is usually caused by errors made while configuring the partitions manually. that medium. The most common cause of that error is a failing hard drive, or a disk write error.
Fixing “Invalid partition table” on Windows
Windows Setup CD/DVD Required!Some of the solutions below require the use of the Microsoft Windows setup CD or DVD. If your PC did not come with a Windows installation disc or if you no longer have your Windows setup media, you can use Easy Recovery Essentials for Windows instead. EasyRE will automatically find and fix many problems, and can also be used to solve this problem with the directions below.
Fix #1: Rebuild the MBR with Easy Recovery Essentials
Easy Recovery Essentials can fix many errors such as this automatically using its built-in Automated Repair option. EasyRE is currently available for Windows XP, Vista, 7 and 8 and can be downloaded and created on any PC.
- Download Easy Recovery Essentials. Make sure to note your Windows version (XP, Vista, 7 or 8) before you download EasyRE. This guide can help you identify what version of Windows you have installed.
- Burn the image. Follow these instructions on how to burn the bootable ISO image very carefully, as making a bootable CD can be tricky! Alternatively, these instructions explain how to create a bootable EasyRE recovery USB stick/drive.
- Boot up your PC from the Easy Recovery Essentials CD or USB you created.
-
Once EasyRE is running, choose the “Automated Repair” option and click Continue.
-
After EasyRE scans your computer’s drives, identify and select the drive letter for your Windows installation from the list, and then click on the Automated Repair button to begin.
-
Easy Recovery Essentials will start analyzing the selected drive for problems. EasyRE will test for and attempt to automatically correct errors with the disk, partition, bootsector, filesystem, bootloader, and registry. No intervention is required, as EasyRE’s repair is fully automated:
- Once the process is complete, EasyRE will report its findings. Click on the Restart button to reboot your PC and test the changes.
-
The “Invalid partition table” error should now be fixed as your PC begins to load:
You can download Easy Recovery Essentials from here.
Fix #2: Rebuild the MBR manually
You can try to rebuild the BCD if the winload.efi error appears because of a corrupt BCD file:
- Insert the installation disc
- Restart your computer and boot from the disc
- Click Repair your computer
- At the System Recovery Options screen, select Command Prompt
- Run the following commands:
bootrec /fixboot
bootrec /scanos
bootrec /fixmbr
bootrec /rebuildbcd
- Press Enter after each and wait for the commands to finish
- Restart your computer

bootrec utility results screen
Fix #3: Check partition status using Diskpart
The built-in Diskpart Windows utility can be used to check partition status and mark them as inactive if necessary. Note that the active partition must contain the Windows bootloader for Windows to load correctly.
Here are the steps to run Diskpart and change the disk’s status:
- Boot from the Windows install disc
- Click on Repair your computer after after selecting proper language, time and keyboard input
- Select the Windows installation drive, which is usually , and click Next
- Choose Command Prompt when the System Recovery Options box appears
- Write the following command and press Enter afterwards:
diskpart
- Then, write
list volume
to get the list of all available partitions, and press Enter. The active volume(volumes) will have an asterisk(*) next to its name.
- Then, write
select volume X
to select the volume you want to mark as inactive, and press Enter
- Then, write
inactive
to mark the currently selected volume as active, and press Enter
Here is an example screenshot of what the PC’s console output should look like after the volume is marked as inactive with Diskpart:
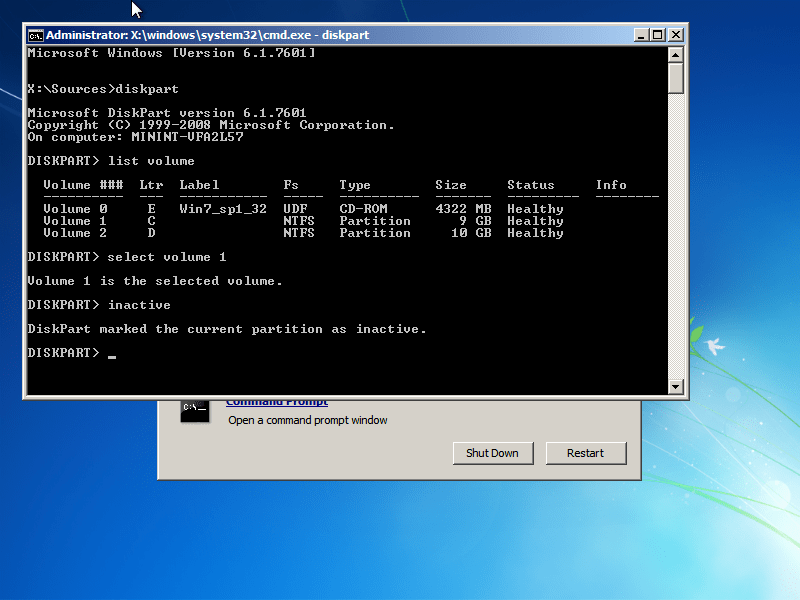
Diskpart utility results screen
Устранение проблемы
Самым простым способом борьбы с данной неполадкой является перезапуск оборудования.
Если сбой носил временный характер, то при повторном запуске он снова не возникнет.
Далее задачей пользователя является определить, возникла ли неполадка в оборудовании или она носит программный характер.
Физические повреждения
Они могли произойти только в случае, если системный блок компьютера подвергался ударам, падению, давлению или другим воздействиям, и обычно, они бывают заметны визуально.
Снимите корпус с системного блока или заднюю крышку с ноутбука (обесточенных) и осмотрите жесткий диск и все его соединения, причем важно проверить правильность и исправность шлейфов, как к жесткому диску, так и к материнской плате. Если какой-то из шлейфов отключен и проблему устранить легко, то вы можете переподключить его самостоятельно
Если какой-то из шлейфов отключен и проблему устранить легко, то вы можете переподключить его самостоятельно.
Однако, если визуально заметны повреждения устройства, то скорее всего, потребуется замена винчестера, которую должны провести специалисты.
Внешние носители
На следующем этапе необходимо исключить вероятность того, что загрузка происходит с какого-либо другого носителя.
Для этого проделайте следующее:
Выньте все диски, установленные во внешних или встроенных приводах;
Выньте все карты памяти и другие подключенные внешние накопители;
Отключите максимум не необходимых устройств.
После этого перезапустите оборудование. Если причина сбоя была в этом, то теперь устройство должно запускаться нормально.
Внешние носители
На следующем этапе необходимо исключить вероятность того, что загрузка происходит с какого-либо другого носителя.
Для этого проделайте следующее:
- Выньте все диски, установленные во внешних или встроенных приводах;
- Выньте все карты памяти и другие подключенные внешние накопители;
- Отключите максимум не необходимых устройств.
- После этого перезапустите оборудование. Если причина сбоя была в этом, то теперь устройство должно запускаться нормально.
Приоритет загрузки
Это параметр, который настраивается в БИОС, он определяет, к какому именно носителю должна обратиться система для того, чтобы начать загрузку.
Проверить и изменить при необходимости очередь загрузки можно таким образом:
- Запустите устройство;
- Нажмите Del в процессе загрузки, иногда может потребоваться нажать F8 одновременно с ней – это зависит от настроек устройства;
- Откроется синее меню БИОС, для его работы не нужно, чтобы система была загружено;
- Оно отличается в зависимости от версии и сборки ПК, потому точная навигация по нему будет отличаться, но цель всегда одна – с помощью стрелок на клавиатуре пользователю необходимо найти пункт со словом Boot Manager или просто Boot;
- Просмотрите список, который отображен в этом разделе – первым в нем должно быть то устройство, на котором у вас записана система;
Если это не так, то с помощью стрелок поменяйте порядок оборудования.
Если же это так, то проблема, скорее всего, со стороны аппаратной части компьютера.
Второй вариант: устройство вообще не видит жесткого диска с системой и в списке он не отображается (но подключен при этом верно).
В этом случае неисправен сам жесткий диск и ему требуется замена.
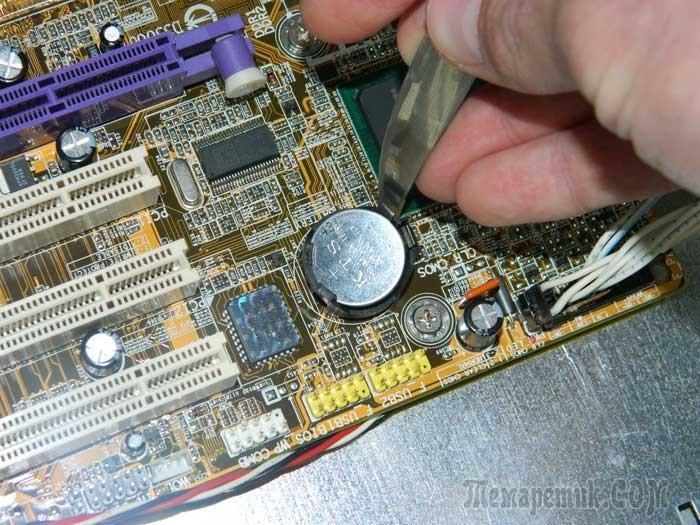
Батарейка
В некоторых случаях все внесенный в очередь загрузки в БИОСе изменения откатываются назад при перезапуске.
Это свидетельствует о том, что имеются проблемы с батарейкой системной платы.
Заменять ее должны в сервисном центре, но стоимость такого устройства не велика.
Батарейка
В некоторых случаях все внесенный в очередь загрузки в БИОСе изменения откатываются назад при перезапуске.
Это свидетельствует о том, что имеются проблемы с батарейкой системной платы.
Заменять ее должны в сервисном центре, но стоимость такого устройства не велика.
Проблемы с системой
Возможна ситуация, при которой проблема состоит в самой операционной системе.
Проверить это достаточно легко – возьмите установочный диск или флешку, установите его в устройство и выполните загрузку с него, выставив его первым в очереди загрузки в БИОСе.
После чего зайдите в Восстановление системы, и с помощью командной строки поочередно выполните три команды bootrec/fixmbr, bootrec /fixboot и chkdsk:/f/r.
Другие неполадки
Если вы пытались запустить систему, записанную на внешнем жестком диске, подключенном к компьютеру через USB-порт, то рекомендуется переподключить винчестер с использованием другого порта.
Так как данные порты иногда могут работать нестабильно с жесткими дисками.
Причины недопустимой таблицы разделов?
Если вы получили эту ошибку на своем ПК, это означает, что произошла сбой в работе вашей системы. Общие причины включают неправильную или неудачную установку или удаление программного обеспечения, которое может привести к недействительным записям в вашем реестре Windows, последствиям атаки вирусов или вредоносных программ, неправильному отключению системы из-за сбоя питания или другого фактора, кто-то с небольшими техническими знаниями, случайно удалив необходимый системный файл или запись в реестре, а также ряд других причин. Непосредственной причиной ошибки «Недопустимая таблица разделов» является неправильное выполнение одной из обычных операций с помощью системного или прикладного компонента.
Create the partition
The following two sections show how to create an EFI system partition (ESP).
Warning: The EFI system partition must be a physical partition in the main partition table of the disk, not under LVM or software RAID etc.
Note: It is recommended to use GPT since some firmwares might not support UEFI/MBR booting due to it not being supported by Windows Setup. See also for the advantages of GPT in general.
GPT partitioned disks
EFI system partition on a GUID Partition Table is identified by the .
Choose one of the following methods to create an ESP for a GPT partitioned disk:
- fdisk: Create a partition with partition type .
- gdisk: Create a partition with partition type .
- GNU Parted: Create a partition with as the file system type and set the flag on it.
Proceed to section below.
MBR partitioned disks
EFI system partition on a Master Boot Record partition table is identified by the partition type ID .
Choose one of the following methods to create an ESP for a MBR partitioned disk:
- fdisk: Create a primary partition with partition type .
- GNU Parted: Create a primary partition with as the file system type and set the flag on it.
Proceed to section below.
Создание EFI-раздела на пустом жёстком диске утилитой Bootice
Кто не любит командную строку, для создания EFI-разметки пустого носителя может воспользоваться утилитой Bootice с графическим интерфейсом. Она бесплатная, её можно скачать на любом софт-портале Интернета. В главном окне выбираем второй жёсткий. Кликаем «Parts Manage».
Затем – «Re-Partitioning».
Первым делом ставим галочку GPT в графе «Partition table type». Затем галочку ставим «Create ESP partition». И вверху в графе «Settings» убираем все значения «Size» кроме последнего. Жмём «Ок».
В итоге получим разметку диска с EFI-разделом на 128 Мб и разделом, вместившим в себя остальное дисковое пространство.
***
А как быть, если жёсткий диск не пустой? Если на нём есть структура и хранящиеся пользовательские данные. Или мы хотим восстановить Windows, лишившуюся загрузочного EFI-раздела после выхода из строя или отключения жёсткого диска, на котором ранее существовал её загрузчик. И на этот случай есть решения. Для восстановления системы без загрузчика нам, естественно, понадобится среда для выполнения определённых операций. В одном из случаев сгодится и обычный установочный носитель Windows. В другом случае будем работать с менеджером дискового пространства, потому нам понадобится функциональный и надёжный LiveDisk WinPE. Одним из таких является LiveDisk Стрельца. Сайт загрузки образа — Sergeistrelec.Ru.
Примечание: приведённые ниже операции не могут быть проведены на дисках динамического типа. Диск оставшегося без загрузчика зеркала Windows необходимо прежде преобразовывать в базовый тип. Сделать это можно только сторонними средствами.
Причины
Из написанного выше ясно, что фактически устройство не может получить доступ к жесткому диску, то есть проблема связана с аппаратными компонентами, а не с программными.
Есть несколько причин, по которым такая проблема может возникнуть:
- Физическое повреждение жесткого диска;
- Временный разовый сбой в работе винчестера несистемного характера;
- Нарушения, возникающие в результате воздействия вирусов, хотя такое происходит достаточно редко;
- Устройство пытается запустить систему с того накопителя, который не указан как приоритетный в настройках БИОСа;
- Испорчена, сломалась или выработала ресурс батарейка на системной плате;
- Не работают USB-порты, конечно, в том случае, если жесткий диск присоединен к ПК таким способом;
- Проблемы с самой операционной системой, что также бывает достаточно редко, так как об этом, обычно, сигнализируют ошибки иного типа.
В зависимости от причины, которая повлекла за собой такой сбой, существует несколько способов устранения данной неполадки.
Partitions on an Android device
A partition is simply a discrete section on the phone’s internal storage where data is kept. What kind of data is kept on each partition depends on the hardware, operating system, and many other factors. The bootloader will have one, the system (Android OS) will have one, the user data will have one… and so on and so forth. When you see people talk about “/system” and “/cache”, they’re referring to the given names for those partitions. The OnePlus 6, for example, has 72 partitions. That sounds like a lot, but the OnePlus 6 is one of the devices that supports seamless updates which means many of these partitions are simply duplicates of each other.
Partial output of the partitions on the OnePlus 6. Some A/B partitions are underlined for demonstration purposes.
There are a lot of partitions on a device that you will never have to worry about as a user. Many of these partitions are never modified when flashing custom ROMs, kernels, recoveries, or modifications like Magisk or Xposed. A lot of these partitions will either be unused for our purposes or are too dangerous to touch unless you know what you’re doing (XLOADER and OEMINFO on Huawei/Honor devices come to mind.) For the vast majority of Android users, the partitions that we mostly deal with are system, boot, recovery, userdata and more recently vendor and vbmeta. Here’s a brief explanation of the purpose of each partition:
- system – holds the Android OS, system libraries, system apps, and other system media like bootanimations, stock wallpapers, ringtones, etc.
- boot – holds the kernel, ramdisk, and on A/B devices also the recovery as well
- recovery – holds the recovery, where TWRP is most commonly flashed on A-only devices (A/B devices don’t have a dedicated recovery partition)
- userdata – holds all of your app, system, and internal storage data
- vendor – holds platform and device-specific HALs, the files necessary for the Android OS to communicate with the underlying hardware
- vbmeta – the partition for Android Verified Boot 2.0 which verifies the integrity of the boot process
Device OEMs can change their partition schemes to use whatever layout they want. For instance, Huawei splits the boot partition into ramdisk_recovery and kernel. There are also a lot of extra partitions that may contain other system apps such as cust, product, and oem, and while these are safe to modify, it’s generally not recommended if you want to make it easier on yourself to return to stock. So where do A/B partitions play a role?
Causes of Hard Disk problem \ Invalid Signature in partition table?
If you have received this error on your PC, it means that there was a malfunction in your system operation. Common reasons include incorrect or failed installation or uninstallation of software that may have left invalid entries in your Windows registry, consequences of a virus or malware attack, improper system shutdown due to a power failure or another factor, someone with little technical knowledge accidentally deleting a necessary system file or registry entry, as well as a number of other causes. The immediate cause of the «Hard Disk problem \ Invalid Signature in partition table» error is a failure to correctly run one of its normal operations by a system or application component.
Need to make partition bootable in Windows 7
Boot partition, also known as boot volume, is the disk partition that contains the boot loader and necessary files for the Windows operating system. It is the prerequisite to start a computer normally. A suitable boot partition does not only need to contain the related bootable data, it also needs to be marked as an active partition.
For each OS you install, you’ll have boot partitions for each. If you have multiple systems in one disk and you only want to load the appropriate operating system, then you can make the related partition bootable by setting the partition active. But meanwhile, other partitions cannot be set as an active partition because one disk can only has one active partition.
Besides, set active partition is often used when your computer fails to boot. If your computer can’t boot, you should first check if the boot partition is set as active. If not set, you must mark this partition as active to make partition bootable in Windows 7.
Что такое «Invalid partition table»?
Перевод «Invalid partition table звучит как «некорректная таблица разделов», обычно обозначая ситуацию, когда система обратилась к флеш-накопителю за нужными для инсталляции данными, но из-за ряда причин не смогла это осуществить. Среди таких причин я бы отметил следующие:
- Загрузочная флешка создана некорректно (неверно выбрана файловая система при форматировании флешки, использовано сомнительное программное обеспечение и др.);
- Загрузочная флешка аппаратно неисправна;
- Некорректные настройки БИОСа;
- Используемый в компьютере БИОС устарел, и необходимо его обновление.