Download filmora9 video editor free trial on windows & mac
Содержание:
- Benutzeroberfläche
- Детальный разбор интерфейса
- Record Videos with Filmora
- How to Download & Install Filmora9 Video Editor for Free? [Windows & Mac]
- О функционале программы
- Обзор Wondershare Filmora
- Editing Image
- Возможности
- See What’s Possible in Filmora9
- Export and Share
- PIP (Picture in Picture)
- Filmora für Windows User Guide Übersicht:
- Обзор программы
- Видеообзор (пример монтажа)
Benutzeroberfläche

1. Medien- & Effektbibliothek
Hier finden Sie alle Ihre Medien einschließlich Videoclips, Fotos und Musik. Unter den einzelnen Registerkarten finden Sie Übergänge, Effekte und eine Vielzahl anderer Ressourcen, die Sie in Ihren Projekten verwenden können.
2. Vorschaufenster
Das Vorschaufenster zeigt Ihnen das Video an, dass Sie zur Zeitleiste hinzugefügt haben. Die Position des Abspielkopfs wird in der Zeitangabe in der unteren rechten Ecke angezeigt. Sie können eine Zeitangabe eingeben, um zu einem bestimmten Punkt in Ihrem Video zu springen. Darunter finden Sie die Schaltfläche für Schnappschuss, mit der Sie einen Screenshot Ihres Videos in voller Auflösung speichern können. Das Bild wird automatisch zur Medienbibliothek hinzugefügt.
3. Werkzeugleiste
Die Werkzeugleiste bietet Ihnen einfachen Zugriff auf die Bearbeitungsfunktionen Filmoras. Sie können den Zoom der Zeitleiste anpassen und auf eine Vielzahl von Werkzeugen zurückgreifen, wie z. B. Videoschnitt und Geschwindigkeit anpassen.
4. Zeitleiste
In der Zeitleiste können Sie die Medien und Effekte für Ihr Videoprojekt zusammenstellen. Mit dem Schieberegler in der unteren rechten Ecke können Sie die Zeitleistenansicht steuern.
Детальный разбор интерфейса
Начнём рассматривать программу с верхнего левого угла. В отделённом вертикальной линией окошке можно переключаться между пользовательскими альбомами, примерами цветов и видео.
При выборе «Примеры видео», которых представлено девять, открывается перечень стандартных видеофайлов. Если просто кликнуть на них, то они отобразятся в окошке справа, если же нажать на всплывающий плюсик посередине файла, то видео автоматически переместится в редактор внизу.

Справа над редактором есть ползунок, благодаря которому можно задавать масштаб отображения ролика в редакторе. Это помогает в организации пространства при очень коротких или длинных видео. Очень удобна функция просмотра видео по кадрам, представленная обычной и зеркальной буквами «к». Они располагаются слева под видео.
Вернёмся к «Пользовательскому альбому». Просто кликнув в нём по пустому месту, мы получаем доступ ко всем файлам и можем переместить их в это окно. Открыв желаемое видео, добавив его в редактор через всплывающий значок плюса или просто перетащив, можно увидеть следующее.

Переходить к разным кадрам можно не только в самом окошке с видео, но и в редакторе с помощью вертикальной линии-разделителя. Как видите, добавить видео и начать работать с ним потребует всего нескольких кликов.
Для обрезки видео выберите всё ту же вертикальную линию и расположите её на нужном участке. Чтобы было проще отметить подходящий момент, можно воспользоваться переключением по кадрам. Когда место для обрезки выбрано, нажмите на значок ножниц над редактором. При отведении отметки вбок можно заметить, что кусочек ролика был отделён. Кликните на него и нажмите delete или значок корзины, и он будет удалён.

Когда видео обрезано и подготовлено, и осталось лишь наложить на него музыку. Для этого отключите родной звук в ролике. Делается это просто: щёлкните правой кнопкой мыши по видео в редакторе и выберите «Отключение аудио». Теперь звук отделён от видео и отобразился в дорожке внизу. Там он может быть удалён, как и обрезанный ранее кусочек ролика.

Перетащите в освободившуюся дорожку своё аудио. При наведении на него курсора появляется указатель в виде руки, с помощью которого запись можно двигать. С обоих краёв композиции есть знак разделения, он может сделать продолжительность композиции равной продолжительности видео. Аудиозапись будет автоматически подрезана.

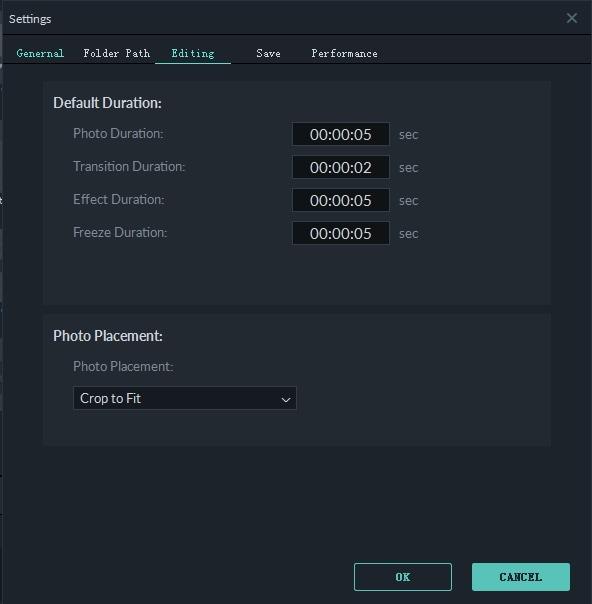
Как вы могли понять, работать с этим видеоредактором очень просто. Вы с лёгкостью можете делать то, что вам нужно. Снизу для примера показано, как выглядит раздел «Музыка». В нём находится 51 файл. Всё это отображается в верхнем левом разделе экрана. Вы можете заметить в углу файлов стрелку вниз: она означает, что аудиозапись не скачана. Чтобы её загрузить, просто щёлкните на файл дважды левой кнопкой мыши.

В разделе «Элементы» представлена большая библиотека разных дополнений. Как они выглядят и работают вы можете узнать, скачав их через стрелку вниз и перетащив к нужному месту в видео. Посмотреть результат можно в окошке справа. Допустимо корректировать отображение, меняя положение элемента и его размер.

Вам ещё многое предстоит посмотреть, если вы всерьёз решили пользоваться этой программой и легко создавать отличные видеоролики
Теперь самое время уделить внимание возможностям этой программы, о которых заявляют разработчики
Record Videos with Filmora
You can record a video from your Webcam, record your PC screen and record a voiceover with Filmora9. Follow the steps blow to learn how:
Record from Webcam
To use this feature, make sure your webcam is well connected to your PC first.
Click the Record button in the upper left of the Media Library panel. In the Capture Video window that pops up, click the camera icon to start recording and click it again to stop recording. Then, click OK to save the recorded video file to the Captured files folder.
The recorded video file will show up in the Media Library automatically after you finish the recording. You can simply drag it into your Timeline, or you can right click it, select Reveal in Explorer to find it in your local computer folder.
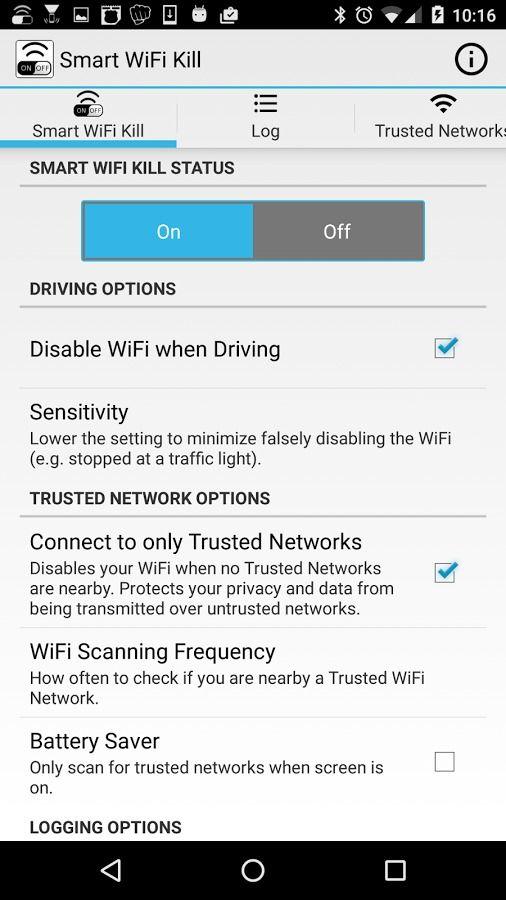
Record PC Screen
Choose Record PC Screen from the Record menu and the Wondershare Filmora Scrn plugin window will pop up. In this window, you can set the aspect ratio of your video and the portion of the screen you want to record. Click the red button to start recording, and press F9 to stop recording. The recorded video file will be added to Media Library automatically so you can drag it into your Timeline easily.
Record Voiceover
Choose Record Voiceover under the Record menu, and make sure your microphone is connected to your PC properly. Click the microphone icon and you will have 3 seconds before the recording starts. An audio track will be added to the timeline while you are recording.

How to Download & Install Filmora9 Video Editor for Free? [Windows & Mac]
Filmora9 is available on Windows7/Windows8/Windows8.1/Windows 10 64-bit computer and Mac running macOS X 10.11 or later, you can click the download button below to download the latest version of Filmora9 to experience these new features such as animated split-screen, and Preview Render.
The downloaded file size is less than 1MB on Windows and about 2.5MB on Mac, you can click it to install directly.
Compared with those expensive and sophisticated video editing software, Wondershare Filmora9 video editor is undoubtedly a great choice for the average home or novice users or semi-pros.

Whether you want to edit home movies to send to family and friends or upload to YouTube and Vimeo for sharing, this video editor from Wondershare can help take your videos to a higher level effortlessly. Here let’s take a look at the main features of this video editing software.
Filmora9 is compatible with the Filmstock effects store, an online stock media library for your video projects, including video effects, video footage, music, and sound effects, and stock images as well.
Download and try this easy to use yet powerful enough video editor that everyone can master in a few minutes for making superior videos at a fast speed.
О функционале программы
Сразу после её открытия появится такое окно. Учтите, что оно может выглядеть по-разному в зависимости от версии, но основные элементы и функционал останутся теми же.

Первое, что бросается в глаза, это разделение экрана. Верхняя половина состоит из двух частей. В левой осуществляется общее управление, экспорт и импорт файлов, выбор эффектов, переходов и многого другого. В правой части можно просматривать видео и то, что получается в процессе.
Нижняя половина экрана полностью посвящена редактированию. Есть отдельные дорожки для видео, текста, аудио. Файлы удобно перетаскивать в редакторе, все эффекты добавляются просто, а обрезать видео можно всего в несколько движений. Действительно, нет ничего проще, но сказывается ли это на качестве результата?
Разработчики преподносят эту программу как инструмент для создания произведений искусства. Они соотносят её лёгкость и простоту в использовании с мощным функционалом, приводят отзывы довольных пользователей, которых свыше 5 миллионов! Эта цифра говорит о многом.
Рассмотрим же всё более детально, попробуем обрезать видео и наложить на него музыку и затем перейдём к заявленным разработчиками возможностям.
Wondershare Filmora – удобная программа для создания и редактирования видео. Вы можете бесплатно скачать Филмору на русском языке со всеми дополнениями, и уже сейчас приступить к профессиональной обработке видеофайлов.
Программа позволяет произвести простые операции над видеофайлами:
- Обрезать видео- и аудио-дорожки убрав лишний фрагмент и заменив его необходимыми.
- Наложить эффекты, анимации или фильтры из огромного встроенного пакета.
- Сменить звуковую дорожку полностью, наложив другой звуковой ряд или добавив музыку поверх имеющегося.
- Изменить скорость воспроизведения видео и аудиоряда.
- Сохранить готовое видео на DVD или конвертировать в любой удобныйформат, в том числе поддерживающийся мобильными устройствами.
- Добавлять надписи и создавать субтитры, выбрав цвет и размер шрифта, его тип и добавить эффекты
- Сохранить готовое видео на DVD или конвертировать в любой удобныйформат, в том числе поддерживающийся мобильными устройствами.
В программе представлено большое количество разнообразных фильтров, переходов и эффектов. Они дают возможность создать плавную смену клипов, добавить яркости и цвета на видео, применить необычный эффект или анимацию. В Филмора есть большое количество шаблонов, которые позволят быстро создать красивое и интересное видео. Многофункциональность Филмора превратит обычное редактирование видео в творческий процесс.
Готовый проект можно сохранить на DVD, создав интерактивное меню прямо в редакторе. Филмора Вондершейр позволяет адаптировать видео для мобильных устройств: Android, iPad, iPhone и другие устройства с возможностью просматривать видео.
Важной особенностью Wondershare Filmora является то, что программа имеет два режима редактирования: полнофункциональный и базовый. Базовый режим позволяет пошагово обработать любое видео на должном уровне, просто следую подсказкам программы.. Вы можете бесплатно скачать Wondershare Filmora и начать монтировать видео прямо сейчас.
Вы можете бесплатно скачать Wondershare Filmora и начать монтировать видео прямо сейчас.
Editing Image
It’s a great way to tell a story with images. In Filmora9 (Latest Filmora version 9), adding, managing and editing images is easy. Easy-to-use editing features and dozens of filters and overlay effects can enhance your images a lot.
In this guide, learn how to:
1. Add Image to Video Track
To add an image to a video track, position the Playhead at the location the image is to be inserted, right-click on the image in the media library, and select Insert. If you want to add the image to the end of the video, then you can select Append (add to the end).
You could also click on the image in your media library, drag it to where you want it in the timeline, and drop it in.
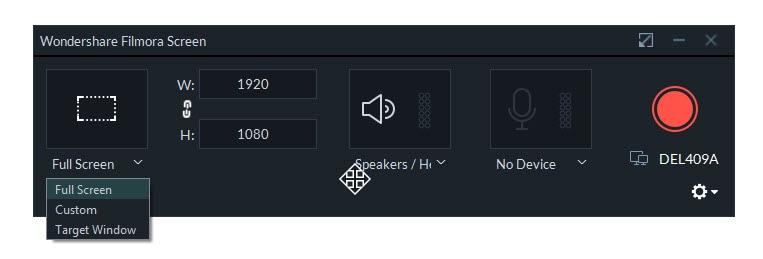
If there are black bars around your image in the preview, here’s how to remove them:
Go to File and select Settings. In the Settings panel, switch to the Editing tab and then go to Photo Placement and select Crop to Fit or Pan & Zoom. This will apply the Crop to Fit or Pan & Zoom effect to all of your images.
Note:if you want to insert an image into the middle of a video clip, you need to split the clip where you want to add the image so the image can be placed between the two separated portions of the clip.
2. Add Image as overlays
Drag your image to a video track above the track with your video clip in it.
Note: Video track 1 is the bottom layer of your video. Anything you add to video tracks above it (video tracks 2 and up) will be displayed on top of any media inside video track 1, or any other video tracks with lower numbers (i.e. an image in video track 4 will be layered over top of media in video tracks 1-3). You can add up to 100 video tracks.
To Change Image Duration
When an image is added to the timeline it has a default duration of 5 seconds, but you may want it to stay on screen for more or less time.
There are two ways to change the duration of an image:
- Drag the left or right edges of the image on the timeline (not the image in the preview) to change the duration.
- Right click on the target image and select Duration to open the Duration Setting panel and input a new duration.

To Change the Position of an Image
Drag the image in the Preview window to move it around. To resize the image, drag the small circles and squares at its edges.
To Rotate or Flip an Image
Double click on the image in the timeline to open the Image panel. Go to Transform and move the slider next to Rotate to rotate the image.
To flip the image, click the Horizontal Flip icon to reverse the image from left to right or the Vertical Flip icon to turn the image upside down.
To Composite Images and Videos
After adding the image as an overlay, you can also choose to adjust the opacity (transparency) and add a blending mode (i.e. have the video you can see through the image be darkened or tinted behind it).
Double click the image to enter the Image settings section and then go to Compositing. Choose a blending mode from the drop-down menu (your options include Screen, Darken, Multiply and more). You can also move the Opacity slider to adjust the transparency of the image.
To Adjust Image Color
Double click the image and then switch to the Color Tab. In the Color section you can adjust the image temperature, tint, contrast, saturation, and brightness. You can also apply 3D LUT effects. For more advanced color correction, click the Advanced button. Press OK button to save your changes.
To Apply Motion Effects to Images
Motion effects add animations to your images.
To add a motion effect, double click on the image in the timeline and then switch to the Motion Tab. Double click on any motion effect to apply it to the image.
Возможности
Wondershare Filmora – программа для редактирования видео с хорошим функционалом. Меню разделено на две части: вверху расположена кнопка для импорта файлов, а справа можно отслеживать все изменения в видео. Внизу предусмотрена временная шкала – можно обрезать файл, редактировать его продолжительность.
Скачать Filmora video editor стоит ради таких возможностей.
Обработка видео-контента
Из него можно вырезать лишние фрагменты, меняя таким образом длительность. Таймлайн стандартный: для выбора корректных показателей нужно перемещать ползунок. На панели появляется раскадровка: Filmora video editor показывает, какой кадр соответствует заданному временному отрезку.
Работа с музыкальным сопровождением
В Filmora video editor есть богатая библиотека аудиофайлов. Их можно использовать в качестве дорожек к видео-контенту. Музыка разбита на несколько подгрупп по жанру.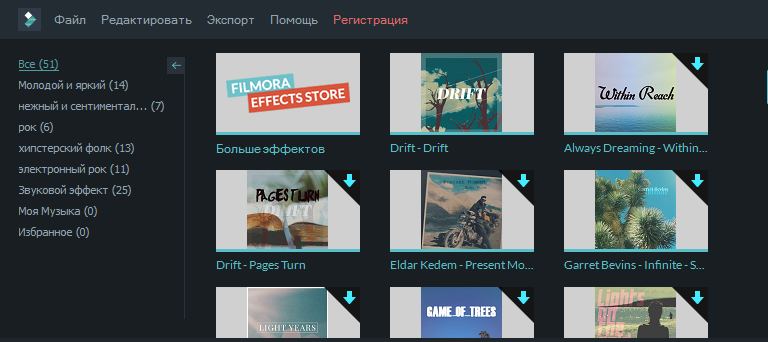
По умолчанию в Video editor 51 трек, но при необходимости пользователь может загрузить файл самостоятельно. Для этого в меню предусмотрена специальная кнопка. Скачать треки можно с официального сайта Wondershare или загрузить из жесткого диска ПК.
Добавление текстовых символов
Разнообразить видео-файл в Filmora video editor можно и текстовыми вставками. В меню можно выбрать шрифт и расположение надписи на кадре. Чтобы применить текст на видео, нужно мышкой перетащить фрагмент в необходимое место на таймлайне. Шрифты разделены на несколько групп в зависимости от стиля оформления. На сайте Wondershare скачать можно и другие.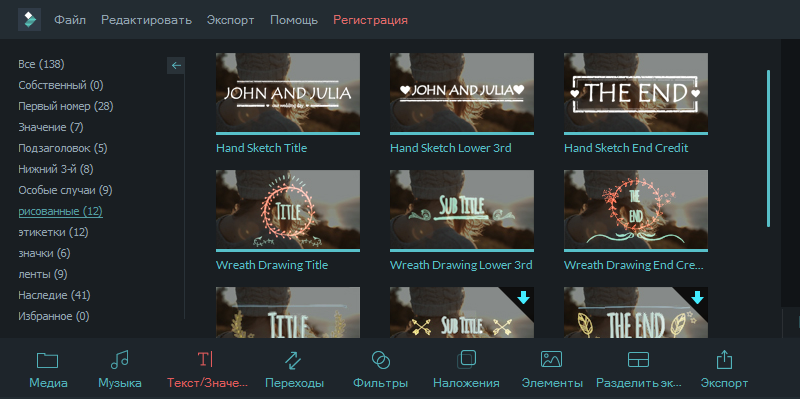
Вставка переходов
Анимированные переходы – функция, которая помогает разнообразить видеоряд. В Filmora на выбор представлены 94 различных анимированных переходов, на иконка схематически изображен принцип обработки изображения. Для удобства понравившиеся эффекты можно добавлять в раздел «Избранное». В Wondershare можно скачать и другие.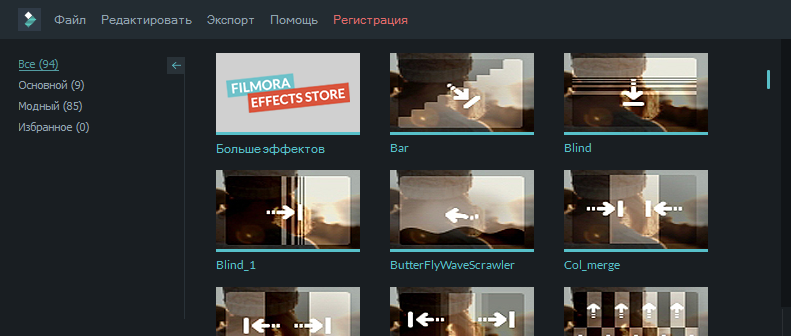
Фильтры
В Filmora Wondershare video editor, как и во всех известных программах для обработки видео, есть большое количество встроенных фильтров. При их наложении удается добиться новых эффектов. По умолчанию доступно 138 фильтров.
Наложения
В Filmora Wondershare video editor предусмотрена и функция наложения слоев. Несколько эффектов боке, рамки, как в старых фильмах и множество других вариаций помогают разнообразить видеоряд. Скачать дополнительные наложения можно на официальном сайте.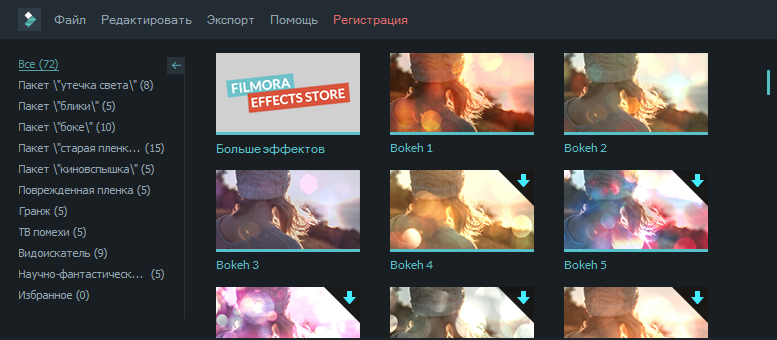
Функция разделения экрана
Для удобства работы с видео и создания нескольких зон в одном кадре в Filmora video предусмотрена возможность разделения экрана. В библиотеке представлено несколько способов поделить изображение.
Обработка видео- и аудиофайлов
Для улучшения качества материалов, изменения ориентации с вертикальной на горизонтальную, разворота кадров представлен специальный инструмент.
Обрабатывать можно и аудио. В video editor настраивают эффекты исчезновения и появления, удаляют внутренние шумы и т.д.
See What’s Possible in Filmora9
Filmora9 users create amazing videos every day. Watch them here and get inspired.
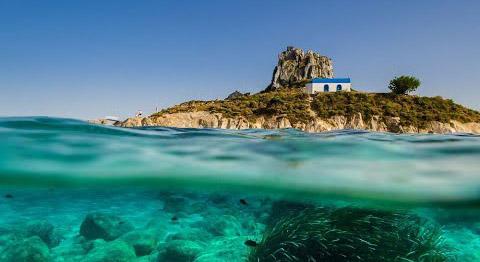
Vacationing on Kos, Greece
This year we vacationed on the Greek island of Kos. Awestruck by some of the wonderful locations we visited, I was happy I brought my notebook with Filmora9, so I could start editing the footage right away and make the most of the footage I shot.
by
YouTube Channel: 111
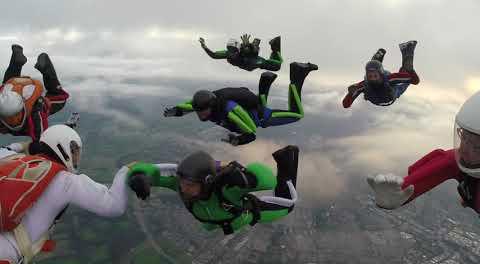
Why we jump.
My father used to photograph all our family activities and document this in photobooks. At first, I did the same since I still enjoy reading those books but then. But later, I discovered the power of a short movie. So I bought action and handy cams and started making short movies in Windows moviemaker. Not only is it really fun to make those movies, but I can also tell a million words in a few minutes. But soon I discovered that I wanted a better, more versatile, and powerful program to make my movies. Filmora and later Filmora9 answered to all my needs. I enjoy the easy use, combined with the many features Filmora9 has to offer.
by
YouTube Channel: 111
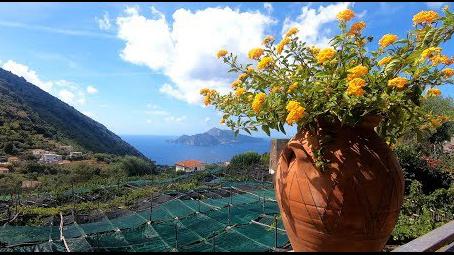
Punta Campanella, Sorrento (Italy)
I started for fun. Filmora helped me to make a great video with an in-depth knowledge of video editing.
by
YouTube Channel: 111
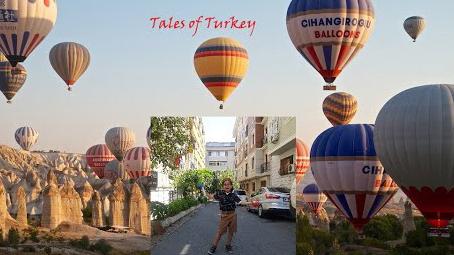
I am an 8-year-old boy who likes to make videos and I like Filmora a lot.
by
YouTube Channel: 111

Martha’s Vineyard
Filmora has been unbelievably helpful for me as I started my journey as a video editor. I always had a passion for it, but the program I was using would crash and make editing tedious and a hassle. Filmora has reinvigorated my love for editing by allowing me to edit my videos and create great content easily. It had allowed me to do what I originally wanted when I started making videos: to create and share great videos that capture great memories with friends and family.
by
YouTube Channel: 111

The rise of syzygy ~ A R6S Montage
I started making videos because I love to game and create highlights for my friends and people who want to view them. After purchasing Filmora two years ago, it helped me thrive and create the perfect videos I always wanted to create.
by
YouTube Channel: 111
Here is how to export and share your finished videos:
1. Export your video to your computer
To export your video to your computer, click the export button and choose the Local tab. Then, select the format you want to export in. Currently, Filmora9 supports the following formats: WMV, MP4, AVI, MOV, F4V, MKV, TS, 3GP, MPEG-2, WEBM, GIF and MP3.

After selecting the output format, you can rename the video and change the location on your computer where you save it. You can also check the output resolution, frame rate, size, and duration before you export. To change your export settings (i.e. resolution, bit rate, and frame rate) click the SETTINGS button.
In the settings window there are three quality levels: Best, Better and Good. The only difference among them is the Bit Rate. You are able to adjust this or other parameters, such as Resolution, and Frame Rate in this window.
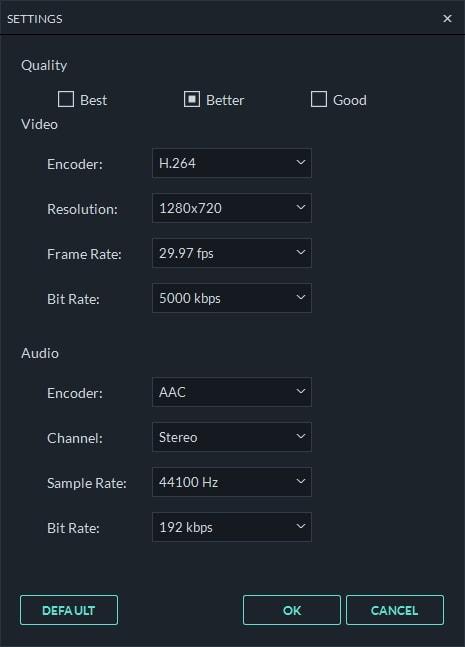
It is best to export your video with the same settings as your original video.
When you’re finished adjusting your export settings, press OK to save them. Then, after you have closed the Settings window, press the Export button in the Export window.
Note:
- The size of the video depends on the length of the project and the bit rate. If the file size looks too big, you can try changing the bit rate in the Settings window to make it smaller.
- If you want to export HEVC, you need to upgrade the latest Windows 10 and install the HEVC video extensions by Microsoft.
2. Export by the device you want to play your video on
In the Device tab under Format, you can choose to output your video according to the ideal settings for different types of devices, such as: iPhones, iPads, apple TVs, Samsung Galaxy phones, PlayStation 4s, and more. You can make manual adjustments to your settings as well by clicking the Settings button. Click export when you’re finished.
Note: exporting in this way won’t automatically transfer your videos to your devices. Your videos will still be stored on your computer’s local hard drive.

3. Upload Your Video to YouTube
To upload a finished video directly to YouTube, click Export and then select YouTube. Input the title, description, and tags for the video and choose whether to upload the video as public, unlisted or private. You will also need to sign in to your YouTube account.

4. Burn a DVD
You can burn your video from to a DVD. Choose the DVD tab and enter the required settings, such as the aspect ratio and disc type.

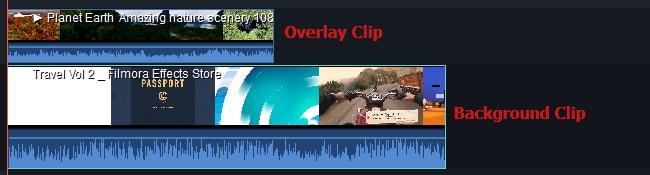
PIP (Picture in Picture)
PIP, also known as Picture in Picture, is an effect often used to overlay some smaller videos on a background clip, which enables you to simultaneously display two or more video clips on the screen. It is an extremely useful technique to help you create convincing content when you make online tutorials, product demonstrations or game videos etc. The following guide will provide a step-by-step procedure for making PIP videos by using this feature.
1. Add Overlay Clip to Timeline
-
- Launch the program and select Create New Project to start a project.
- Import both your background video as well as overlay video clips to the media library of Filmora9. This can be done by either clicking the import button to choose from your local hard drive, or just dragging and dropping the video clips to the library.
- Choose a background clip and then drag it to the video track in the timeline below.
- Overlay clip will need to be dragged to another video track as below:
Resize and Reposition the overlay clip: Click on a video on the PIP clip and you will be able to resize the clip by dragging the resizing handles on the clip in the preview window, or you can also drag it to any other place on the screen as you want.

2. Modify Overlay Clip
To Apply Motions to Overlays Clip
Motions add a touch to your overlays. Filmora9 provides dozens of motion effects for you to choose from. To apply a motion, double click the target clip on the overlay clip to enter the motion library as below:

Simply choose one that you like, double click it to apply (or right click on it and hit Apply). Then preview the effects on the right.
To Add a Mask Frame
Not satisfied with the rectangular shape of your clip? Apply a mask effect to it. A click of the button brings up dozens of mask effects, which can be utilized to adjust the shape of your media file. Go to Effects > Filters > Utility > Shape Mask.
Note: you need to drag the mask filter onto overlay video clip, not on another blank track. Otherwise, the mask filter will be applied to the background video.

After double click on the overlay clip, a video editing panel will be opened at the top left corner. Go to Video Effects to adjust X, Y, width, height and feather. If you want to a rectangle or round overlay, drag the yellow dot to left or right in the preview window.

If you want to make an image overlay, drag a picture to the timeline. Go to Effects > Filters > Utility > Image Mask. Drag it onto the overlay clip. Double click on the overlay clip. Then you can change the image shape mask at the video editing panel. Just select one preset you like. You can also directly reposition it in the preview window.
Add PIP Blending Modes
After double click on the overlay video clip in the timeline, you will see the compositing tab in the control panel. Select a blending mode (i.e. multiply, darken, or color burn). You can fine tune the opacity until you have the look you want.

Split screen: Know the detailed guide about using Split Screen effect to create PIP videos.
Filmora für Windows User Guide Übersicht:
- Herunterladen / Installieren / Registrieren / Aktualisieren / Deinstallieren
- Projekt mit Filmora9 erstellen
- Mediendateien importieren / Video aufnehmen
- Videobearbeitung: Schneiden, Zuschneiden, Kürzen, Teilen, Drehen, Zusammenfügen und Umkehren
- Audiobearbeitung: Audio teilen, bearbeiten, stummschalten und von Videos loslösen
- Bilder hinzufügen und bearbeiten
- Texte und Titel in Videoclips verwenden
- Farbkorrektur für Videoclips und Bilder
- Videostabilisierung
- Video-Overlays / Bild-in-Bild Videos (PIP)
- Greenscreen-Video erstellen (Chroma Key)
- Schnappschuss (Screenshot) oder Standbild (Freeze Frame) hinzufügen
- Instant-Cutter-Tool
- Video exportieren
- Videoeffekte: Filter und Overlays
- Übergänge & Elemente hinzufügen
- Erweiterte Videoeffekte: Tiefenunschärfe (Tilt-Shift), Verpixeln, Gesichtsmaske und Bildmaske
- Filmora-Wasserzeichen aus Videos entfernen
- Action-Cam Videobearbeitung
- Action-Cam Instant-Cutter-Tool
Обзор программы
Для работы с контентом в Filmora video представлены следующие возможности:
- обрезка видео и удаление из него определенных частей на таймлайне;
- запись дубляжей для роликов;
- запись видео с веб-камеры или экрана;
- отключение звука из видео, добавление своих аудиодорожек;
- наложение фигур, анимации, титров, текста, фильтров, переходов, заставок;
- совмещение кадров;
- настройка видео: его вращение, кадрирование, стабилизация, настройка яркости, скорости воспроизведения;
- отдаление и заглушка аудиодорожки в видео.
Фотографии для вставки в видео можно скачать и загрузить с Инстаграм, Фейсбук. В Filmora video editor можно делить экран на несколько частей.
Filmora отличается простым интерфейсом — ее скачать рекомендуется начинающим операторам. Под каждой иконкой есть надпись, возле списка эффектов и дорожек есть подсказки относительно того, как применить их к файлу. Эта программа позволяет редактировать и контент и вставлять в него различные эффекты. Скачать новые можно на сайте Wondershare.
Видеообзор (пример монтажа)
Возможности программы Wondershare Filmora:
Поддержка видео с разрешением SD (1280×720), HD (1920×1080) и 4K (3840×2160). Видео можно редактировать и экспортировать с любым из этих разрешений. Придание звуку большей чёткости и ясности с помощью удаления шумов. Возможность накладывать несколько видео друг на друга, при этом одно может идти параллельно в дополнительном окне. Десятикратное ускорение и замедление видео. Можно играть с темпом видео или просто корректировать его скорость при необходимости. Воспроизведение клипа в обратном порядке. Можно использовать для всего ролика или некоторых его частей. Более 300 стильных и классных эффектов. Возможности делать запись экрана любого устройства. Это часто используется для объяснения работы программ и не только. Стабилизация видео и устранение шатания картинки в ролике. Коррекция цвета и баланса белого
Это особенно важно, если вы предпочитаете видео в конкретных оттенках
На самом деле на этом возможности программы Filmora не заканчиваются! Установите её, чтобы оценить в работе
Неважно, профессионал вы или новичок, программа порадует большим количеством функций, которыми легко и удобно пользоваться, тем более с русскоязычным интерфейсом