Deluge торрент-клиент для windows и ubuntu
Содержание:
- What is the difference between full allocation and compact allocation?
- Headless setup
- Ubuntu / Debian
- How to install it on different platforms?
- Скачать torrent-client Deluge
- Configure Deluge Daemon for ThinClient use
- Windows
- Daemon
- Пользовательский опыт
- POST /streaming/stream
- The Pros and the Cons.
- Developer Install
- Removing From System
- English[edit]
- Troubleshooting
- Create SSH Tunnel
- Deluge Daemon Setup
What is the difference between full allocation and compact allocation?
Compact allocation only allocates as much storage as it needs to keep the pieces downloaded so far. This means that pieces will be moved around to be placed at their final position in the files while downloading (to make sure the completed download has all its pieces in the correct place). In full allocation, the entire space that a file needs is allocated as soon as one piece of that file is downloaded, thus decreasing fragmentation.
We suggest that our users use full allocation.
Deluge uses sparse files for full allocation, the compact allocation option is only useful on file systems that don’t support sparse files (such as FAT or HFS+).
Headless setup
Deluge is quite useful on a headless system, often referred to as a seed box, because of its client/server model. To set up deluge on a headless system, set up the daemon as shown above.
Create a user
To allow interaction with the server remotely, create a user in . For example:
$ echo "delugeuser:p422WoRd:10" >> $HOME/.config/deluge/auth
Note:
- The user/password created does not have to match any system users, and to maintain good security practices it should not!
- The user/password in this file are not hashed or salted like in the web client config.
- The user/password must match the user/password found in /srv/deluge/.config/deluge/auth otherwise the authentication fails.
The number 10 corresponds to a level of Admin. Refer to the following table for additional values:
| Level Name | Level Value |
|---|---|
| None | |
| Read Only | 1 |
| Normal | 5 |
| Admin | 10 |
Note: In Deluge 1.35, these values have no effect, but multiuser options are under development.
Allow remote
The default settings disallow remote connections. Change the «allow_remote» setting in :
"allow_remote": true
Note:
1. is automatically created at the first configuration change, if it does not exist, set the value via :
config --set allow_remote true
2. Changes made while the service is running won’t be read into the daemon, therefore, stop the service before making changes to this file.
Firewall
Open the port for remote access. The following example uses the default daemon port (58846):
# iptables -A INPUT -p tcp --dport 58846 -j ACCEPT
See iptables for more information on firewall rules.
Users behind a NAT router/firewall must forward the port to access the daemon from outside the network if this behavior is desired.
Connect
In the console client:
connect <host> <user> <password>
In the GTK client, Edit > Connection Manager > Add.
In the Web client, Connection Manager > Add.
SSH Tunnel
An SSH tunnel can be created to use an encrypted connection on any client. This requires an extra loopback address to be added, but this can be automated at boot. Without this step, the connection would be considered local. The actual command to establish an SSH tunnel cannot be automated as it requires user input. There are a few possible ways to go about doing that.
/etc/systemd/system/extra_lo_addr.service
Description=extra loopback address
Wants=network.target


Type=oneshot
RemainAfterExit=yes
ExecStart=/sbin/ip addr add 127.0.0.2/8 dev lo
ExecStop=/sbin/ip addr del 127.0.0.2/8 dev lo


WantedBy=multi-user.target
$ ssh -fNL 127.0.0.2:58846:localhost:58846 <ssh host>
The port 58846 should be replaced with the port the deluge server is running on and <ssh host> should be replaced with the server hosting both deluge and the SSH server.
Ubuntu / Debian
- Install dependencies for libtorrent build automatically using build-dep:
sudo apt-get build-dep libtorrent-rasterbar
sudo apt-get install checkinstall
- Download libtorrent and extract:
tar xf libtorrent-rasterbar.tar.gz
cd libtorrent-rasterbar
- Configure:
./configure --enable-python-binding --with-libiconv
- Missing configure script: (e.g. source code from git) create it with ./autotool.sh (requires extra packages: sudo apt-get install autoconf automake libtool).
- Logging: Add --enable-logging=default to get logs in the current working directory. verbose and error can also be used.
- Debug: To create a debug build add --enable-debug=yes.
- ARM architecture (Raspberry Pi, etc): add --with-boost-libdir=/usr/lib/arm-linux-gnueabihf at the end to avoid boost library error.
- Build:
make -j$(nproc)
- CPU Cores: The make option -j$(nproc) will utilize all available cpu cores.
- Non-specific errors: e.g. g++: internal compiler error: Killed (program cc1plus) try using a
- Install library and python bindings:
sudo checkinstall
sudo ldconfig
Substituted make install for checkinstall as it creates a deb package for easier removal/re-install by dpkg. Running ldconfig avoids an ImportError for libtorrent-rasterbar.so, a result of Python being unable to find the main library.
- Verify libtorrent and the python bindings are installed correctly:
python3 -c "import libtorrent; print (libtorrent.version)"
>> 1.0.6.0
Temporary Swap File for Rasperry Pi or low memory systems
Compiling libtorrent requires a lot of memory/swap during the make process ~1-2GB.
If you get an internal error during the make phase on a computer with low memory and/or no swap partition (verify with free -m ) you can try the below procedure.
- Create a 1GB empty swap file, (use a drive location that has enough free space):
dd if=/dev/zero of=/.swapfile bs=1M count=1024
- Format swap file:
mkswap /.swapfile
- Activate swap file:
sudo swapon /.swapfile
- Verify swap file is recognized:
swapon -s
- Start/restart your libtorrent build.
- Disable swap file:
swapoff /.swapfile
- Delete swap file:
rm -f /.swapfile
How to install it on different platforms?
When downloading your Deluge client, you will find a wide availability of different platforms to choose from.
Download the correct version and follow the next instructions to install Deluge.
How to install Deluge on Ubuntu?
The official repositories of Ubuntu include Deluge, so you might get away with using Ubuntu GUI install from terminal “sudo apt-get install deluge”. Unfortunately, those repositories might be outdated, so you might need to use PPA repository instead. Copy and Paste the following lines in the terminal:
sudo add-apt-repository ppa:deluge-team/ppa
sudo apt-get update
sudo apt-get install deluge
|
1 |
sudo add-apt-repository ppadeluge-team/ppa sudo apt-get update sudo apt-get install deluge |
How to install Deluge on Debian 8.3?
To install Deluge on Debian, you first need to add the repositories to the sources.list with an editor like “nano”.
nano /etc/apt/sources.list
| 1 | nano/etc/apt/sources.list |
Then copy/paste the following lines at the end of the file.
#Deluge PPA
deb http://ppa.launchpad.net/deluge-team/ppa/ubuntu trusty main
deb-src http://ppa.launchpad.net/deluge-team/ppa/ubuntu trusty main
|
1 |
#Deluge PPA deb http//ppa.launchpad.net/deluge-team/ppa/ubuntu trusty main deb-src http//ppa.launchpad.net/deluge-team/ppa/ubuntu trusty main |
Save your changes, then update and install.
apt-get update
apt-get install -t trusty deluged deluge-web
|
1 |
apt-get update apt-get install-ttrusty deluged deluge-web |
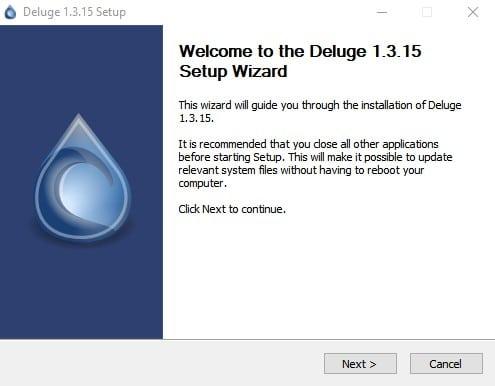
How to install Deluge on Windows?
To install Deluge on Windows platforms is really straightforward. Once downloaded, run the executable file (.exe). If it was downloaded from a source other than deluge-torrent.org, you might want to scan it against Malware.
In the next step, you will need to select the components to install with Deluge.
The client is grayed out because you are installing the client itself, but if you have another torrent client, such as uTorrent and want to leave that client to handle all .torrent files, and let Deluge handle all magnet links, this is your chance to customize which components to manage with Deluge.
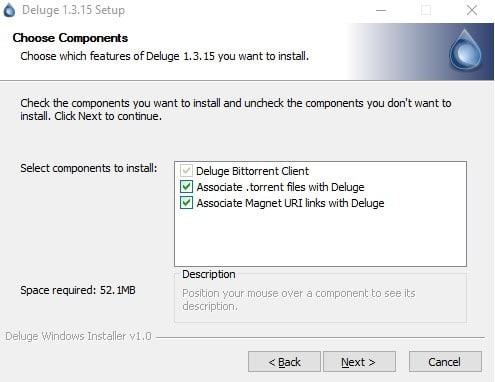
In the next steps, choose your install location and click Install. That’s it… Deluge is installed on your device.
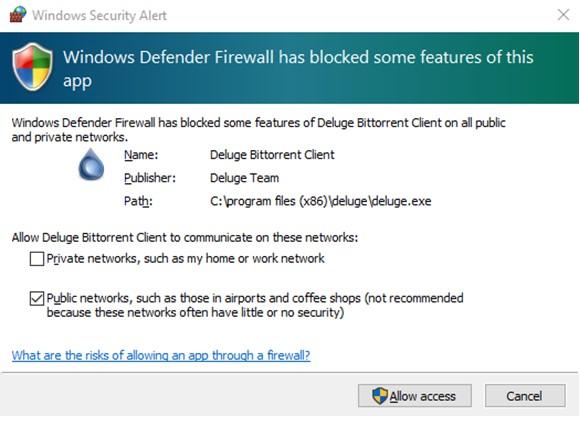
You might be faced with the following Windows Security Alert from the Firewall. It is recommended (as Windows suggests) to leave Deluge client to operate in trusted networks. You might leave Deluge ports open while connected to a public coffee shop’s WiFi, but you can easily be found and probably hacked…
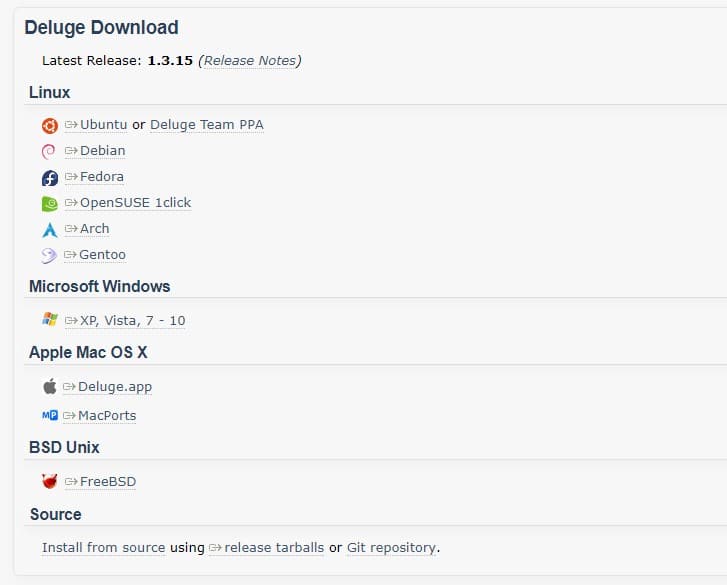
Скачать torrent-client Deluge
Чтобы бесплатно скачать Deluge, нужно воспользоваться приведённой на сайте utorrentfree ссылкой. Программа уже проверена, без вирусов и русифицирована, поэтому скачавшим её людям останется провести установку, подстроить сервис под собственные нужды (с помощью имеющихся в настройках плагинов и расширений) и приступить к загрузке торрентов.
-
Версия: 1.3.15 (32 -bit) for Windows Совместимость: Windows 10, 8, 7, Vista, XP Язык: Английский/ENG Стоимость: Бесплатно/Free -
Версия: 2.0.3 Совместимость: Ubuntu Язык: Английский/ENG Стоимость: Бесплатно/Free -
Версия: 1.3.15 Совместимость: Mac OS X Язык: Английский/ENG Стоимость: Бесплатно/Free
Сообщить о битой ссылке
Configure Deluge Daemon for ThinClient use
Install Deluge daemon following our guide Install Deluge on Ubuntu Server 14.04 LTS or Install and Configure Deluge VPN Split Tunneling Ubuntu 14.x. Once you have a working Deluge daemon that you can access over Deluge Web UI you can proceed with the ThinClient setup. First we need to create a username and password for the client that will access the daemon. We need to edit the authentication file of the daemon.
If you are using an Ubuntu Server version up to 14.04 LTS (that use upstart script), then stop Deluge with
If you are running a version of Ubuntu Server equal or higher then 15.04 (that use systemd), then stop Deluge with
The auth file consists of a line with a username, a password, and the authentication level associated with the client. The authentication level is a work in progress feature in Deluge 1.3.3 and it doesn’t do anything yet, but it will be activated in an upcoming version. We will set it to level 10, admin, which will give the client user full control over Deluge daemon.
- If you installed Deluge Daemon as deluge user, then proceed to Option 1.
- If you have installed Deluge Daemon with VPN Split Tunneling, then proceed to Option 2.
Option 1. Deluge Daemon Installed as deluge User
If you installed Deluge following our guide then you are running Deluge with user deluge.
Choose a and you will use to access Deluge daemon from the client, replace accordingly
Next step is to enable and allow remote connection for the Deluge daemon, open the core.conf file for editing
Find the line
and change it to
Hit Ctrl + X, Y to save and exit.
Now start the Deluge daemon service, on Ubuntu Server up to 14.04 LTS with
on Ubuntu Server starting from version 15.04 with
Option 2. Deluge Daemon Installed as vpn User for Split Tunneling
If you installed Deluge daemon with VPN Split Tunnel by following our guide, then you are running Deluge daemon as vpn user.
Choose a and you will use to access Deluge daemon from the client, replace accordingly
Next step is to enable and allow remote connection for the Deluge daemon
Find the line
and change it to
Hit Ctrl + X, Y to save and exit.
Now start the Deluge daemon service, on Ubuntu Server up to 14.04 LTS with
On Ubuntu Server starting from version 15.04 with
Windows
- Download and install/extract these packages:
- MS VC++ Compiler for Python
- OpenSSL requirement needs .
- Python 2.7
- MSVC 2008 SP1 Redist Package (x86)
- .NET Framework 3.5
- Boost
- libtorrent
- Setup the Windows Command Prompt by executing VC for Python vcvarsall.bat, e.g.:
"%USERPROFILE%\AppData\Local\Programs\Common\Microsoft\Visual C++ for Python\9.0\vcvarsall.bat"
Note: If using Visual Studio simple open a Visual Studio 2008 Command Prompt.
- Boost Build Steps:
- Create a Boost user-config.jam file in the toplevel folder (e.g. C:\boost) with the following to force msvc version:
using msvc : 9.0 : : <setup>"%USERPROFILE%\\AppData\\Local\\Programs\\Common\\Microsoft\\Visual C++ for Python\\9.0\\vcvarsall.bat" ;
Note: For Visual Studio, simply using msvc : 9.0 ; is required.
- libtorrent Build Steps:
- Setup the Environmental Variables:
set BOOST_BUILD_PATH=C:\boost
set PATH=%BOOST_BUILD_PATH%;%PATH%
- Navigate to libtorrent Python bindings folder:
cd C:\libtorrent-rasterbar\bindings\python
- Build libtorrent with Python bindings:
b2 boost=source libtorrent-link=static geoip=static boost-link=static release optimization=space encryption=openssl include=C:\OpenSSL-Win32\include linkflags=/LIBPATH:C:\OpenSSL-Win32\lib -j%NUMBER_OF_PROCESSORS% --hash
Note1: Modify the paths for OpenSSL if installed to a different location. Note2: For libtorrent versions <=1.0.6 rename libtorrent-link to link.
- Setup the Environmental Variables:
Upon a successful build the library file named libtorrent.pyd is created in the current bindings/python directory.
Debugging libtorrent on Windows
- Download and install just the debug tools
Standalone Debugging Tools for Windows (WinDbg)
:
- Build libtorrent with debug enabled by changing release to debug in the b2 build line.
- Open windbg (C:\Program Files\Debugging Tools for Windows (x86)\windbg.exe):
- File|Open Executable and tick Debug child processes
- Hit F5 or Go a few times to get the program running
- After the crash execute: !analyze -v -f.
- Symbols for libtorrent will be in the build output path:
C:\libtorrent-rasterbar\bindings\python\bin\msvc-9.0\debug\boost-source\geoip-static\link-static\optimization-space\threading-multi
So the full symbols line should look something like this:
srv*;C:\libtorrent-rasterbar\bindings\python\bin\msvc-9.0\debug\boost-source\geoip-static\link-static\optimization-space\threading-multi;C:\Python27\symbols;srv*c:\Symbols*http://msdl.microsoft.com/download/symbols
Debug References:
- Mozilla WinDbg stacktrace
- Windbg for Beginners
Daemon
Deluge works with a client/server model. The server is referred to as the daemon and runs in the background waiting for a client (console, gtk, or web-based) to connect. The client can disconnect but the daemon continues to run transferring the torrent files in the queue.
Upon installation, pacman will create a non-privileged deluge user. This user is meant to run the provided daemon, . Users are able to start the daemon several ways:
- Systemd system service (runs as the deluge user).
- Systemd user service (runs as another user).
- Running it directly (runs as another user).
Tip: For the highest level of security, running via the systemd system service () is recommended since the deluge user has no shell access (limited account) or other group affiliation on the host system. In addition to the security benefits of running as the non-privileged deluge user, the system service can also run at boot without the need to start Xorg or a client.
User service
Warning: If multiple users are running a daemon, the default port (58846) will need to be changed for each user.
A user service will allow to run when is started. This is accomplished by creating a user service file:
/etc/systemd/user/deluged.service
Description=Deluge Daemon
After=network.target


ExecStart=/usr/bin/deluged -d -P %h/.config/deluge/deluge.pid


WantedBy=default.target
The deluge user service can now be started and enabled by the user.
The user service can also be placed in . See systemd/User for more information on user services.
Пользовательский опыт
На первый взгляд Deluge может выглядеть просто и немного устаревшим по сравнению с другими клиентами BitTorrent, такими как Vuze. Тем не менее, как только вы начнете использовать его, Deluge делает для себя случай с простым интерфейсом и широкими возможностями.
Огромное количество плагинов, которые поддерживает этот клиент, позволяет пользователю очень легко получить максимум от Deluge. Он использует libtorrent для поддержки бэкэнда и предоставляет доступ к нескольким пользовательским интерфейсам..
Как клиент BitTorrent, Deluge предлагает множество вариантов получения поддержки, таких как электронная почта и часто задаваемые вопросы, если у вас есть какие-либо вопросы. На официальном сайте представлен широкий спектр инструкций по установке и использованию для всех платформ..
У сообщества также есть полезный модерируемый форум, чтобы помочь, округляя поддержку приятно.
(Изображение предоставлено: Deluge)
POST /streaming/stream
POST body must be the raw torrent you want to stream. No form formatting or anything can be used.
List of URL GET Arguments
- path: Path inside the torrent file to either a folder or a file you want to stream. The plugin will try to guess the best one. Optional. Default: » (i.e. find the best file in the whole torrent)
- infohash: Infohash of the torrent you want to stream, can make it a bit faster as it can avoid reading POST body. Optional.
- label: If label plugin is enabled and the torrent is actually added then give the torrent this label. Optional. Default: »
- wait_for_end_pieces: Wait for the first and last piece in the streamed file to be fully downloaded. Can be necessary for some video players. It also enforces that the torrent can be actually downloaded. If the key exist with any (even empty) value, the feature is enabled. Optional. Default: false
The Pros and the Cons.
Still trying to make up your mind?
Most of the basic characteristics that define a real torrent client are not considered an advantage, but a necessity. Deluge is one of those real torrent clients with all basic features.
The PROs;
- It does not come with embedded advertisements.
- Its functionality can be improved with the help of plugins.
- Deluge is open source and free.
- It is super light (always under 15MB).
- It can encrypt BitTorrent traffic through the use of MSE/PE or Message Stream. Encryption/Protocol Encryption.
- It is highly portable. It can be installed on a USB and ran directly from it.
- Deluge comes with all the torrent basic features, such as DHT, PEX, prioritization, Magnet Links, etc.
- It has a graphical web and command line interface (with daemon).
- It allows automatic port mapping with UPnP, NAT-PMP, NAT for automatic router configuration.
The CONs;
Deluge is almost perfect, but serious torrent users have been able to find a couple of disadvantages that make the program not so perfect…
- Not able to override queuing settings or “Force start” downloads.
- There is no built-in search engine.
- It is unable, by default, to stream media files while a download is in progress. But there is a workaround that will enable you to stream videos, the plugin is called Deluge Streaming.
- Limited magnet URI functionality. There is no way to get information about torrent content in a magnet link until the download has started.
- No super-seeding setting enabled by default. But you can apply this plug-in to get around this issue.
- It does not allow tracker exchange functionality.
- Lack of web seeding support
- Not able to share files with an embedded tracker.
- The demon consumes large CPU resources as compared with other clients.
Developer Install
Installing Deluge with develop mode creates binaries that link back to source code. Therefore changes will be reflected immediately with no need to repeatedly install.
python setup.py develop
If you wish to use a specific development directory, the following will create a Deluge install in ~/delugeDev:
export PYTHONPATH=${HOME}/delugeDev
python setup.py develop --install-dir ~/delugeDev
Do have the included plugins available, build them with
python setup.py build_plugins develop
Another alternative for a separate Deluge development environment is to use Python Virtualenv
Removing From System
In the unlikely event you want to remove Deluge installed by the previous method, you will have to manually delete the Deluge related files on your system. The main files are normally installed in one of the following places:
/usr/lib/python2.x/site-packages
/usr/local/lib/python2.x/site-packages
/usr/lib/python2.x/dist-packages
/usr/local/lib/python2.x/dist-packages
Example:
sudo rm -r /usr/lib/python2.7/dist-packages/deluge*
To find and remove the remaining files use the locate command and to ensure up-to date information also run updatedb:
sudo updatedb
locate deluge
English[edit]
Nounedit
deluge (plural )
- A great flood or rain.
- The deluge continued for hours, drenching the land and slowing traffic to a halt.
- An overwhelming amount of something; anything that overwhelms or causes great destruction.
- The rock concert was a deluge of sound.
-
1667, John Milton, “Book 1”, in Paradise Lost. A Poem Written in Ten Books, London: … ,…, OCLC ; republished as Paradise Lost in Ten Books:…, London: Basil Montagu Pickering…, 1873, OCLC :
- A fiery deluge fed / With ever-burning sulphur unconsumed.
-
1848, James Russell Lowell, The Vision of Sir Launfal
- The little bird sits at his door in the sun, / Atilt like a blossom among the leaves, / And lets his illumined being o’errun / With the deluge of summer it receives.
-
(military engineering)
2002, NAVEDTRA, Gunner’s Mate 14324A
In the event of a restrained firing or canister overtemperature condition, the deluge system sprays cooling water within the canister until the overtemperature condition no longer exists.A damage control system on navy warships which is activated by excessive temperature within the Vertical Launching System.
Translationsedit
a great flood
|
|
overwhelming rain
|
an overwhelming amount of something
|
|
Verbedit
deluge (third-person singular simple present , present participle , simple past and past participle )
-
() To flood with water.
- Some areas were deluged with a month’s worth of rain in 24 hours.
2020 July 29, Andrew Roden, “ORR demands more action on weather resistance”, in Rail, page 21, photo caption:South Yorkshire 2019: The track at Conisbrough is deluged by floodwater. Lines were shut and services were disrupted across Yorkshire and the East Midlands.
-
() To overwhelm.
- After the announcement, they were deluged with requests for more information.
Translationsedit
to flood with water
|
|
to overwhelm
|
|
1996, T.F. Hoad, The Concise Oxford Dictionary of Etymology, Oxford University Press, →ISBN
inundate
Troubleshooting
No torrents appear in the list when creating a new subscription
If no torrents appear in the list in the subscription dialog, but they show up fine in your web browser, the problem is likely that the web server requires some cookies. The cookies are added automatically by the browser, but you’ll have to add them manually to YaRSS2.
There are a lot of guides on how to find the correct cookie values (most torrent sites that require cookies have some guide or forum thread where this is explained).
- Find the necessary cookie values for your tracker in your web browser.
- Go to the settings tab in YaRSS2 in the preferences and click the cookies tab at the bottom.
- Provide the base URL of the tracker in the «Site URL» field. If the address is www.address.com/rss+23423r/whatever++, use only www.address.com
- Add each value/pair as they are stored in your browser.
- Save the cookies and test if this works in the subscription dialog.
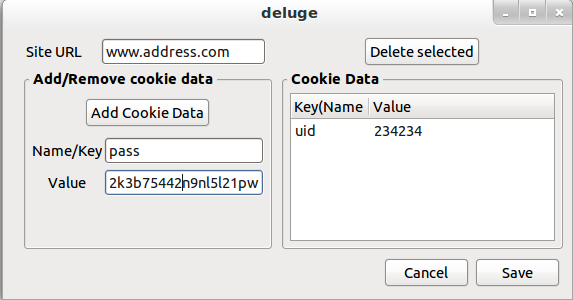
The pass and uid keys are just examples, and might be named differently on your tracker.
Dealing with feeds that are missing a pubDate tag
Some trackers publish RSS feeds that do not have the standard pubDate tag for each item that contains the timestamp of when the item was added to the feed. Without this tag, YaRSS2 cannot process the feed, as it has no way of knowing a new item from an old one. Most of these trackers DO include a timestamp somewhere in each item’s entry, but if it’s not in the pubDate tag, then YaRSS2 doesn’t find it. To solve this, you can contact the feed’s publisher and request that they conform to the RSS standard and include the pubDate tag in their feed. When they tell you to go pound sand, fear not. There is a workaround that’s fairly easy. To add the pubDate tag into an existing RSS feed yourself, you can use a service from Yahoo called Pipes:
Yahoo has pretty good documentation for this tool, so you should be able to figure out the Pipes tool after a little experimenting. Here’s a general guideline of how to add the missing pubDate tag:
- Open the RSS feed in a web browser and view the page’s source. You’ll see all the tags for each item. Identify the tag that contains the published date.
- Create a Yahoo account and build a new pipe. String the following modules together in the following order.
- Use the fetch feed module to read the source feed.
- Then use the rename module to copy the tag containing the date into a new tag called pubDate.
- You may need to use the regex module to strip all but the time and date out of your new pubDate tag.
- Use the Create RSS module to map the tags to conform to RSS standard.
- Save and run the pipe. Click on «get as RSS» and use the link it generates as your RSS source in YaRSS2.
- Enjoy. The feed now has a proper timestamp tag and should work.
Hopefully this will help some people get their favourite feeds working with YaRSS2.
Email notifications
For gmail, the following settings works:
| SMTP server | smtp.gmail.com |
| Port | 587 |
| From email address | name @ gmail.com |
| Username | same as your email address |
| Password | app password |
Create SSH Tunnel
From Deluge 1.2 onward, all communication between the GTK UI and daemon is encrypted using a automatically generated self-signed certificate so SSH tunneling is not a requirement if you are on a trusted local network. If you access the daemon over the internet, you should still use a SSH tunnel.
In a Terminal, enter the following, replacing <server> with the public IP of your server.
ssh -fNL 127.0.0.2:58846:localhost:58846 <server>
Note: We use 127.0.0.2 instead of localhost so that Deluge client knows that we are connecting to a remote daemon. Otherwise you will encounter problems with file browsing as it will assume to be on local client machine rather than remote server.
If you get the error ‘bind: Can't assign requested address‘, you need to add 127.0.0.2 as an alias for the loopback device:
sudo ifconfig lo0 add 127.0.0.2
Deluge Daemon Setup
The Deluge daemon deluged and deluge-console should be installed on the server.
See the service guides to run deluged as a service so that it starts/stops on server boot/shutdown. Substitute any daemon start or stop commands below with the appropriate service commands.
To debug any problems setting up deluged and check for errors.
Create Default Config
To create the config directory and populate with the default files, run and then stop deluged. (If using a service substitute appropriate operating system commands):
deluged
killall deluged
Note: The config location is either the with reference to the user that deluged is running as. Alternatively if using a service it will be specified in the service config files with -c <path> option.
Add User to the authentication file
Create a Deluge user for clients/UIs to access the daemon by editing the authentication file, auth, located in the above config location.
The auth file should consist of lines of <username>:<password>:<level>. Replace <username> and <password> with your choice and <level> with the desired authentication level.
You can use your favourite text editor to achieve this or can be done with a one-line echo command e.g.:
echo "alice:MyC0mpL3xPass:10" >> ~/.config/deluge/auth
Enable Remote Connection
We will use deluge-console to configure deluged to accept connections from computers other than localhost. For SSH Tunnelling you do not need to enable remote connections so this step can be skipped.
Using the Console in command-line mode, set the allow_remote option and then verify with these commands:
deluge-console "config -s allow_remote True"
deluge-console "config allow_remote"
If you are running deluged under another user (e.g. deluge) you will need to temporarily login as that user to enable deluge-console to access that daemon’s config:
su --shell /bin/bash --login deluge
Alternatively you can edit core.conf (deluged must not be running) in the config and change allow_remote from false to true.
Verify Server IP Address
You will need to know the server’s IP address for configuring clients, for private IP: hostname -I or public IP: curl ifconfig.me
Congratulations! The server is now setup for remote client access.