Top 5 remote desktop apps for mac
Содержание:
- #4. Jump Desktop App For OS X
- Ottenere il client Desktop remotoGet the Remote Desktop client
- Informazioni sulla versione beta del client MacWhat about the Mac beta client?
- Connettersi a un gateway Desktop remoto per accedere alle risorse interneConnect to an RD Gateway to access internal assets
- Prise en charge de l’autorisation et de l’authentification enfichables de la passerelle des services Bureau à distanceSupport for Remote Desktop gateway pluggable authentication and authorization
- Remotix VNC & RDP
- Présentation du client de la version bêta MacWhat about the Mac beta client?
- Schermi con spazi separatiDisplays have separate spaces
- Как осуществляется связь?
- Adición de un área de trabajoAdd a workspace
- Zoho Assist
- #2. Apple Remote Desktop App For OS X
- Поддерживаемые устройства вводаSupported input devices
- Подключение по RDP c iPhone / iPad
- NoMachine
- Step 1: Set Up Remote Desktop on Windows 10
- Step 4: Configure Your Remote Connection
- Gérer vos comptes d’utilisateurManage your user accounts
- Step 5: Connect to Windows 10 From Your Mac
- Настройка Microsoft Remote Desktop на Mac для доступа к ПК
- Manage your user accounts
#4. Jump Desktop App For OS X

Download Jump Desktop On Mac
Jump Desktop is a remote desktop application that lets you securely connect to any computer in the world. Compatible with both RDP and VNC, Jump Desktop is secure, reliable and very easy to set up.
Secure:
Jump encrypts the connection between computers to ensure privacy and security. Automatic connections are always encrypted by default. Supports NLA, TLS/SSL encryption for RDP. SSH Tunnelling and SSL/TLS encryption for VNC.
Supercharged Productivity:
Use Mac keyboard shortcuts in Windows. Seamlessly switch between computers without changing the way you use the keyboard. Vastly improves productivity. Fully customizable: Configure your own shortcuts or use the built-in defaults. No other app comes close.
Integrated into OS X
Quickly search and launch computers directly from Spotlight. Sync connections using iCloud. Tightly integrated into Mavericks’ and Yosemite’s power saving technology to give you the best battery life on the go.
RDP features:
* Tested on: Windows 2000, XP, Vista, Windows 7, Windows 8, Server 2003, Server 2008, Server 2008 R2, Server 2012/R2, SBS Server
* RD Broker and Load balancer support.
* RD Gateway support
* Secure: 128-bit RDP, TLS/SSL, FIPS and NLA authentication supported
Supports 8, 16 and 24-bit colors and all RDP performance options
* Printing support: Print directly to a Wi-Fi printer using RDP’s printer redirection feature (exclusive feature on the App Store!)
* Audio streaming
* Console sessions
* Folder sharing
* International keyboard layouts
* SSH support
VNC features:
* The fastest VNC engine on the planet!
* Tested with Mac OS X, TightVNC, RealVNC, UltraVNC, Linux (Ubuntu Remote Desktop)
* Secure: Supports SSH tunneling as well as SSL encryption (SSL only available when using automatic setup)
* Black and white, Grayscale, 8-bit and 16-bit color modes to help manage bandwidth
* Clipboard syncing
* Multiple monitor support
* Supported encodings: copyrect, zrle, tight, (zlib)hextile, zlib, rre, raw, desktop-resize
Jump Desktop Screenshot
JumpDesktop-RDP-For-El-Capitan
JumpDesktop-For-Yosemite
JumpDesktop-Keyboard-Settings
JumpDesktop-Remote-Desktop-SSH
Ottenere il client Desktop remotoGet the Remote Desktop client
Per iniziare a usare Desktop remoto nel computer Mac, segui questi passaggi:Follow these steps to get started with Remote Desktop on your Mac:
- Scaricare il client di Desktop remoto Microsoft dal Mac App Store.Download the Microsoft Remote Desktop client from the Mac App Store.
- .. Se ignori questo passaggio, non puoi connetterti al PC.(If you skip this step, you can’t connect to your PC.)
- Aggiungi una connessione Desktop remoto o una risorsa remota.Add a Remote Desktop connection or a remote resource. Una connessione consente di connettersi direttamente a un PC Windows, mentre una risorsa remota consente di usare un programma RemoteApp, un desktop basato su sessione o un desktop virtuale pubblicato in locale usando connessioni RemoteApp e Desktop.You use a connection to connect directly to a Windows PC and a remote resource to use a RemoteApp program, session-based desktop, or a virtual desktop published on-premises using RemoteApp and Desktop Connections. Questa funzionalità è in genere disponibile negli ambienti aziendali.This feature is typically available in corporate environments.
Informazioni sulla versione beta del client MacWhat about the Mac beta client?
Stiamo testando nuove funzionalità nel canale di anteprima di AppCenter.We’re testing new features on our preview channel on AppCenter. Per dare un’occhiata,Want to check it out? vai a Desktop remoto Microsoft per Mac e seleziona Scarica.Go to Microsoft Remote Desktop for Mac and select Download. Non devi creare un account o accedere ad AppCenter per scaricare la versione beta del client.You don’t need to create an account or sign into AppCenter to download the beta client.
Se hai già il client, puoi verificare la disponibilità di aggiornamenti per assicurarti di usare la versione più recente.If you already have the client, you can check for updates to ensure you have the latest version. Nel client beta seleziona Desktop remoto Microsoft Beta in alto, quindi Controlla aggiornamenti.In the beta client, select Microsoft Remote Desktop Beta at the top, and then select Check for updates.
Connettersi a un gateway Desktop remoto per accedere alle risorse interneConnect to an RD Gateway to access internal assets
Un gateway Desktop remoto consente di stabilire la connessione a un computer remoto in una rete aziendale da qualsiasi posizione in Internet.A Remote Desktop Gateway (RD Gateway) lets you connect to a remote computer on a corporate network from anywhere on the Internet. Puoi creare e gestire i gateway nelle preferenze dell’app o durante la configurazione di una nuova connessione desktop.You can create and manage your gateways in the preferences of the app or while setting up a new desktop connection.
Per impostare un nuovo gateway nelle preferenze:To set up a new gateway in preferences:
- Nel centro connessioni seleziona Preferenze > Gateway.In the Connection Center, select Preferences > Gateways.
-
Seleziona il pulsante + nella parte inferiore della tabella e immetti le informazioni seguenti:Select the + button at the bottom of the table Enter the following information:
- Nome del server : il nome del computer di cui si desidera utilizzare come gateway.Server name – The name of the computer you want to use as a gateway. Puoi usare il nome di un computer Windows, un nome di dominio Internet o un indirizzo IP.This can be a Windows computer name, an Internet domain name, or an IP address. Puoi anche aggiungere informazioni sulla porta al nome del server (ad esempio: RDGateway:443 oppure 10.0.0.1:443).You can also add port information to the server name (for example: RDGateway:443 or 10.0.0.1:443).
- Nome utente -il nome utente e la password da utilizzare per il gateway Desktop remoto si connette.User name — The user name and password to be used for the Remote Desktop gateway you are connecting to. È inoltre possibile selezionare utilizzare le credenziali di connessione da utilizzare il medesimo nome utente e la password come quelle utilizzate per la connessione desktop remoto.You can also select Use connection credentials to use the same user name and password as those used for the remote desktop connection.
Windows Server 2012 R2 a introduit la prise en charge d’une nouvelle méthode d’authentification, l’autorisation et l’authentification enfichables de la passerelle des services Bureau à distance, qui offre plus de souplesse pour les routines d’authentification personnalisée.Windows Server 2012 R2 introduced support for a new authentication method, Remote Desktop Gateway pluggable authentication and authorization, which provides more flexibility for custom authentication routines. Vous pouvez maintenant essayer ce modèle d’authentification avec le client Mac.You can now try this authentication model with the Mac client.
Important
Les modèles d’authentification et d’autorisation personnalisés avant Windows 8.1 ne sont pas pris en charge, bien que l’article ci-dessus les évoque.Custom authentication and authorization models before Windows 8.1 aren’t supported, although the article above discusses them.
Pour en savoir plus sur cette fonctionnalité, veuillez consulter la page https://aka.ms/paa-sample.To learn more about this feature, check out https://aka.ms/paa-sample.
Remotix VNC & RDP
Remotix is an extremely fast, slick and user-friendly remote desktop connection client for Mac.
In fact, If you just need to share the screen of your iPad or iPhone with your Mac, then there are few better RDP clients around.
There’s very little lag in connections made with Remotix to Windows either as it quickly optimizes itself for the speed of your internet connection.
For those new to remote desktop connections, it guides you clearly through the setup process. You can store connection profiles via iCloud backup and even access printers from your remote Mac using Remotix.
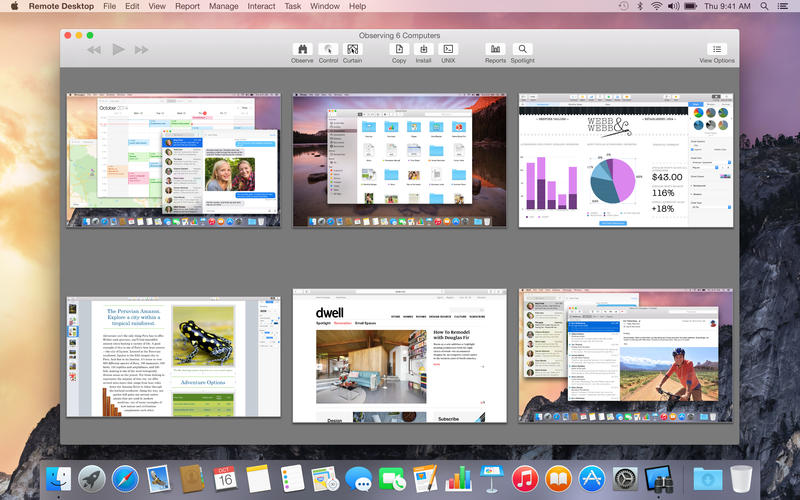
You can clearly see how many connections you’ve got open via the Multiple Computer Observer screen:

Remotix is also one of the most secure RDP clients for Mac available with built-in SSH tunneling for both RDP and VNC.
You can also set a master password to protect all of your connections rather than have to enter individual passwords for each one.
If you’ve been having problems with Back to My Mac, or just want to connect to Macs, Remotix is definitely worth checking-out.
Pricing: Starts at $49.95
Présentation du client de la version bêta MacWhat about the Mac beta client?
Nous testons de nouvelles fonctionnalités sur notre canal de préversion sur AppCenter.We’re testing new features on our preview channel on AppCenter. Vous voulez en savoir plus ?Want to check it out? Rendez-vous sur la page Bureau à distance Microsoft pour Mac et sélectionnez Télécharger.Go to Microsoft Remote Desktop for Mac and select Download. Vous n’avez pas besoin de créer un compte ou de vous connecter à AppCenter pour télécharger le client de la version bêta.You don’t need to create an account or sign into AppCenter to download the beta client.
Si vous avez déjà le client, vous pouvez vérifier si des mises à jour sont disponibles, pour être certain d’avoir la version la plus récente.If you already have the client, you can check for updates to ensure you have the latest version. En haut de la fenêtre du client de la version bêta, sélectionnez Version bêta de Bureau à distance Microsoft, puis Rechercher des mises à jour.In the beta client, select Microsoft Remote Desktop Beta at the top, and then select Check for updates.
Schermi con spazi separatiDisplays have separate spaces
Se si esegue Mac OS X 10.9 ed è stato disabilitato Displays have separate spaces (Schermi con spazi separati) in Mavericks (System Preferences > Mission Control (Preferenze di sistema > Controllo missione)), è necessario configurare questa impostazione nel client Desktop remoto usando la stessa opzione.If you’re running Mac OS X 10.9 and have disabled Displays have separate spaces in Mavericks (System Preferences > Mission Control), you need to configure this setting in the Remote Desktop client using the same option.
Reindirizzamento delle unità per le risorse remoteDrive redirection for remote resources
Il reindirizzamento delle unità è supportato per le risorse remote e consente di salvare localmente nel computer Mac i file creati con un’applicazione remota.Drive redirection is supported for remote resources, so that you can save files created with a remote application locally to your Mac. La cartella reindirizzata è sempre la home directory visualizzata come un’unità di rete nella sessione remota.The redirected folder is always your home directory displayed as a network drive in the remote session.
Nota
Per usare questa funzionalità, l’amministratore deve definire le impostazioni appropriate nel server.In order to use this feature, the administrator needs to set the appropriate settings on the server.
Как осуществляется связь?
Теперь несколько слов о том, как работает RDP-клиент для Windows 7 или других систем. Как правило, по умолчанию для доступа к удаленному терминалу используется семейство протоколов ITU T. 120, порты 3389 для TCP и 443 для HTTPS.
Чтобы не вникать в технические подробности, работу таких программ можно объяснить намного проще. RDP-клиенты реагируют на события, производимые на компьютере, с которого осуществляется доступ (нажатие клавиш на клавиатуре, действия с мышью и т. д.), после чего через собственный драйвер передают их аналогичным устройствам на удаленном терминале, а затем, опять же при помощи своего собственно видеодрайвера, отображают содержимое на экране и формируют обратную отправку пакетов клиенту RDC (терминалу, с которого осуществляется управление).
Adición de un área de trabajoAdd a workspace
Suscríbete a la fuente que te proporcionó el administrador para obtener la lista de recursos administrados que tienes a tu disposición en el dispositivo macOS.Subscribe to the feed your admin gave you to get the list of managed resources available to you on your macOS device.
Para suscribirte a una fuente:To subscribe to a feed:
- Selecciona Add feed (Agregar fuente) en la página principal para conectarte al servicio y recuperar los recursos.Select Add feed on the main page to connect to the service and retrieve your resources.
-
Escribe la dirección URL de la fuente.Enter the feed URL. Puede ser una dirección URL o una dirección de correo electrónico:This can be a URL or email address:
-
Esta dirección URL suele ser una URL de Windows Virtual Desktop.This URL is usually a Windows Virtual Desktop URL. La que use dependerá de la versión de Windows Virtual Desktop que esté usando.Which one you use depends on which version of Windows Virtual Desktop you’re using.
- Para Windows Virtual Desktop (clásico), use .For Windows Virtual Desktop (classic), use .
- Para Windows Virtual Desktop, use .For Windows Virtual Desktop, use .
- Para usar un correo electrónico, escribe tu dirección de correo:To use email, enter your email address. Esto indica al cliente que busque una dirección URL asociada a tu dirección de correo electrónico si el administrador lo ha configurado así.This tells the client to search for a URL associated with your email address if your admin configured the server that way.
-
Esta dirección URL suele ser una URL de Windows Virtual Desktop.This URL is usually a Windows Virtual Desktop URL. La que use dependerá de la versión de Windows Virtual Desktop que esté usando.Which one you use depends on which version of Windows Virtual Desktop you’re using.
- Selecciona Subscribe (Suscribirse).Select Subscribe.
- Inicia sesión con tu cuenta de usuario cuando se te solicite.Sign in with your user account when prompted.
Después de iniciar sesión, verás una lista de los recursos disponibles.After you’ve signed in, you should see a list of available resources.
Una vez suscrito a una fuente, el contenido de la fuente se actualizará automáticamente de forma periódica.Once you’ve subscribed to a feed, the feed’s content will update automatically on a regular basis. Se pueden agregar, cambiar o quitar recursos en función de los cambios que realice el administrador.Resources may be added, changed, or removed based on changes made by your administrator.
Exportación e importación de conexionesExport and import connections
Puede exportar una definición de conexión a Escritorio remoto y usarla en otro dispositivo.You can export a remote desktop connection definition and use it on a different device. Los escritorios remotos se guardan en archivos RDP separados.Remote desktops are saved in separate RDP files.
Para exportar un archivo RDP:To export an RDP file:
- En Connection Center, haz clic con el botón derecho en el escritorio remoto.In the Connection Center, right-click the remote desktop.
- Selecciona Export (Exportar).Select Export.
- Vaya a la ubicación donde quiere guardar el archivo RDP del escritorio remoto.Browse to the location where you want to save the remote desktop RDP file.
- Seleccione Aceptar.Select OK.
Para importar un archivo RDP:To import an RDP file:
- En la barra de menús, haz clic en File > Import (Archivo > Importar).In the menu bar, select File > Import.
- Vaya al archivo RDP.Browse to the RDP file.
- Selecciona Open (Abrir).Select Open.
Zoho Assist
Zoho Assist is easily the best remote desktop software for Mac users when it comes to remote support and unattended remote access of both Macs and PCs.
Zoho Assist is an amazing all round remote access software that’s not just for customer support but also makes it ridiculously easy to connect, access or control another computer or mobile device.
It’s also probably the best deal on the market for remote access software on this level with a limited Free Forever plan and paid plans starting at just $10 per month.

Although Zoho Assist can be used by anyone, it’s ideal for Customer Support and IT Professionals, IT Help Desks, Outsourced IT and MSP Support.
Some of the nice advanced touches in Zoho Assist include remote printing and custom branding of your company or organization.
Zoho Assist is also one of the most secure remote desktop tools for Mac users with no prior installation required at either end.
There are a range of extra security measures taken by Zoho Assist such as two factor authentication, SSL and 256-bit encryption and action log viewer to see who’s accessing your network in real time.
You can try Zoho Assist free to see for yourself.
You can also read our full review of Zoho Assist for more.
Pricing: Limited Free Forever plan / Paid plans start at $10 per month
#2. Apple Remote Desktop App For OS X
Download Apple Remote Desktop
Apple Remote Desktop is the best way to manage the Mac computers on your network. Distribute software, provide real-time online help to end-users, create detailed software and hardware reports, and automate routine management tasks — all from your own Mac.
Software Distribution:
-Easily copy and install software on remote Mac systems.
-Encrypt network data when copying packages and files.
-Configure a Task Server to assist with package installations on offline computers.
Remote Assistance:
-Observe and control your Mac computers.
-Transfer files between Mac computers using Drag and Drop.
-Copy and paste information between any two computers.
-Prevent end-users from viewing the screen while you control their systems with Curtain Mode.
-Control Virtual Network Computing (VNC)–enabled computers including Windows, Linux and UNIX systems.
Remote Administration:
-Perform over a dozen commands securely on remote Mac systems.
-Remotely lock screens, sleep, wake, restart and shutdown of Mac systems.
-Execute UNIX shell scripts or commands on your client systems.
Asset Management and Reporting:
-Perform lightning-fast searches with Remote Spotlight search.
-Gather reports on more than 200 Mac hardware attributes.
-See reports on user logins and application use.
-Use a Task Server to assemble inventory reports, even from mobile systems not connected to the network.
Automation:
-Automate routine management tasks
-Get started immediately with over 40 actions.
-Chain actions together to create powerful system administration workflows.
-Combine actions with other application actions to create end-to-end solutions.
-Save workflows as plug-ins to provide simple, customized interfaces to Apple Remote Desktop features.
Apple Remote Desktop App Screenshot
Apple-Remote-Desktop-App-Settings
Apple-RDP-App-Clients
Apple-RDP-App-Connnect-Windows-10
Apple-RDP-Linux-Ubuntu
Поддерживаемые устройства вводаSupported input devices
Для клиента в качестве специальной возможности доступна поддержка Bluetooth-мыши в iOS 13 и iPadOS.The client has Bluetooth mouse support for iOS 13 and iPadOS as an accessibility feature. Для более глубокой интеграции можно использовать мышь Swiftpoint GT или ProPoint.You can use Swiftpoint GT or ProPoint mice for deeper mouse integration. Клиент также поддерживает внешние клавиатуры, совместимые с iOS и iPadOS.The client also supports external keyboards that are compatible with iOS and iPadOS.
Дополнительные сведения о поддержке устройств см. в статье Что нового в клиенте iOS и в iOS App Store.For more information about device support, see What’s new in the iOS client and the iOS App Store.
Совет
Swiftpoint предлагает эксклюзивную скидку на мыши ProPoint для пользователей клиента iOS.Swiftpoint is offering an exclusive discount on the ProPoint mouse for iOS client users.
Подключение по RDP c iPhone / iPad
Для того, что бы подключиться с iPhone или iPad необходимо установить на него RDP клиент. Рекомендуем использовать «Microsoft Remote Desktop» от компании Майкрософт1. Запустите Microsoft Remote Desktop» и нажмите «+» в правом верхнем углу для добавления нового сервера: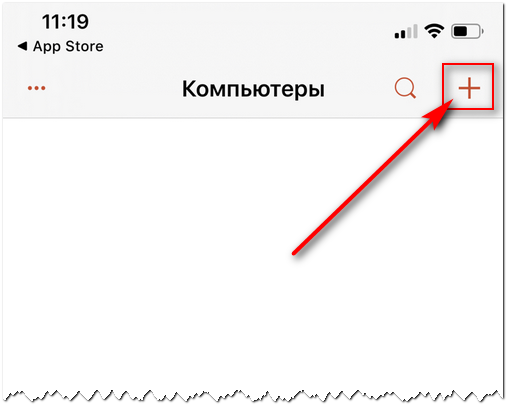 2. Выберите из предложенного списка «Добавить компьютер»:
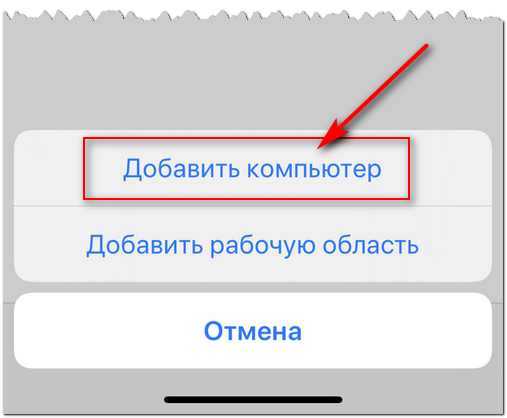 3. В открывшейся форме добавления нового сервера нажмите на поле «Имя копьютера»:
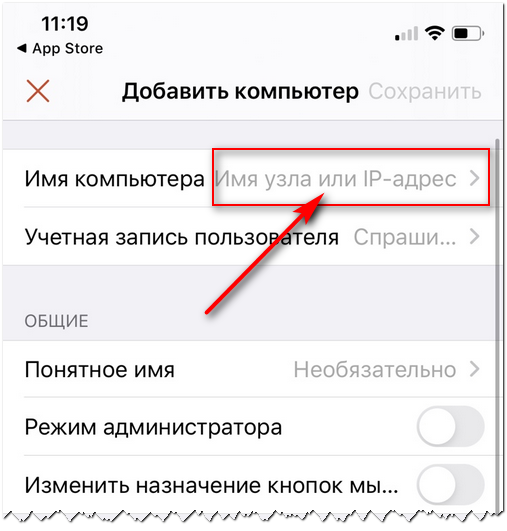 4. Введите IP адрес вашего аккаунта (указан у вас в личном кабинете, в меню Услуги — Мои аккаунты — кнопка Управление) в поле Имя ПК (водить адрес нужно полностью, вместе с :4443 в конце). Внимательно проверьте его, ошибка в адресе — наиболее частая причина проблем с подключением! Затем нажмите стрелочку «назад» в верхнем левом углу экрана:
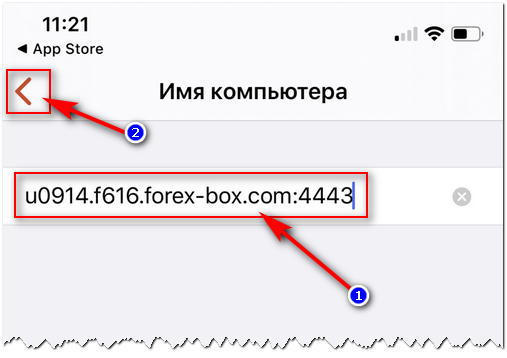 5. Нажмите на поле «Учетная запись пользователя»:
 6. На следующем экране выберите Добавление учетной записи пользователя:
 7. Откроется форма добавления новой учетной записи (имени пользователя и его пароля):
 8. В поле Имя пользователя введите ваше имя пользователя (выглядит как UXXXX), в поле Пароль — скопируйте и вставьте ваш пароль из личного кабинет (вводить его вручную не рекомендуется, что бы исключить ошибки, так как некоторые символы могут быть очень похожи (1 (один) и l (маленькая L) или I (большая i), 0 (ноль) и O (большая о) и т.д.). Поле «Понятное имя» можно оставить пустым или продублировать там Имя пользователя. Затем нажмите Сохранить в правом верхнем углу экрана:
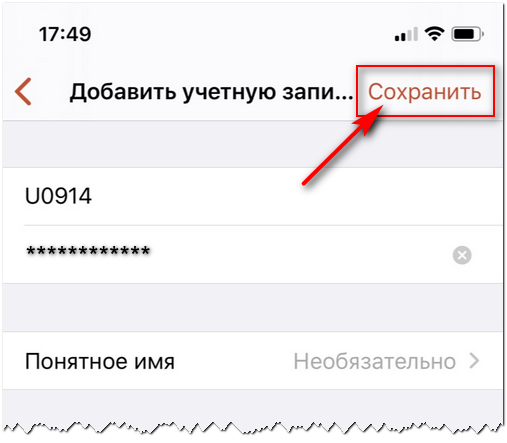 9. Убедитесь, что выбрано нужное имя пользователя (отмечено галочкой) и нажмите стрелочку «Назад» в верхнем левом углу:
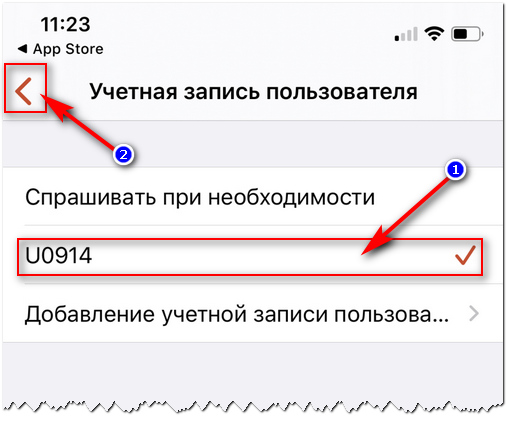 10. Убедитесь, что: (1) переключатель Режим администратора ВЫКлючен,(2) поле Шлюз не заполнено («нет настроенного шлюза»)(3) переключатели Буфер обмена и (4) Хранилище включеныВ поле Понятное имя можно указать призвольное название подключения (например «ForexBOX U0419»), которое будет отображаться у вас в списке подключений. Если оставить его пустым, тогда в списке будет показываться значение из поля «Имя компьютера».Затем нажмите «Сохранить» в правом верхнем углу экрана:
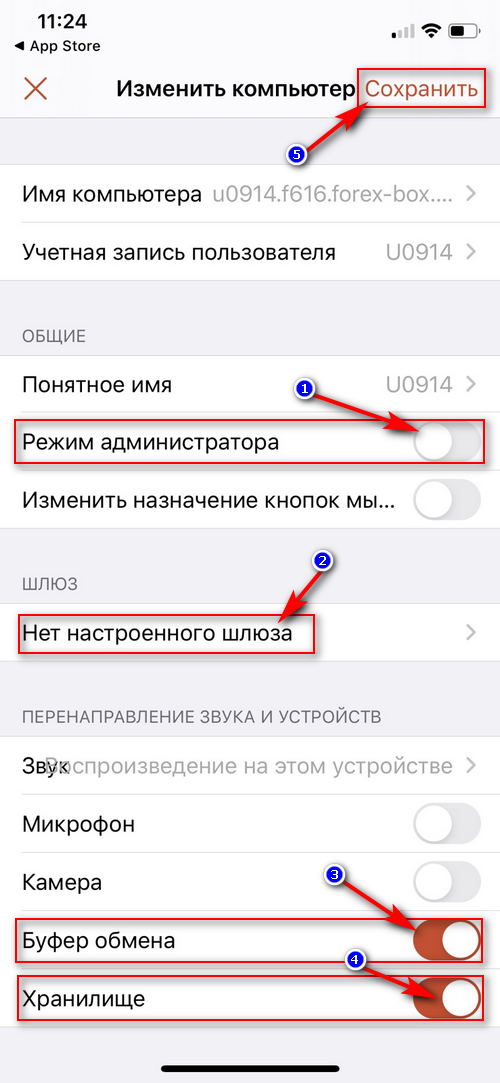 11. Создание нового подключения завершено, и оно отобразится в списке на главном экране приложения:
 12. Для подключения к серверу, нажмите на иконку созданного подключения. При подключении в первый раз может появиться предпреждение системы безопасности. Установите галочку «Больше не спрашивать для этого ПК» и нажмите Принять:
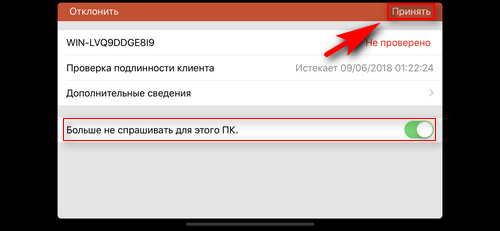
Возможные ошибки при подключении:
«Учетная запись пользователя не подошла» 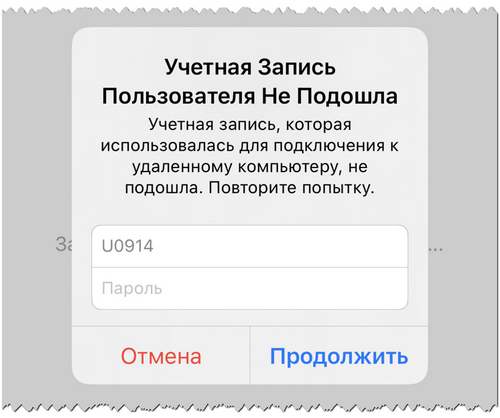 Эта ошибка означает, что вы допустили ошибку в имени пользователя или пароле. Они будут запрошены еще раз. Внимательно введите их еще раз (что бы исключить ошибки, пароль нужно скопировать в личном кабинете и вставить в поле ввода).»Доступ к требуемому сеансу отклонен»
 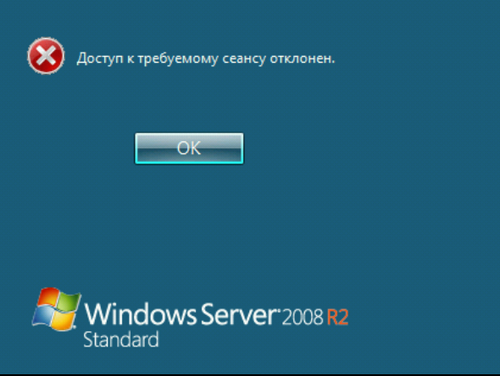 Эта ошибка означает, что у вас в настройках подключения установлен (включен) переключатель «Режим администратора» (вы не выполнили пункт 10.1 инструкции).»Could not connect to the remore PC»
 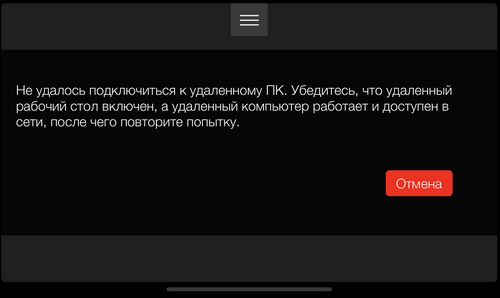 Причина ошибки может быть в не правильно указанном IP адресе (пункт 4 инструкции), вашем операторе сотовой связи или провайдере (он может блокировать доступ к 3389 порту, используемом для RDP подключения. Попробуйт подключиться через Wi-Fi или другое подключение), или же с настройками вашего телефона (например, ограничение интернета для приложений, лимит трафика, разрешения на доступ в сеть и т.д.) Инструкция по настройке подключения для смартфонов и планшетов на базе андроид. Если вы используете другой RDP клиент на вашем устройстве и у вас есть сложности с настройкой — обратитесь к его документации или автору за помощью.
Также читают
Проблемные советники, зависания МТ4 и перерасход ресурсов (просмотров: 2805)
Как изменить пароль для подключения по RDP (просмотров: 2848)
Пересоздание (переустановка) аккаунта (просмотров: 1390)
Автоматический перезапуск терминала по расписанию (просмотров: 7812)
Как удалить советник не запуская терминал МТ (просмотров: 854)
NoMachine
NoMachine is a slick Remote Desktop Client which tends to go under the radar when Mac users are looking for remote desktop software but is definitely worth a look.
NoMachine looks great on macOS, is very easy to set up and use and there’s a free version for limited connections.
The good thing about NoMachine is all you need to connect to another machine over the internet is its IP address and port number.
It’s incredibly easy to use and setup with no manual configuration required.
A setup wizard clearly takes you step-by-step through the connection process. Connections are stable and fast and there’s a NoMachine forum where you’ll get help with any problems you might have with the client.
There’s also an extensive knowledge base for those with more technical needs but generally, you shouldn’t have many problems if you just need NoMachine for basic remote connections.
NoMachine for Mac is free for personal use but there are paid Enterprise and Cloud editions available.
Pricing: Starts at $44.50
Step 1: Set Up Remote Desktop on Windows 10
Microsoft Remote Desktop requires Windows 10 Pro or Enterprise, or Windows Server. The software runs on Microsoft’s proprietary RDP protocol, which isn’t available on the standard Windows 10 Home Edition. If you need to connect to a PC running Home, one of the best remote access tools will help you out.
The first steps to set up Remote Desktop for Mac occur on your Windows computer.
On your Windows 10 machine, open the Start menu and go to Settings > System > Remote Desktop. Set Enable Remote Desktop to On, and click Confirm when prompted.
Advertisement
Your PC needs to be on and awake for you to connect remotely. You might therefore want to activate the Keep my PC awake option. To do this, click Show settings alongside it and set Sleep to Never. You should probably only do this if you need constant remote access to the computer. If you don’t, then allowing it to sleep is wise.
Next, scroll down to User accounts. By default, the account you’re logged into will automatically have remote access permissions. To allow other users to log in remotely, click Select users to add their usernames.
Advertisement
Get Your PC Name and IP Address
Finally, you need to grab a couple of pieces of info before you switch over to your Mac. On the same Remote Desktop menu, under How to connect to this PC, make a note of your PC name.
If the current name is generic and you’d like to make it something that’s easier to remember, switch to the About tab and click Rename this PC.
Next, you need to find your computer’s IP address on your network. Go to Settings > Network & Internet. Select Wi-Fi (or Ethernet if you using a wired connection), then click on the network you’re connected to.
Advertisement
This opens the network connection properties screen. Scroll to the bottom of the page and locate the IPv4 address in the list. Make a note of this number.
Step 4: Configure Your Remote Connection
Click Show More to change your settings. Here, you’re able to configure how your remote connection works:
- In the General tab, add a Friendly Name to make a computer recognizable if you’ve got more than one connection set up.
- Under the Display tab, click Fit session to window if you aren’t planning on using the remote connection in full screen mode. Also, set Optimize for Retina Displays if you’re working on a high-res monitor.
- In the Sound tab, choose which computer should play sound (if either), and whether you want to be able to use your Mac’s microphone.
However, the most important option is Local Resources.
This allows you to make certain folders on your Mac accessible within your remote Windows session. You can access these folders through the Windows File Explorer, where you’ll find them under This PC. You can work with files stored on your Mac in a Windows app, or copy files between the machines.
It’s all contained within the remote session, however. Sharing a folder in this way does not make the folder accessible on the physical Windows computer.
Click Save to finish setting up your connection.
Gérer vos comptes d’utilisateurManage your user accounts
Quand vous vous connectez à un bureau ou à des ressources distantes, vous pouvez enregistrer les comptes d’utilisateur pour les resélectionner ultérieurement.When you connect to a desktop or remote resources, you can save the user accounts to select from again. Vous pouvez gérer vos comptes d’utilisateur à l’aide du client Bureau à distance.You can manage your user accounts by using the Remote Desktop client.
Pour créer un compte d’utilisateur :To create a new user account:
- Dans le Centre de connexion, sélectionnez Paramètres > Comptes.In the Connection Center, select Settings > Accounts.
- Sélectionnez Ajouter un compte d’utilisateur.Select Add User Account.
-
Entrez les informations suivantes :Enter the following information:
- Nom d’utilisateur : nom d’utilisateur à enregistrer pour l’utiliser avec une connexion à distance.User Name — The name of the user to save for use with a remote connection. Entrez le nom d’utilisateur dans un de ces formats : nom_utilisateur, domaine\nom_utilisateur ou user_name@domain.com.You can enter the user name in any of the following formats: user_name, domain\user_name, or user_name@domain.com.
- Mot de passe : mot de passe associé à l’utilisateur spécifié.Password — The password for the user you specified. Chaque compte d’utilisateur que vous souhaitez enregistrer pour les connexions à distance doit avoir un mot de passe associé.Every user account that you want to save to use for remote connections needs to have a password associated with it.
- Nom convivial : si vous utilisez le même compte d’utilisateur avec des mots de passe différents, définissez un nom convivial pour distinguer ces comptes d’utilisateurs.Friendly Name — If you are using the same user account with different passwords, set a friendly name to distinguish those user accounts.
- Sélectionnez Enregistrer, puis Paramètres.Select Save, then select Settings.
Step 5: Connect to Windows 10 From Your Mac
You’re now ready to connect. Your PC must be turned on, awake, and connected to the same network as your Mac.
The Remote Desktop app will list your computer, with a thumbnail preview, under Saved Desktops. Double-click it to connect.
If you didn’t change the settings, you’ll need to enter your username and/or password now. Remember, the username must be in the format domain\. Click OK.
Security Warning
When you make an RDP connection from Mac to Windows, you’ll see a security warning relating to an unverified certificate. If you’re at home, or working on a small business network, you can click Continue and ignore the message. If you’re on a large network with public access, be wary about doing this.
Once You’re Connected
When your Mac establishes the remote desktop connection, your Windows PC will lock and switch to the login screen. If anyone tries to use the PC, your remote session will end. You can’t have two people using the same computer at once.
Настройка Microsoft Remote Desktop на Mac для доступа к ПК
Чтобы получить доступ ко всем файлам, приложениям и работе на ПК с Windows через устройство MacBook или MacOS, все, что вам нужно сделать, — это воспользоваться бесплатным инструментом Удаленный рабочий стол для Mac , предоставленным Microsoft. Для использования удаленного рабочего стола вам потребуется Windows 10 Pro или Enterprise. Настроить удаленный рабочий стол на Mac очень просто. В этой статье мы подробно объясняем, как установить и настроить Microsoft Remote Desktop для Mac для управления ПК с Windows.
Включить удаленный рабочий стол на ПК с Windows
Чтобы включить удаленный рабочий стол, на компьютере с Windows перейдите в меню Пуск и нажмите Настройки.
Перейдите в Система и выберите параметр Удаленный рабочий стол в левой части меню.
Чтобы включить удаленный рабочий стол, включите параметр Удаленный рабочий стол .
Нажмите кнопку Подтвердить в небольшом всплывающем окне.
Убедитесь, что ваш компьютер всегда активен для удаленного подключения. Измените настройки режима сна на never в параметре удаленного рабочего стола.
Прежде чем переключиться на Mac, чтобы настроить клиент удаленного рабочего стола, необходимо сначала собрать информацию о вашем IP-адресе Windows и имени компьютера.
Чтобы узнать имя своего ПК в том же окне удаленного рабочего стола, перейдите на страницу Как подключиться к этому ПК.
Под этим запишите имя вашего ПК.
Чтобы получить IP-адрес вашего ноутбука, перейдите в настройки и нажмите Сеть и Интернет.
Нажмите Wi-Fi и выберите сетевое подключение.
Запишите свой IPv4-адрес из списка Свойства .
Еще один простой способ начать работу — загрузить простую программу под названием Microsoft Remote Desktop Assistant на свой ПК с Windows. Помощник по удаленным рабочим столам автоматически изменит параметры удаленного подключения и разблокирует порты брандмауэра, чтобы разрешить удаленный рабочий стол. Программа обеспечивает удаленное подключение и поддерживает ваш компьютер в состоянии сна после установки. Выполните следующие действия, чтобы установить помощник по удаленному рабочему столу на ПК с Windows.
При установке нажмите Начало работы , чтобы изменить настройки удаленного подключения.
После этого на экране отобразится информация для подключения, такая как имя ПК, имя пользователя, QR-код, которые вам понадобятся для добавления вашего ПК к удаленному устройству.
Теперь переключитесь на MacBook, чтобы настроить Microsoft Remote Desktop
Установите и настройте Microsoft Remote Desktop для Mac
На вашем Mac перейдите в App Store и найдите Microsoft Remote Desktop.
Нажмите кнопку Получить , чтобы загрузить приложение.
После этого запустите приложение и нажмите кнопку ‘+’ в верхней части окна Microsoft Remote Desktop .
Выберите «Рабочий стол» в раскрывающемся меню и введите все данные, такие как имя ПК или IP-адрес, который вы указали ранее. Вам также предоставляется возможность настроить шлюз для подключения виртуальных рабочих столов или рабочих столов на основе сеансов к сети вашей компании, если это необходимо.
Введите учетные данные домена, такие как имя пользователя, пароль для вашего ПК, чтобы установить удаленное подключение. Эти поля являются обязательными, так как они понадобятся вам для входа на ПК через удаленное соединение.
После этого нажмите кнопку Добавить .
Вы также можете настроить отображение компьютера на удаленном рабочем столе, внеся изменения в личные настройки в настройках, такие как цвета, режимы экрана и разрешение.
Чтобы сохранить список, нажмите красную кнопку в верхней части окна.
Теперь выберите свое имя пользователя в разделе MyDesktops и нажмите Пуск в верхней части окна, чтобы запустить удаленное подключение.
Нажмите Продолжить во всплывающем окне подтверждения сертификата.
После этого вы сможете увидеть, что ваш ПК с Windows будет отображаться в полноэкранном режиме на вашем MacBook или MacOS.
Чтобы внести какие-либо изменения в соединение, нажмите Изменить в верхней части окна Microsoft Remote Desktop.
Чтобы изменить настройки или добавить шлюз, нажмите Настройки в верхней части окна Microsoft Remote Desktop.
Это все.
Manage your user accounts
When you connect to a desktop or remote resources, you can save the user accounts to select from again. You can manage your user accounts by using the Remote Desktop client.
To create a new user account:
- In the Connection Center, select Settings > Accounts.
- Select Add User Account.
- Enter the following information:
- User Name — The name of the user to save for use with a remote connection. You can enter the user name in any of the following formats: user_name, domain\user_name, or user_name@domain.com.
- Password — The password for the user you specified. Every user account that you want to save to use for remote connections needs to have a password associated with it.
- Friendly Name — If you are using the same user account with different passwords, set a friendly name to distinguish those user accounts.
- Select Save, then select Settings.