Программа для восстановления данных getdata recover my files
Содержание:
- Проверка восстановления данных с помощью программы
- Как пользоваться Recover My Files
- 4.1.1 Purchase Online
- 10.2 Save and load a listing of search results
- 6.1 User Interface
- 12.1 Display Options
- 6.2 Toolbar (top)
- What makes Recover My Files different from other data recovery products?
- Process Lasso Pro 6.0.1.68 RePack + Portable [2012, Менеджер процессов]
- 6.4.2 Gallery View
- Recovery of Formatted Disk
- Who uses Recover My Files?
- 8.4 Running a Recover Files search
- 8.3 Before You Begin
- 5.3 Offline Activation
- 6.3 Tree pane (left)
- 8.5 Recover Files Search Results
- Save options
- 6.3.1 Folders view
- 4.4 Upgrade from a previous version
- AusLogics BoostSpeed 6.4.0.0 RePack + Portable [2013, Оптимизация системы]
- 8.1 File Recovery Quick Start
Проверка восстановления данных с помощью программы
lass=»remon-after-2nd-h2″ id=»remon-1617059721″>
Для своей попытки восстановить какие-либо файлы я взял свою флешку, на который на данный момент находился дистрибутив Windows 7 и ничего больше (загрузочная флешка) и отформатировал ее в NTFS (из FAT32). Я точно помню, что еще до того, как я поместил файлы Windows 7 на накопитель, на нем были фотографии. Вот и посмотрим, получится ли добраться до них.
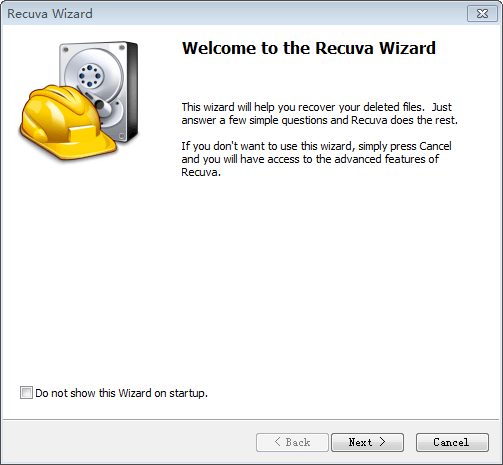
Окно мастера восстановления
После запуска Recover My Files, откроется мастер восстановления данных с двумя пунктами (на английском языке, русского в программе я не нашел, возможно, имеются неофициальные переводы):
- Recover Files — восстановление удаленных, очищенных из корзины или потерянных в результате сбоя программы файлов;
- Recover a Drive — восстановление после форматирования, переустановки Windows, проблем с жестким диском или USB накопителем.
Не обязательно пользоваться мастером, все эти действия можно проделать и вручную в главном окне программы. Но я все-таки попробую воспользоваться вторым пунктом — Recover a Drive.
В следующем пункте появится предложение выбрать накопитель, с которого нужно восстановить данные. Также можно выбрать не физический диск, а его образ или RAID массив. Выбираю флешку.
Очередное диалоговое окно предлагает два варианта: автоматическое восстановление или выбор нужных типов файлов. В моем случае подойдет указание типов файлов — JPG, именно в этом формате хранились фотографии.
В окне выбора типа файлов можно также указать скорость восстановления. По умолчанию стоит «Самый быстрый». Не буду менять, хотя толком и не знаю, что это может означать и каким именно образом изменится поведение программы, если указать другое значение, а также как это повлияет на эффективность восстановления.
После нажатия кнопки Start начнется процесс поиска потерянных данных.
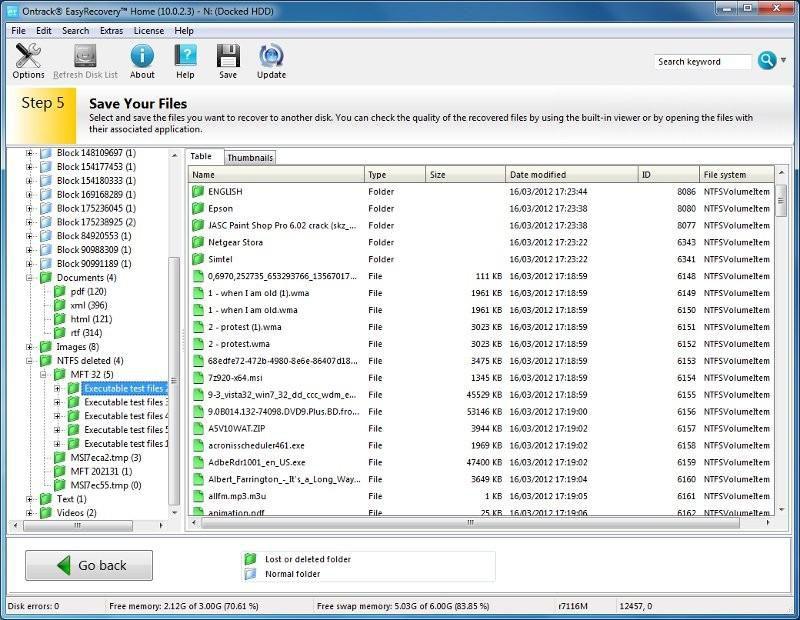
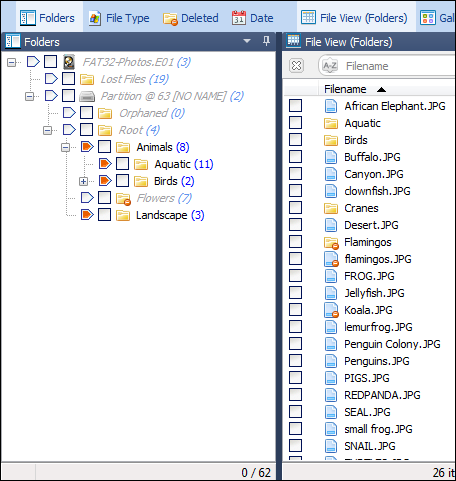
И вот результат: найдено много самых разных файлов, далеко не только фотографии. Более того, обнаружились мои древние рисунки, которые я даже не знал, что есть на этой флешке.
Для большинства файлов (но не для всех) сохранена также структура папок и имена. Фотографии, как видно из скриншота, можно увидеть в окне предварительного просмотра. Отмечу, что последующее сканирование этой же флешки с помощью бесплатной программы Recuva дало более скромные результаты.
В общем, подводя итог, Recover My Files выполняет свою задачу, программа проста в использовании, и имеет достаточно широкий набор функций (хоть я и не экспериментировал со всеми из них в этом обзоре. Так что, если у вас нет проблем с английским языком, рекомендую попробовать.
А вдруг и это будет интересно:
Как пользоваться Recover My Files
Настраиваем поиск потерянных объектов
Скачав и установив программу, при первом запуске видим окно с выбором источника потерянной информации.
«Recover Files» — ищет информацию с рабочих дисков, флешек и т.п.
«Recover a Drive» — нужен для восстановления файлов с поврежденных разделов. Например, в случае форматирования, переустановки Windows. Если информация была утеряна в следствии атаки вирусов, ее также можно попытаться восстановить с помощью «Recover a Drive».
Я буду выбирать первый вариант. Жмем «Next».
В открывшемся окне, нам необходимо выбрать раздел, в котором мы будем искать файлы. В данном случае это флешка. Выберем диск «E» и жмем «Далее (Next)».
Теперь нам предлагают два варианта поиска файлов. Если выбираем «Автоматический режим (Search for deleted files)», то поиск будет производиться по всем типам данных. Это удобно в случае, когда пользователь не уверен, что нужно найти. После выбора данного режима, нажимаем «Старт (Start)» и поиск начнется автоматически.
«Ручной режим (Search for deleted files, thean search for selected «Lost File» types)», предусматривает поиск по выбранным параметрам. Отмечаем данный вариант, жмем «Next».
В отличии от автоматического режима, появляется дополнительное окно настроек. Для примера, настроим поиск картинок. Открываем в дереве раздел «Graphics», в открывшемся списке можно выбрать формат удаленных картинок, если выбор не сделан, то отмечены будут все.
Обратите внимание, что параллельно с «Graphics», отмечаются дополнительные разделы. Такое выделение можно снять двойным кликом на зеленом квадрате
После жмем «Start».
В правой части мы можем выбирать скорость поиска потерянных объектов. По умолчанию, стоит самая высокая. Чем скорость ниже, тем меньше вероятность возникновения ошибок. Программа будет более тщательно проверять выбранный раздел. После жмем «Start».
Фильтрация найденных объектов
Сразу хочу сказать, что проверка занимает немалое количество времени. Флешку на 32 Гигабайта, я проверял часа 2. Когда сканирование завершится, на экране будет выведено соответствующее сообщение. В левой части окна можем увидеть проводник, в котором размещаются все найденные объекты.
Если, нам необходимо найти файлы удаленные в определенный день, то можем их отфильтровать по дате. Для этого нам необходимо перейти в дополнительную вкладку «Date» и выбрать необходимую.
Чтобы сделать выборку изображений по форматам, тогда нам необходимо зайти во вкладку «File Type», и там выбрать интересующий.
Кроме того, можно увидеть из какой папки были удалены объекты, которые мы разыскивали. Эта информация доступна в разделе «Folders».
А если нужны все удаленные и потерянные файлы, тогда нам нужна вкладка «Deleted».
Восстановление найденных файлов
В настройках вроде разобрались, теперь попробуем их восстановить. Для этого нужные файлы, в правой части окна нам необходимо выделить. Затем на верхней панели находим «Save As» и выбираем место для сохранения. Восстанавливать найденные объекты ни в коем случае нельзя на тот же диск, с которого он был утерян, иначе это приведет к их перезаписи и данные уже не возможно будет вернуть.
Рассмотрев программу, могу сказать, что это многофункциональный инструмент для восстановления данных. Расстраивает невозможность применить ее главную функцию в пробном периоде. Да и скорость поиска объектов довольно низкая.
Опишите, что у вас не получилось.
Наши специалисты постараются ответить максимально быстро.
4.1.1 Purchase Online
Recover My Files can be purchased online at http://www.recovermyfiles.com. The purchase page can be access directly by using the using the “Buy” button in the program toolbar:
Please visit the purchase page for pricing, volume discounts and software bundle options. Full credit card and PayPal payment options are available.
Delivery of a purchased CD
For an additional $14.95 a CD can be purchased with your order. This price includes shipping worldwide. (Note: GetData is not responsible for any customs, excise, or import duty applied by other agencies). Your CD is produced on demand with the latest version at the time of your order. A CD is sent by regular post. Please allow 6-10 days for delivery.
4.1.2 Purchase Orders
Purchase Orders are available to government and corporate entities. Approved customers may place purchase orders on 30 day terms.
Purchase Orders can be placed online at http://www.recovermyfiles.com/data-recovery-software-purchase.php by following the purchase order instructions in the checkout, or by directly contacting GetData head office:
It is possible to upgrade and existing license, e.g. from a Standard to a Professional. Please contact sales@getdata.com for assistance.
The new software activation key is entered by selecting the “Upgrade” button in the program toolbar:
Recover My Files must be restarted for the upgraded features to become available.
10.2 Save and load a listing of search results
When Recover My Files is closed, or a new search is started, any exiting search results are cleared from memory. In order to recreate the existing search results, it is necessary to run a new search. To avoid this, it is possible to save a listing of existing search results as an .rsv file so that they can be quickly reloaded at a later time.
|
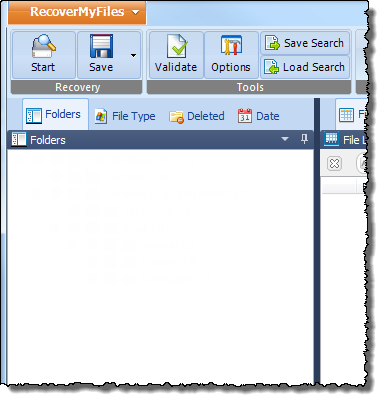
To save a listing of search results, click the Save Session button and save a .rsv file. |
|
|
To load list of search results at a later time, ensure that the problem hard drive is connected, select the Load Search button and load the relevant .rsv file. |
It is important to remember that you are as saving a listing of the search results only. If the content of the drive subsequently changes (i.e. new data is written to the drive), this may overwrite and destroy deleted files and the saved search results may no longer be valid. If you plan to reload the search at a later time, minimize the use of the drive in the interim.
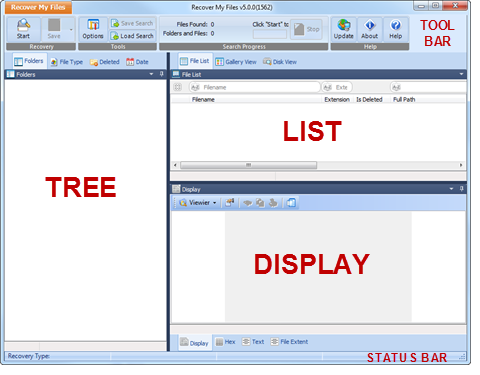
6.1 User Interface
The Recover My Files Graphic User Interface (GUI) is broken down into the following areas:
- Toolbar (top)
- Tree pane (left)
- List pane (right)
- Display pane (bottom)
- Status bar (bottom)
As shown below:
The Recover My Files v5 GUI is however highly configurable. The Tree, List and Display panes hold different “data views” used to present search results to the user. Each of the data views can be moved and re-attached to the other pane, or completely detached from the main program screen. Customized screen layouts can be saved and loaded as required. Refer to Chapter 15 for further information on customizing the interface.
12.1 Display Options
Click on the “Options” button in the toolbar of the main program screen to set program options:
Default options can be reset at any time by selecting the “Reset to Defaults” button.
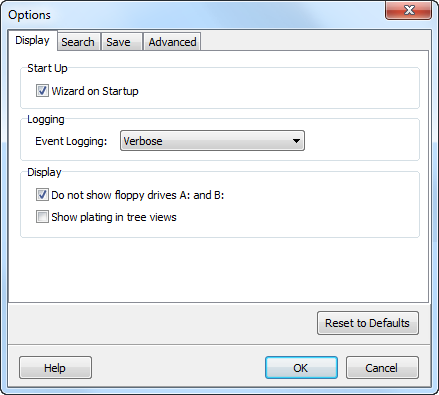
Wizard on Start up
This option controls whether the search wizard window opens automatically when the program starts.
Event Logging
This option controls the level of logging during processing. It is recommended that it be set at “None” or “Verbose” to maintain search speed. Do not use “Debug” or “Technical” unless instructed by GetData support staff.
Ignore floppy drives A: and B:
This option controls whether floppy drives connected to the computer are shown in the drive selection wizard window.
12.1.1 Show plating in tree views
One of the most powerful features of Tree view is the “show branch plate”. When the show branch plate is turned on, all files beneath that plate are displayed as a single list in List view. For example, this action can be used to display the contents of a folder and all of its sub folders and files.
To turn the branch plate on:
- Click Options > General > Display > Show plating option in tree views
- Click the plate icon next to the required folder (the plate will turn orange). The content of the folder and its sub folders will be displayed in the list view:
Plated folders are displayed in normal font. The non-plated folders are in grey italic.
To plate multiple branches;
- Click the first required plate with the mouse;
- Hold down the CTRL key and click the other required plates.
A useful application of the branch plate is to Gallery view all pictures on the drive. To do this, select the branch plate for the Root folder, Partition, or drive, and then switch to Gallery view (as shown in Figure 74 below):

6.2 Toolbar (top)
At the top of the program tool bar is the Recover My Files drop down menu, shown below:
The drop down menu contains the following unique functions:
- Export CSV file: Exports the listing of current search results to as CSV file.
- Print Report: Prints a listing of the current search results to an installed printer. A confirmation message is displayed showing the number of pages that will be printed.
- Disk Imager: Runs the disk imaging program used to acquire sector copies of drives. See Chapter 14 – Drive Imaging.
- Exit: Closes Recover My Files. A confirmation prompt is provided if search results are currently listed.
- The other functions in the drop down menu are replicated in the toolbar icons, described as follows:
Opens the start search wizard.
Opens the save dialogue to save search results. See Chapter 10 – Saving Files.
Runs the File Type Validation Tool
Opens the program options window. See Chapter 12 – Options.
Used to save and load a listing of search results. See Chapter 10 – Saving Files.
Used to stop the progress of a search.
Checks for program updates. An internet connection is required.
Opens the program “about” window, which contains version, activation and support information.
Opens this support documentation.
Links to the program purchase page at www.recovermyfiles.com
Opens the program activation window. Also used to upgrade between licenses, e.g. Standard to Professional.
The toolbar is also used the place where search progress is reported to the user. Messages relating to the current search are displayed with the progress bar.
What makes Recover My Files different from other data recovery products?
Recover My Files uses advanced partition recovery and File carving techniques. It combines a flexible graphic user interface (GUI) with advanced sorting, filtering, and searching technology. It enables access to all areas of physical, logical and disk imaged media, including Windows System files and unallocated drive space.
Recover My Files is designed with the following key principles:
- To enable a user to accurately determine if their files can be recovered prior to purchasing a license. This is primarily achieved via the display window which shows the content of files found.
- It will not alter the contents of a drive being searched. Recover My Files is designed as a data recovery tool, NOT a drive repair tool. It will not write to or change the content of the original hard drive. If Recover My Files is not the solution, the user can seek a new solution without any change to the status of the problem drive.
Process Lasso Pro 6.0.1.68 RePack + Portable [2012, Менеджер процессов]
Год выпуска: 2012Жанр: Менеджер процессовРазработчик: Bitsum TechnologiesСайт разработчика: http://bitsum.com/Язык интерфейса: Русский + АнглийскийТип сборки: RePack + PortableРазрядность: 32/64-bitОперационная система: Windows 2000, XP, Vista, 7, 8Описание: Process Lasso Pro — утилита которая позволяет вручную или автоматически управлять процессами, запущенными на вашем компьютере, для достижения стабильности и максимального быстродействия. Утилита не является заменой стандартному менеджеру процессов, она, только добавляет новые функции, которые позволят оптимизировать работу ЦПУ при …
Программы / Системные приложения / Оптимизация, настройка и диагностика системы
Подробнее
6.4.2 Gallery View
Gallery view is used to thumbnail graphics files (jpg, bmp and png) in the currently highlighted folder/s.
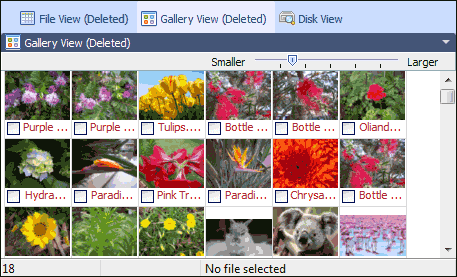
Graphics displayed in Gallery view are determined by the selection made in the Tree pane (left window). If a single folder is selected, the graphics inside that folder will be displayed. The branch plate option (see 12.1) can be used to display all graphics on the drive at one time.
The default setting in Gallery view is to render and display thumbnails 1 page ahead. For each page displayed, the following page is also rendered and is available to the user after a page down command or use of the scroll bar.
In some situations it may be advantageous to render all available images.
To cache thumbnails to RAM;
- Select or branch plate the required folders in the Tree pane data view to display the gallery view thumbnails;
- Right click in the gallery view window and select “Cache All Images”
Thumbnails will be cached to RAM. A rotating drive will appear in the bottom right hand corner of the gallery view window to indicate that caching is in progress.
The size and number of graphics displayed is controlled by moving the slide-bar in the footer of this window from small to large.
The Gallery view tab can also be detached from the File List view pane and re-sized displayed as a standalone window (see the chapter on “Customizing the Interface” for more information).
Recovery of Formatted Disk
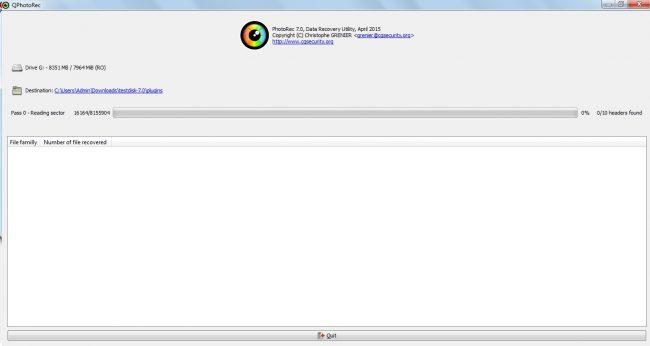
The NTFS recovery principles for recovering a formatted NTFS disk are essentially the same. At the highest level, Recover My Files searches for missing NTFS partitions which it rebuilds and displays in the search results screen. It then searches for additional individual MFT entries on the disk to recreate the file and folder structure.
In a Recover My Files search it is possible to determine when MFT entries are located by watching the «Files and Folders» number next to the progress bar. MFT records are usually located at the start of a partition. This means that when the Files and Folders number rises quickly then remains stable, an MFT file table has been found and read. The «skip» button can then be used to jump directly to the process of rebuilding and displaying the file and folder structure in the search results screen. This methodology can greatly reduce the time needed to complete a search and recovery all file and folders with the original structure.
Learn more about a Recover My Files drive recovery.
Who uses Recover My Files?
Recover My Files is primarily purchased by home users for use on computers, cameras and other media devices. It enables cost effective data recovery at a fraction of the price of a commercial data recovery service.
Recover My Files is also widely used by business. It is recommended recovery software by support services companies including DELL, IBM and HP. In 2012, USA retail chain Office Depot rolled out Recover My Files nationwide to their tech services department to perform data recovery services for its customers.
Recover My Files was originally developed for use by law enforcement in computer forensics. Today it is widely used by law enforcement agencies worldwide including the FBI, the USSS and the UK Metropolitan police.
8.4 Running a Recover Files search
To run a Recover Files search:
Run Recover My Files. In the wizard, lick the «Recover Files» icon (if the Wizard screen is not open, click the Start icon in the toolbar) and click the Next button:
In the drive selection window highlight the drive letter from which the files are missing and click Next.
Drive not listed: See 11.1 — Troubleshooting drive selection. Working with image files: See 14.3 — Recovering data from an image file.
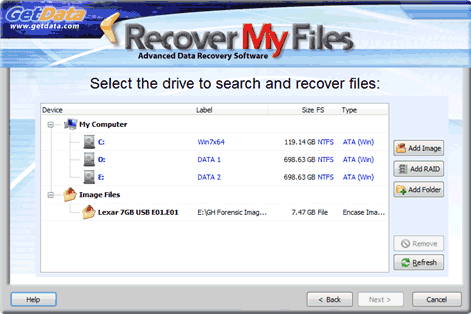
The Device Selection window includes the following information:
Label: Physical drives are listed with their Windows device number. Logical drives display the drive label (if no label is present then «{no label}» is used).
Size: The size column contains the size of the physical or logical device. Note that the actual size of the drive is usually smaller than what the drive is labeled. Drive manufactures usually round up the drive capacity, so a 453.99 GB drive in this screen may be sold as 500GB.
FS Type: The File-system on the drive, e.g. FAT, NTFS, HFS. Describes the way in which the drive is connected to the computer.
Select the File Recovery options:
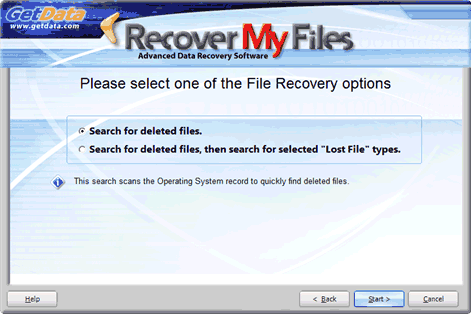
Search for Deleted Files
Each file on a Windows computer has a record in the file-system index (e.g. the FAT or MFT). When a file is deleted, the record is updated with a deleted file marker. The clusters on the drive used to store the file data are now considered unallocated (i.e. available for new storage). However the file content remains in those clusters. A search for deleted files reads the entire file-system index, including records for deleted files, and displays the file content.
To search for deleted files:
- Select the “Search for deleted files.” option;
- Click the Start button.
Recover My Files will then commence to read the file-system. This search will take less than 20 minutes to complete. At the completion of the search review the search results as described in 8.5 below. If files are NOT found, try the option to “Search for deleted files, and then search for selected Lost File types”.
8.4.2 Search for deleted files, then search for selected “Lost File” types
As the name suggests “Search for deleted files, then search for selected “Lost File” types” runs the search for deleted files (described above), then sequentially scans the remaining area of the drive for «Lost” files.
A lost file is a file that is located by file carving. File carving is a sequential search of the drive to find file headers for the specified file types. Learn more about lost files at the beginning of this manual — Data Recovery Fundamentals. This search should be run when:
- The «Search for deleted files» option did NOT find the missing files;
- When you wish to be certain that all possible data on the drive is located and recovered.
To search for deleted and lost files:
- Select the “Search for deleted files, then search for selected Lost File types” option and click the Next button (shown in Figure 49). The file type selection window will open:
- Place a select tick in the box next to the file types that you wish to recover. The file types in this list have a known structure that can be identified if found on the drive (a full list is provided at Appendix 2 — File carving). To search for a file type, type the extension into the “Find File Extension” search box.Important: The more file types that are selected, the more resource intensive is these search and the longer the search will take. It is suggested that you do not perform a Lost File search for more than 10 files at any one time. A sequential search of a large hard drive, e.g. 2TB or more containing many files may take up to 24 hours.
- Click the Start button to commence the search. A search for deleted files (described in 9.2.1 above) will commence.
- The start of the lost files search is indicated by the message «Scanning block xxxxx of xxxxx for lost files» above the progress bar.
- Lost file are placed in the Lost Files folder. As the search progresses, review the search results (as described below). If the missing files are located, stop the search and save the files.
8.3 Before You Begin
Deleted files will remain on a computer up until such time as they are overwritten by new data. For this reason you should minimize the use of the drive on which the files were lost until such time as you have had the opportunity finish your data recovery.
Recovering Data from a C: Drive
Your C: drive is the most vulnerable to new data simply because it is where Windows is running. If practical you may consider connecting the drive to another PC as a secondary and then using that computer to run the search. In critical situation, you may also consider taking a drive image (a sector by sector copy of the entire drive) and working on the image rather than the original drive. For more information see Chapter 15 – Drive Imaging.
Many users may not have the available resources to move the hard drive to another computer. Recover My Files is a relatively small program (less than 20mb), so whilst installing on the problem drive is not ideal, it is a limited risk.
Review your PC power settings
When running a Recover Files search it can be advantageous to boost your PC power settings so that problems are not encountered with drives powering down during the recovery or the save process. See Chapter 7 for more information.
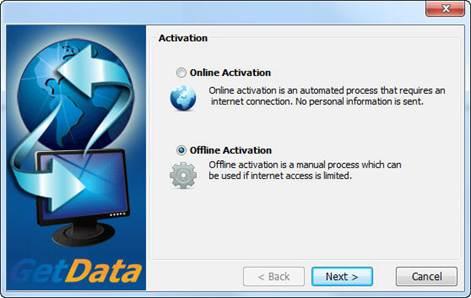
5.3 Offline Activation
Where the computer on which the software is being installed is not connected to the internet, a separate internet connected computer can be used to activate. The activation process involves:
- Exporting a license file from the software;
- Uploading the license file, together with your purchase email address and license key at a web site (using any internet connected computer);
- Downloading the validated license file and importing it back into the software.
To activate an offline computer:
Click the Offline Activation button and click Next;
Click on the Export button to export and save the license file «GetData.GDActRequest»:
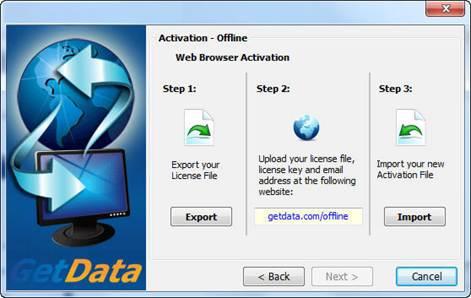
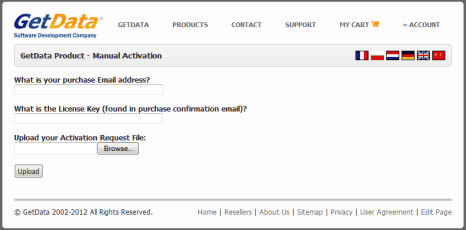
Click the Upload button to send the details to the activation server:
The details are validated by the activation server and the file «GetData.GDActResponse» is returned to you.
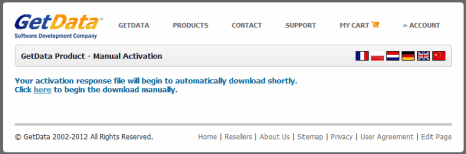
Save «GetData.GDActResponse» and take it back to the offline computer on which you will be activating the software.
Once the «GetData.GDActResponse» file is back on the offline computer, click the Import button to import the file into the software. The software is now activated:
Troubleshooting offline activation
Some web browser security settings may prohibit the upload or download of the «GetData.GDActRequest» and/or «GetData.GDActResponse» files. If upload or download is blocked:
Try an alternate web browser, e.g. Firefox or Opera; or
Send the «GetData.GDActRequest» file to support@getdata.com and we will generate and return the «GetData.GDActResponse» file to you.
6.3 Tree pane (left)
The Tree pane is the top left hand window of the search results screen.
The tree pane is the default location for the data views Folders, File Type, Deleted and Date.
To navigate the Tree pane data views:
- Use the keyboard arrow keys to traverse, expand and contract a tree;
- Double click a folder to drill down into its sub folders;
- Click the and symbols to expand and contract the tree hierarchy;
- Right click and use “Expand” to expand the currently selected folder, or “Expand All” to expand all folders; use “Contract” to contract the currently selected folder, or “Contract All” to contract all folders.
Clicking on a folder in the Tree pane data views lists the contents of the folder in the adjacent List pane (described in 6.4 below).
Tree Pane Icons
The following icons are used in the Tree pane data views:
A device, e.g. a hard drive or camera card
Active (booting) partition
Partition
An expandable branch (folder structure)
An active folder
A deleted folder
Selection Box
Folders listed in the Tree pane data views are preceded by a selection box. The selection box is ticked to indicate that a file or folder is to be saved (Learn more about saving files in Chapter 10). A tick in a selection box for a file or folder will also show in any other data view in which that file is displayed.
Branch Plate
A powerful feature of the Tree pane data views is the “branch plate”. The branch plate allows the entire contents of a folder and its sub directories to be displayed in a list in the adjacent list view. (Learn more about branch plating in Chapter 12.1.1).
8.5 Recover Files Search Results
Click the icon in the search results screen to expand folders. Use the different data view and sort and filter functions to determine if the missing files have been located (see Chapter 6 for more information).
In the search results screen deleted items are identified by the following icons:
Deleted folder
Deleted file
Lost file
The available data views are summarized as follows:
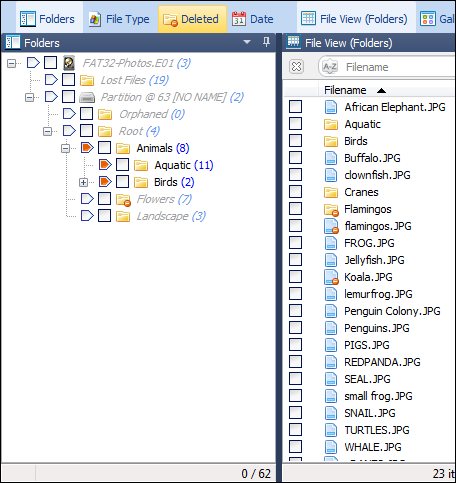
Deleted view
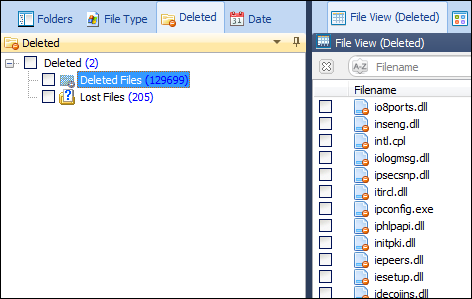
The Deleted view is a fast way to locate relevant files as it shows only deleted files. The folders in the deleted describe the way in which each of the deleted files has been identified, i.e. “Deleted” or “Lost”.
Figure 51, Tree pane, Deleted view
Folders view
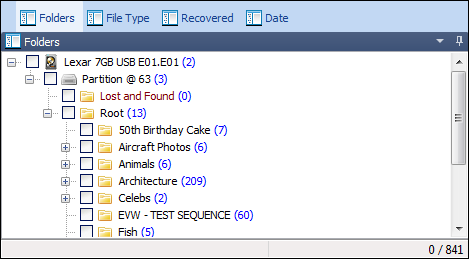
The Folders view shows all files and folders on the examined drive. The “Root” folder contains the existing folder and file structure on the drive. Deleted files and folders are located inside the Root folder and should appear in their original location prior to delete. Lost and Orphaned files are placed in their own folders under the partition in which they were found.
Figure 52, Tree pane, Folders view
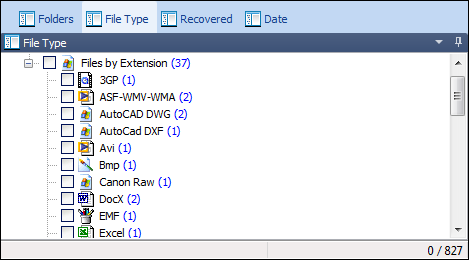
File Type view
The File Type view sorts files by extension. This view shows all files on the examined drive. Select a file type, and then look for the deleted file icons. It is also helpful to sort by the “Is Deleted” column in this view.
Figure 53, Tree pane, File Type view
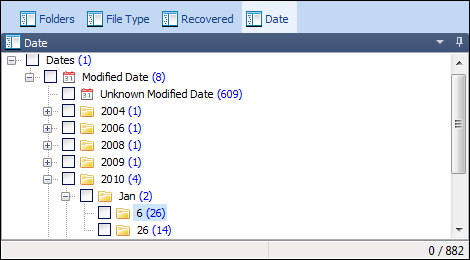
Date view
The date view groups files by date. This view shows all files on the examined drive. Look for the deleted file and folder icons.
Figure 54, Tree pane, Date view
Validating search results and saving files
To learn how to validate the search results and save files, see “Chapter 10”.
Save options

Save with folder information if known
Files are saved with the file and folder structure shown in the Folder data view. If this option is deselected, files will be saved into a single folder only.
Retain original file date/times if known
If this option is set the saved files will have the file date and times shown in the data views of the results screen. If this option is not selected, saved files will show the date and times when the save took place.
Rename file extension to match file signature
If this option is selected a file that has an extension which does not match the file signature (the header) will be renamed when saved. (See “Determine file type” in the “Search” options above).
Do NOT save these
Files with a zero length
If this option is set files with a 0kb length will not be saved.
Directories with no files
If this option is set empty folders will not be saved.
Deleted files
If this option is set, deleted files are not saved (i.e. files marked in the “Is Deleted” column as “Yes”). This option is usually set in a Drive Recover when the user wants to recover the file and folder structure from a drive but does not require any of the deleted files contained within that file-system.
6.3.1 Folders view
Folders view displays all the folders on the examined drive:
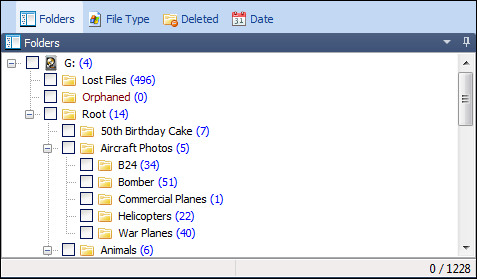
Elements in Folders view include:
- Lost Files: The Lost Files folder contains the results of File carving (See Data Recovery Fundamentals at the start of this manual for more information). The Lost Files folder is created in both a Recover Files (for “deleted and lost files”) and a Recover Drive search.
- Partition @ (Recover Drive search only):A partition appears in a Recover Drives search only. This is a partition which exists on the hard drive and is not missing or deleted. Folders and files in this partition (which are not deleted, lost or orphaned), should be accessible with Windows Explorer.
- Orphaned: Orphans are deleted folders and files for which the original parent folder is unknown.
- Root: The Root folder (also referred as root directory) is the first level folder of a folder hierarchy. A root folder will exist in both an existing and a recovered partition.
- Recovered Partition @ (Recover Drive search only): A recovered partition folder is created in a Recover Drive search only. Its name describes the type of File-system that has been found, and the sector number where it is located. This is where missing file and folder structure will be found in a drive recovery.
4.4 Upgrade from a previous version
If you have purchased a previous version of Recover My Files (i.e. versions 1 – 4), you are entitled to purchase v5 at a discounted rate. To do this:
- Login to your customer account using your purchase email address;
- If you do not know your password, use the “Forget your password” link and it will be sent to your email address.
- If you have changed your email address since your purchase, please contact sales@getdata.com for assistance.
- Click on the Key tab to display your old orders and license keys;
- Click the upgrade to Recover My Files v5 link;
- Checkout via the shopping cart at the discounted price.
AusLogics BoostSpeed 6.4.0.0 RePack + Portable [2013, Оптимизация системы]
Год выпуска: 2013Жанр: Оптимизация системыРазработчик: Auslogics Software Pty Ltd.Сайт разработчика: www.auslogics.comЯзык интерфейса: АнглийскийТип сборки: RePack + PortableРазрядность: 32/64-bitСистемные требования: Windows XP, Vista, 7, 8 Описание: AusLogics BoostSpeed — приложение, которое поможет быстро и качественно произвести настройку ПК на максимальную производительность. Встроенный инструмент System Adviser проверит настройки системы с помощью пятидесяти различных тестов и предложит рекомендации по результатам каждого теста. Программа проверяет систему в режиме реального врем …
Программы / Системные приложения / Оптимизация, настройка и диагностика системы
Подробнее
8.1 File Recovery Quick Start
Use this flow chart to recover deleted files that have been deleted and emptied from the recycle bin.
(Note: If you have a formatted or corrupt drive, refer to the flow chart in Chapter 9).
STARTDeleted files, emptied from or bypassed Recycle Bin, deleted by a virus or Trojan, or lost by some other means.
Minimize Disk UsageMinimize the use of the problem hard disk. If the disk is your current C: drive, consider connecting the drive to another computer as a secondary drive to run the recovery.
Review Your PC Power SettingsConsider changing PC power settings to “High Performance” for data recovery (see Chapter 7)
Download Recover My FilesDownload and install Recover My Files. Preferably install on a different hard disk.(See Chapter 3)
Run Recover My FilesIn the wizard window select “Recover Files”. Click Next.
Select the Drive LetterIn the drive selection window, select the problem drive letter.Click Next.
Select “Search for Deleted Files”Click Start
Review Search ResultsUse different views (e.g. Folders, File Type, Recovered, Gallery View) to locate your files. Do jpegs and documents preview in the display (bottom) window? Use the Validate Files button to validate the results. Determine from the results if you wish to save the files.
Need a more thorough search? Start a New SearchSearch for “Deleted and Lost Files”. Select required file types. Click Next
Save List of Search ResultsConsider saving a list of the search results as a .rsv file that can quickly be loaded at a later time. Use the «Save Session» button to do this.
Online ActivationIs the PC online? Open the software activation window. Enter the software activation key.
Offline ActivationIf PC not online, use another internet connection for offline activation process.
Select Files to be SavedIn the search results window, select the files to be saved (tick the boxes). Select those files which preview OK. Check space required to save files.
Save FilesPress save files button and select the destination drive. Files must be saved to a different drive. Click OK to start the save process.
Review the Saved FilesCheck the destination drive to ensure that the files have saved correctly. Open and test files with their creating applications (e.g. Word, XLS).
Files are recoveredOnce you have confirmed that your data has been successfully recovered, assess what you now wish to do with the problem drive. E.g. Use Windows to copy the recovered files back onto it, or replace the problem hard drive with a new drive.