Драйвера прочих устройств microsoft для windows 7 x64
Содержание:
- How can I fix Xbox 360 controller blinking buttons?
- Developer info
- Troubleshooting
- Dead Zone problems:
- Some controllers will only operate in game, if they are set as “GamePad”. Try to:
- Only one controller, mapped to PAD1, may work correctly in some games. Try to:
- To use more than one controller in game, you may need to combine them. Try to:
- If tab page light won’t turn green / Red light on tab page:
- Installation
- Step 2: Install the controller driver
- How to fix Xbox 360 controller Play and Charge issues on Windows 10
- Adding Third Party Controllers
- Step 3 (for wireless controller only): Connect your controller to the wireless receiver
- Usage
- Для чего нужно приложение Tocaedit Xbox 360 Controller Emulator
- 3 ways to fix Xbox 360 Controller Steam issues in Windows 10
- Настройка джойстика на Windows 8/8.1
- Fix Xbox 360 wired controller not working
- About
- Особенности X360CE
- 2: Update Xbox controller driver automatically (Recommended)
- Как подключить джойстик от xbox 360 к пк
- Install and Use Instructions
- How do I fix Xbox 360 controller driver issues on Windows 10?
1. Make sure that you have the latest updates installed
- Open the Settings app and go to Update & Security section.
- Go to Windows Update section and download all available updates. In addition, you might want to download optional updates as well because those updates are often designed to update your gaming devices and hardware.
- After the updates have been downloaded, restart your computer.
- After your computer restarts, check if the issue is resolved.
Users have reported blinking buttons on Xbox 360Controller, and if you have this issue, it’s advised that you install the latest updates for Windows 10.
2. Reconnect your controller
Users report that their wired Xbox 360 Controller is blinking after Windows 10 wakes up from the Sleep Mode.
In order to fix the blinking Xbox 360 Controller, you just need to unplug it and connect it to your computer again.
According to users, this solution works if you’re using wired Xbox 360 Controller, but if you’re using wireless Xbox controller, you might want to unplug your Bluetooth receiver and connect it back again.
In addition, you might have to pair your wireless Xbox 360 Controller by pressing the pairing button on Bluetooth receiver and Xbox 360 Controller.
Developer info
Anything below this probably doesn’t affect end users, so you can stop reading
now if you just want to use the driver.
Building
You’ll need the full xcode installed via the app store. The command line tools
are not enough.
From the command line, run:
The distribution currently consists of 3 projects — one for the driver
(implemented in C++, as an I/O Kit C++ class), one for the force feedback
support plugin (implemented in C, as an I/O Kit COM plugin) and one for the
Preference Pane (implemented in Objective C as a preference pane plugin).
Ideally these 3 targets should be in the same project, but I’ve not worked on
this yet.
To build, use the standard Xcode build for Deployment on each of the 3
projects. Build Feedback360 before 360Controller, as the 360Controller project
includes a script to copy the Feedback360 bundle to the correct place in the
.kext to make it work.
To debug the driver, to assign the
correct properties — note that the Force Feedback plugin only seems to be found
by OSX if the driver is in so I could only debug
it in place.
To test the Preference Pane, just double-click the resulting file.
Yosemite and signed drivers
Since Yosemite (Mac OS X 10.10) all global kexts are required to be signed.
This means if you want to build the drivers and install locally, you need to
have a mac developer account.
If you’d like to avoid paying apple for the developer account and want to
disable the signature checking, execute the following commands inside a
terminal:
sudo nvram boot-args="kext-dev-mode=1"
sudo kextcache -m /System/Library/Caches/com.apple.kext.caches/Startup/Extensions.mkext /System/Library/Extensions
Note that this is probably a bad idea unless you understand the implications of
running unsigned driver code.
Debugging
Most of the debugging I did was via printing out text. In 360Controller, you
can use IOLog(), and the output will appear in system.log. In Feedback360
normal , and the output will appear on the console of
whatever application is attempting to use Force Feedback. In Pref360Control,
works as it’s an Objective C program, and will output to the console
of the Preferences application.
Troubleshooting
Dead Zone problems:
Some games have control issues, when Dead Zone is reduced to 0%.
Increase the Anti-Dead Zone value, if there is gap between the moment, when you start to push the axis related button, and the reaction in game.
Some controllers will only operate in game, if they are set as “GamePad”. Try to:
1. Run x360ce.exe
2. Select tab page with your controller.
3. Open tab page.
4. Set «Device Type» drop down list value to: GamePad.
5. Click button.
6. Close x360ce Application, run game.
Only one controller, mapped to PAD1, may work correctly in some games. Try to:
1. Run x360ce.exe
2. Select the tab page corresponding to your controller.
3. Open the tab page (visible when the controller is connected).
4. Set «Map To» drop down list value to: 1.
5. Set «Map To» drop down list values (repeat steps 2. to 4.) for other controllers, if you have them, to: 2, 3 or 4.
6. Click button.
7. Close x360ce Application, run game.
To use more than one controller in game, you may need to combine them. Try to:
1. Run x360ce.exe
2. Select the tab page corresponding to your additional controller.
3. Open the tab page.
4. Set «Combine Into» drop down list value to: One.
5. Select tab page.
6. Check «Enable Combining» check-box. (Note: Uncheck «Enable Combining» check-box, when you want to configure the controller.)
7. Click button.
8. Close x360ce Application, run game.
If tab page light won’t turn green / Red light on tab page:
• The controller profile loaded may match the name of your controller, but not actually be for the controller you own.
• There just might not be a profile for your control at all. The light should turn green once the 2 sticks, triggers and D-pad are assigned. Sometimes x360ce.exe application needs to be restarted, after assigning these, for the light to turn green.
• The controller profile might have PassThrough (check-box) enabled.
• The DInput state of the controller might be incorrect due to an application crashing previously and not unloading the controller or some other reason. Opening up Joy.cpl (Set Up USB Game Controllers) and clicking the button, and then Okaying out of the window, that appears, can fix it.
If you have questions about installation or configuration, please go to our NGemu x360ce forum
Installation
See the releases page for the latest compiled and signed version of the driver. Most users will want to run this installer. If you are using macOS 10.13.4 or later, then you will have to allow the signing certificate of «Drew Mills» in order for the software to run. Usually, the installer will prompt you to complete this process:

You can either click «Open Security Preferences» to quickly fix this. If you didn’t see this prompt, you can navigate to the same window using the Apple menu in the top left hand corner of your screen, navigating the «System Preferences» and then clicking on «Security & Privacy.» This will open up the following page. All you need to do is click the «Allow» button near the bottom right.

This prompt has been known to have issues with software or hardware that interferes with mouse movement. If you are using software that impacts the movement of your mouse, such as MagicKeys, or are using a special interface device, such as a Wacom tablet, please using a standard input device, such as a mouse, to click this button. This is a security feature of macOS and is out of our control.
Step 2: Install the controller driver
To make sure your controller or wireless receiver works on your computer, you need to install the latest driver for the device. One easy and reliable way to install drivers is to use Driver Easy.
Driver Easy will automatically recognize your system and find the correct drivers for it. You don’t need to know exactly what system your computer is running, you don’t need to risk downloading and installing the wrong driver, and you don’t need to worry about making a mistake when installing.
You can download and install your drivers by using either Free or Pro version of Driver Easy. But with the Pro version it takes only 2 clicks (and you get full support and a 30-day money back guarantee):
1. Download and Install Driver Easy.
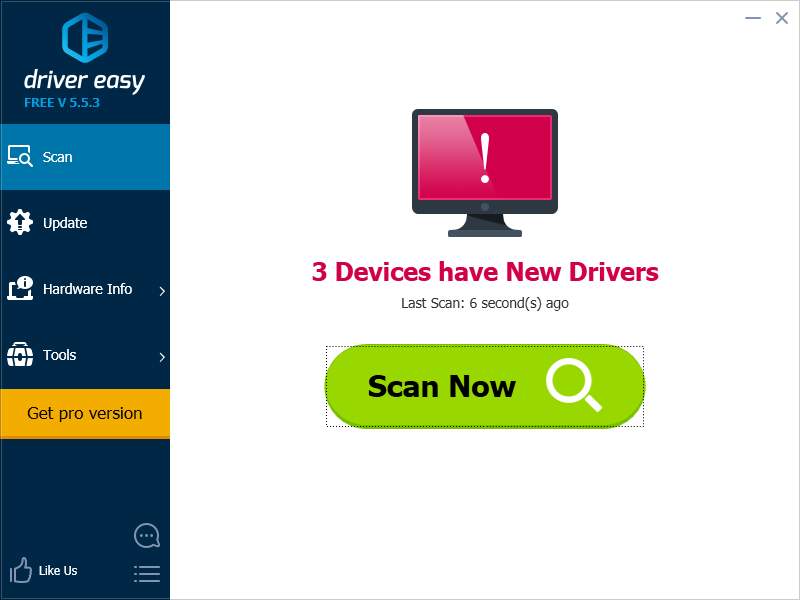
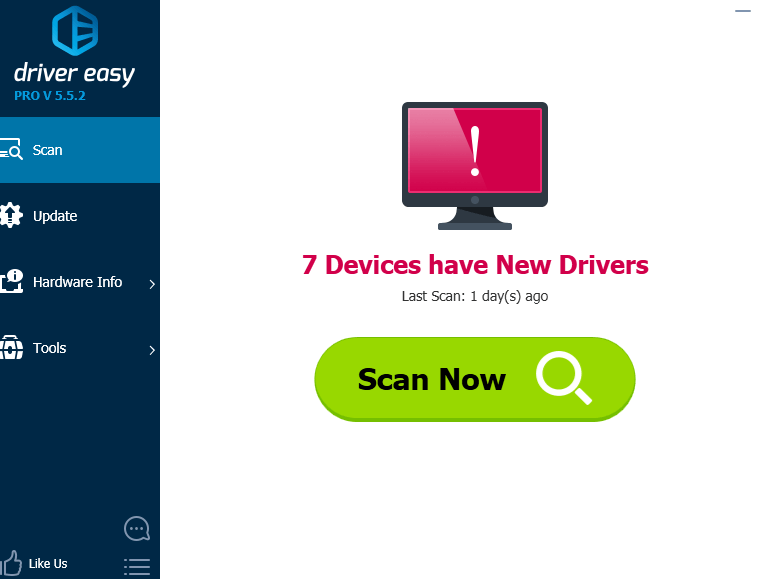
2. Run Driver Easy and hit the Scan Now button. Driver Easy will then scan your computer and detect any problem drivers.
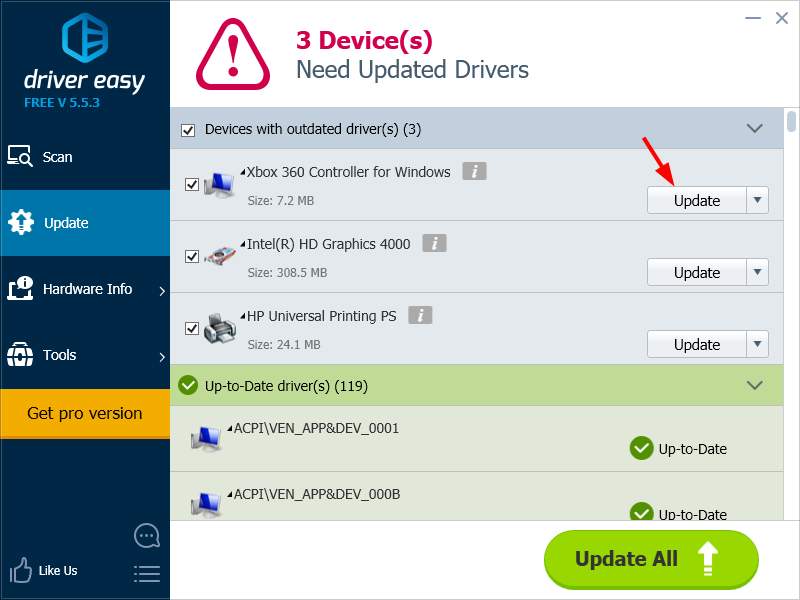
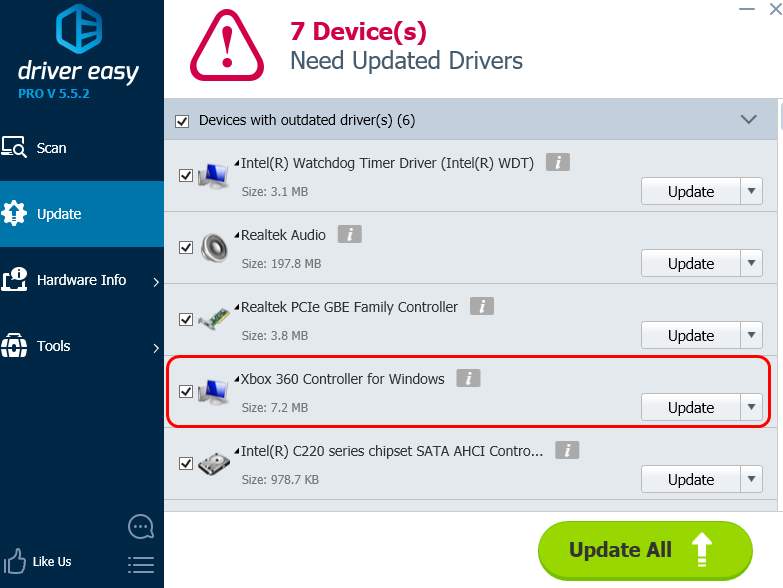
3. Click on the Update button next to the controller or receiver to download the latest and correct driver for it. You can also hit the Update All button at the bottom right to automatically update all outdated or missing drivers on your computer (this requires the Pro version — you will be prompted to upgrade when you click on Update All).
After installing the driver, restart your computer.
How to fix Xbox 360 controller Play and Charge issues on Windows 10
If you have Play and Charge problems, the solution is to use a wired controller or purchase a Bluetooth receiver for Xbox 360 Controller.
Xbox 360 Play and Charge cable is designed to recharge your wireless Xbox 360 Controller while you play games on Xbox 360.
Play and Charge cable works with Windows 10, but using Play and Charge cable won’t allow you to play games on Windows 10 with wireless Xbox 360 Controller.
The Play and Charge cable is designed just to recharge batteries on your wireless Xbox 360 Controller, and even if you have your controller connected to your console or PC, the controller still uses wireless signals to communicate with your PC / Xbox console.
Therefore, if you want to recharge your wireless Xbox 360 Controller while playing games on Windows 10, you’ll have to purchase a special Bluetooth receiver for Xbox 360 controller.
Adding Third Party Controllers
First, so that you can run your custom build with your third party controller added. Then edit . Add your controller following the pattern of pre-existing controllers by adding your vendor and product IDs to a new entry. After this, follow the information in the section, following the «If you don’t have a signing certificate» path to build your new .kext. Then, place your shiny new in to over the old one. You may need to take ownership of the driver in order for it to operate properly. You can do this with . Then, to make sure everything went according to plan, run . This will load your kext into the OS and you should be able to use your controller. Once you reboot, your custom driver should be loaded automatically.
Step 3 (for wireless controller only): Connect your controller to the wireless receiver
1. Insert a pair of AA batteries or a battery pack into your controller.
2. Press and hold the Guide button (the button with a Xbox logo) to turn on the controller.
3. Press the connect button (a circular button near the middle) on the wireless receiver. The light will flash green.
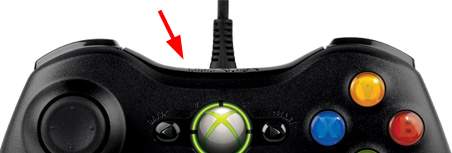
4. Press the connect button on the front edge of the controller.
5. There will be green lights flashing on both the controller and the receiver. This means they are establishing a connection. When they are connected, there will be a green light around the Guide button remaining lit, indicating the connection has been established.
Usage
The driver exposes a standard game pad with a number of standard controls, so any game that supports gaming devices should work. In some cases, this may require an update from the developer of the game. The preference pane uses the standard macOS frameworks for accessing HID devices in addition to access of Force Feedback capabilities. This means that the preference pane is a good indicator that the driver is functional for other programs.
It is important to note that this driver does not work, and can never work, with Apple’s «Game Controller Framework.» This GCController framework corresponds to physical gamepads that have been offically reviewed by Apple and accepted into the mFi program. Due to the fact that we are not Microsoft, we cannot get their gamepad certified to be a GCController. This is an unfortunate oversight on Apple’s part. If you would like to discuss this, please do so at this location.
Users have been maintaining a partial list of working and non-working games. Please contribute your findings so that you can help others debug their controller issues.
Для чего нужно приложение Tocaedit Xbox 360 Controller Emulator
Итак, вы привыкли играть на геймпаде Xbox 360. Контроллер вы находите удобным, и рука уже привыкла к расположению стиков и кнопок. Однако в данный момент вы играете на компьютере, и оригинального контроллера у вас под рукой нет.
К сожалению, периферия сторонних производителей не всегда воспринимается играми как «настоящая». Дело в политике их разработчиков — как правило, недорогие контроллеры для ПК разрабатываются в Китае, а там авторские права белых лаоваев традиционно игнорируют. В свою очередь, создателям игр выгодно, чтобы покупатели платили им за честные лицензии, поэтому они не очень-то спешат ввести поддержку устройств-«дженериков»
Всё внимание — приставкам с «настоящим» железом
Вот тут и приходит на помощь приложение Tocaedit Xbox 360 Controller Emulator. Расположившись как посредник между игрой и оборудованием, программа принимает сигналы от контроллера-дженерика, а игре передаёт те же сигналы, но переведенные на язык настоящего контроллера Xbox 360. Все довольны.
Единственное «но» — программа нуждается в некоторой настройке. Об этом поговорим ниже.
3 ways to fix Xbox 360 Controller Steam issues in Windows 10
1. Uncheck Remember this application as a game in Windows Game overlay
- Press center button on your Xbox 360 Controller while you’re playing any Steam game.
- When Windows Game overlay appears, uncheck Remember this application as a game.
After you’ve done that, Windows Game overlay will be disabled while you’re playing games on Steam and Steam overlay should be restored.
It has been reported that Xbox 360 Controller has some issues with Steam, and according to the users, they cannot access Steam functions by pressing the center button on Xbox 360 controller.
By default, pressing the center button on your Xbox 360 Controller should give you Steam overlay, but for some reason Windows Game overlay appears instead.
2. Disable Game DVR in Xbox app
- Press Windows Key + S and type Xbox. Choose Xbox app from the list of results.
- When Xbox app starts, click Settings (gear icon).
- Now go to Game DVR tab and make sure that Take screenshots using Game DVR option is disabled.
It has been reported that Game DVR functionality of Xbox app can sometimes create problems with Xbox 360 Controller and Steam.
Users report that center button isn’t working properly, and it’s giving them Windows Game overlay while playing Steam games.
This isn’t a big problem, and it can be fixed by disabling Game DVR functionality in Xbox app.
After disabling Game DVR option, Xbox 360 Controller should work with Steam without any problems.
By disabling Game DVR option you won’t be able to record gameplay or take screenshots using the Xbox app, but you can always use alternative software to fix this problem.
Настройка джойстика на Windows 8/8.1
Принцип подключения геймпада в операционных системах Windows 8/8.1 такой же, как и в инструкции, выше.
В том случае, если у вас не вышло автоматически установить программное обеспечение для устройства, тогда необходимо проверить включена ли функция автоматического обновления, или произвести установку драйверов в совместимости с Windows 7. Для установки драйверов в совместимости и подключения геймпада произведите следующие действия:
Первым делом необходимо скачать и установить программное обеспечение для джойстика Xbox 360
Ссылка на скачивание драйверов с официального сайта производителя: https://www.microsoft.com/accessories/uk-ua/d/xbox-360-controller-for-windows
После того как выбрали разрядность системы, выберите язык драйвера и нажмите на ссылку для скачивания файла.
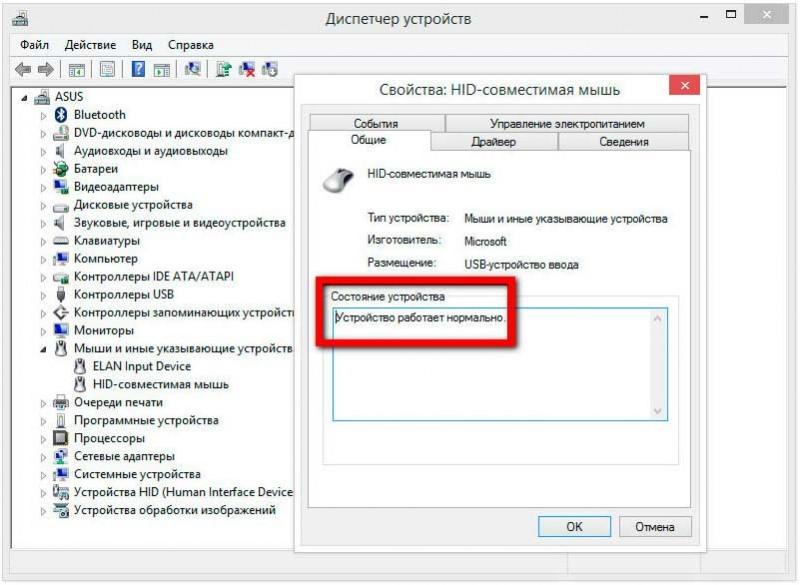
Когда файл скатается, нажмите на него правой кнопкой мыши и в выпавшем меню выберите пункт «Свойства», после чего откроется окно.
Перейдите во вкладку «Совместимость» и в разделе «Режим совместимости» из списка выберите операционную систему в совместимости, с которой необходимо запустить файл, в нашем случаи это «Windows 7». После выбора нажимаем «Ок» и запускаем фал установки драйвера.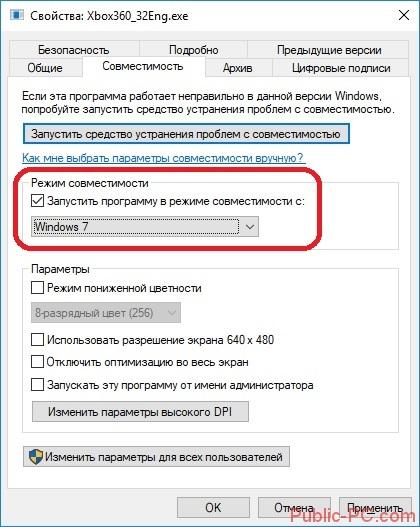
После завершения установки рекомендуется перезагрузить компьютер.
Подключение проводного геймпада к компьютеру
После того как установили драйвер и перезагрузили компьютер, вставьте провод джойстика в любой свободный USB порт компьютера. Он должен определится компьютером.
Для проверки правильной работы контролера Xbox 360 вы можете запустить специальное приложение:
- Нажмите сочетание клавиш Win+R, и в открывшейся строке «Выполнить» введите следующую команду «joy.cpl».
- Откроется окно «Игровые устройства», в котором должен быть отображен ваш контролер.
- Для проверки его работы дважды кликните левой кнопкой мыши по-вашему геймпаду, и в открывшемся окне проверьте работу и соответствие кнопок.
Fix Xbox 360 wired controller not working
The solution is pretty simple: you’ll have to make sure that you’re using a powered USB port.
Sometimes wired Xbox 360 Controller might not work with Windows 10 if you connect it to the USB port on the front of your computer.
In order to fix any potential issues with wired Xbox 360 Controller, it’s always better to connect it to the USB port on the back of your computer since those ports are usually powered USB ports.
If you’re using a USB hub, it’s also advised that you don’t connect the wired Xbox 360 Controller to it since most USB hubs don’t come with powered USB ports.
Using Xbox 360 controller on Windows 10 is a great way to save money since both wireless and wired Xbox 360 Controllers are compatible with Windows 10.
Although Xbox 360 Controller might have some issues on Windows 10, you can easily resolve most of them by following our solutions.
Don’t forget to share your problem and how you solved it in the comments section below.
FAQ: Using Xbox 360 controllers on Windows PCs
Do Xbox 360 controllers work on Xbox One?
The Xbox One does not natively support Xbox 360 controllers, however, you can use a Windows 10 PC as an intermediary device. You will have to connect the Xbox 360 controller to the Windows 10 PC and then stream your Xbox One games to it.
Why is my Xbox 360 controller not working on PC?
If you’re having trouble with your Xbox 360 controller on your Windows PC go through the general troubleshooting or follow the steps listed above to fix the issue.
Can you connect an Xbox 360 controller to a PC via Bluetooth?
To connect an Xbox 360 wireless controller to a Windows PC, you will need a Gaming Receiver to interface between the two devices and in some cases an Xbox 360 Emulator.
Editor’s Note:This post was originally published in May 2019 and has been since revamped and updated in April 2020 for freshness, accuracy, and comprehensiveness.
About
This driver supports the Microsoft Xbox series of controllers including:
-
Original Xbox
Original Xbox controllers are supported by using a USB adapter.
-
Xbox 360
- Wired Xbox 360 controllers are supported directly.
- As of macOS 10.11, Wireless Xbox 360 controller support causes kernel panics. This issue cannot be resolved with minor changes to the driver, and requires that the driver be re-written from scratch to resolve the issue. Due to an excess of caution, we have disabled Wireless Xbox 360 controller support as of 0.16.6. If you want to use a wireless controller, download 0.16.5 or earlier and disable the driver before the computer enters a «sleep» state in order to prevent kernel panics. Alternatively, you can revert to a macOS version before 10.11 to avoid this issue.
-
Xbox One
- Xbox One controllers are supported when connected with a micro USB cable. Using the controller with the Wireless Adapter is not currently supported.
- Bluetooth capable Xbox One controllers (released after August 2016) are natively supported by macOS without the use of this driver. However, installing this driver will allow you to use the controller via USB.
The driver provides developers with access to both force feedback and the LEDs of the controllers. Additionally, a preference pane has been provided so that users can configure their controllers and ensure that the driver has been installed properly.
Controller support includes ALL devices that work with an Xbox series piece of hardware. All wheels, fight sticks, and controllers should work. This includes things like the Xbox One Elite controller. If your hardware does not work with an Xbox console we cannot support it. Sorry.
Особенности X360CE
Приложение Xbox 360 Controller Emulator имеет ряд особенностей, которые надо учесть. Не стоит думать, что программа сразу и автоматически превратит ваш китайский контроллер или простой джойстик в настоящее устройство от Microsoft. Для такого эффекта надо учесть ряд моментов:
- Во-первых, существует две разновидности эмулятора X360CE:
- x32 бит для win 10 и win7 — скачайте её, если пользуетесь Windows 32 bit.
- x64 бит для win 10 и win7 — выбирайте её, если у вас установлена 64 разрядная Windows;
- Логично, что за эмулятором x360ce стоит сообщество энтузиастов. Ведь, по сути, это приложение отнимает доходы у крупной корпорации (и позволяет нам экономить). Будь её автором официально зарегистрированная компания, она бы уже разорилась на судах. А некоммерческому размытому сообществу анонимных авторов суды не страшны.
- Приложение имеет только англоязычный интерфейс. Скачать Tocaedit Xbox 360 Controller Emulator на русском не получится… Только если вы не захотите перевести его меню самостоятельно.
- С помощью X360CE можно подключить не только канонический геймпад, но и простой джойстик.
2: Update Xbox controller driver automatically (Recommended)
Windows only provide driver for Xbox 360 on builds earlier than Windows 7. So if you are using Windows 10 (which is what most of you are using now), Windows 8.1 or 8, you will find the driver provided by Windows not helpful enough.
If you don’t have the time, patience or computer skills to update the Xbox 360 driver manually, you can do it automatically with Driver Easy.
Driver Easy will automatically recognize your system and find the correct drivers for it. You don’t need to know exactly what system your computer is running, you don’t need to risk downloading and installing the wrong driver, and you don’t need to worry about making a mistake when installing.
You can update your drivers automatically with either the FREE or the Pro version of Driver Easy. But with the Pro version it takes just 2 clicks:
1) Download and install Driver Easy.
2) Run Driver Easy and click Scan Now button. Driver Easy will then scan your computer and detect any problem drivers.
3) Click the Update button next to the Xbox controller driver to automatically download and install the correct version of this driver (you can do this with the FREE version).
Or click Update All to automatically download and install the correct version of all the drivers that are missing or out of date on your system (this requires the Pro version – you’ll be prompted to upgrade when you click Update All).
Как подключить джойстик от xbox 360 к пк
Первое включение
Следуйте инструкциям, чтобы установить соединение беспроводного контроллера Xbox 360 на операционной системе Windows 10:
Подключите устройство при помощи USB шнура, в случае если у вас не беспроводной контроллер. Если это версия без проводов, то следует подключить в разъём USB лишь специальную станцию для приема сигнала, которая выглядит следующим образом:
Операционная система Windows 10 автоматически определит устройство и начнёт устанавливать нужное программное обеспечение. Не нужно скачивать стороннее ПО, так как это может повредить ваш компьютер. Как только появится сообщение об успешной установке, можно закрывать окно с установкой и приступать к использованию контроллера.
Откройте любую современную игру и попробуйте испытать возможности джойстика. Если управление происходит корректно, значит драйвера были установлены правильно.
Несколько советов:
- Если системе не удалось обнаружить контроллер Xbox 360, то можно попробовать переставить шнур USB в другой разъём и затем попробовать установить ещё раз;
- Контроллер всё ещё не работает? Проверьте обновления Windows 10. Для этого перейдите в меню параметров, находящееся в «Пуске». Там зайдите в подраздел «Обновление и безопасность» и проверьте наличие обновлений;
- Просмотрите руководство пользователя к игре. Возможности разработчики игрового проекта указали некоторые особенные параметры для запуска управления с помощью джойстика для своей игры.
Настройка под Windows 8 и 8.1
В случае с операционными системами Windows 8 и Windows 8.1, драйвера установлены изначально. Следует просто подключить док-станцию или же сам джойстик посредством USB разъёма и можно приступать к игре.
Если возникнут проблемы в работе, стоит воспользоваться аналогичным ПО для ОС Windows 7.
Параметры под Windows 7
Нужно перейти на
- Windows 7 (32-bit only)
- Windows 7 (64-bit only)
- В меню выбора языка выбирайте язык вашей операционной системы;
- Сохраняйте установочный файл;
- Находите загруженную программу у себя на жёстком диске и кликните по ней правой клавишей мышки. Выберите вкладку «Свойства»;
- Установите вкладку совместимости и в выпадающем списке выбирайте Windows 7;
- Нажимайте кнопку «Принять» и «Ок»;
- Двойным щелчком по установочному файлу запускайте процесс установки ПО для использования джойстика Xbox 360. Нужно будет перезагрузить компьютер.
Проверка работоспособности контроллера Xbox 360 на персональном компьютере
- При использовании ОС Windows 8, нажмите на стартовом окне вбейте в поиск joy.cpl. В случае Windows 7 просто осуществите поиск по системе;
- Найдите контроллер Xbox 360 и нажмите на «Свойства»;
- Чтобы протестировать работоспособность устройства, достаточно нажать на центральную клавишу джойстика в виде большого икса;
- Если устройство было не распознано, то стоит переставить шнур USB в другой порт и попробовать запустить джойстик заново.
Установка на более старых системах
В случае более старых систем, вроде Windows XP и Windows Vista, лучше поставить ПО с помощью CD диска, идущего в комплекте с контроллером Xbox 360 для персонального компьютера:
- Нужно вставить диск в привод ПК. Процесс инсталляции можно включить через окно «Мой Компьютер», если она не началась самостоятельно;
- В окне установки, нажать на кнопку «Install»;
- Система самостоятельно установит всё нужное программное обеспечение и позволит наслаждаться игрой даже на несколько устаревших операционных системах. Нужно будет лишь перезагрузить персональный компьютер после установки всех нужных компонентов.
Обнаружение компьютера
Чтобы система смогла обнаружить джойстик, нужно произвести сопряжение. Для этого стоит нажать на нужную клавишу док-станции:
И сделать то же самое с кнопкой на самом джойстике:
Вокруг центральной кнопки контроллера в виде большого икса будет подан круговой сигнал зелёного цвета. Это означает, что джойстик был подключен корректно.
Надеюсь, что у вас больше нет вопросов по поводу того, как подключить джойстик от xbox 360 к пк
Install and Use Instructions
- Download latest Xbox 360 Controller Emulator (same file for 32-bit and 64-bit Windows).
- Extract downloaded ZIP file and launch x360ce.exe.
Installing Virtual Device Drivers
- Issues tab will start blinking if Virtual Device Drivers are missing.
- Select Issues tab and click on Install button to install Virtual Device Drivers.
Adding DirectInput Device (Controller)
- Connect your DirectInput Device (controller) to computer.
- Select Controller 1 tab and click on Add… button.
- Select controller you want to add-map and click on OK button.
- Enable controller by clicking on Enable # Mapped Device inside Controller 1 tab.
Configuring and Mapping Buttons and Axes
-
Select Controller 1 tab > General tab.
-
Click on drop-down (drop-down menu with options will appear).
-
Map button or axis by selecting option and pressing button or moving axis on your controller.
-
Click Save All button (at top right corner of application) when done.
-
Minimise «Xbox 360 Controller Emulator» in order to reduce CPU use (program icon will be visible in tray).
-
Launch the game and see how it works.
How to Uninstall Virtual Device Driver
- Run «Xbox 360 Controller Emulator» as an Administrator, go to Options tab and press Uninstall button inside «Virtual Device Emulation» group box.
How do I fix Xbox 360 controller driver issues on Windows 10?
1. Install the driver manually
If you’re using wireless Xbox 360 Controller, you need to use a wireless receiver in order to connect it to your computer.
Sometimes, drivers for wireless receiver have to be updated, or your Xbox 360 Controller might not work on Windows 10.
To update the drivers for your receiver, follow these steps:
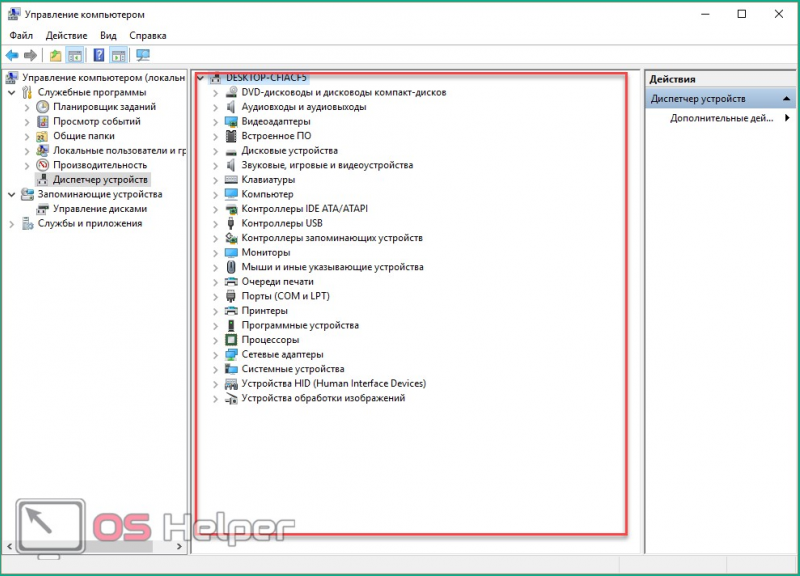
- Open Device Manager. You can access Device Manager by pressing Windows Key + X and choosing Device Manager from the list.
- When Device Manager opens, make sure that your receiver is connected to your PC. Navigate to Other Devices section and expand it. Right-click the Unknown device and choose Update Driver Software from the menu.
- Click Browse my computer for driver software.
- Now click on Let me pick from a list of device drivers on my computer.
- You should see a list of device drivers. Select Xbox 360 peripherals and click Next.
- Choose the latest Receiver driver that’s on the list and click Next. If you get a warning message, just click OK and wait for the driver to install.
- Now you just need to hold the pairing button on your Bluetooth receiver and on your Xbox 360 Controller for about 3 seconds. After doing that, your computer should recognize your controller.
After the driver has been installed, your Xbox 360 Controller should start working on Windows 10 without any problems.
It has been reported that this solution works with third-party receivers as well, so even if you don’t use Microsoft receiver, it should work without any problems as long as you install Microsoft’s drivers.
2. Uninstall the driver
Sometimes Xbox 360 Controller might not work on Windows 10 due to bad driver, and if that’s the case, the best solution is to uninstall that driver and allow Windows to install it again.
To uninstall the driver, follow these steps:
- Start Device Manager.
- In Device Manager locate Xbox 360 Wireless Receiver for Windows and right-click it.
- Choose Uninstall from the menu.
- After the driver has been uninstalled, restart your computer. When your computer restarts, Windows 10 will automatically install the missing driver.
3. Install the latest drivers
Sometimes your Xbox 360 Controller might not be recognized due to outdated driver, and if that’s the case, make sure that your Windows 10 is up to date with latest patches.
In addition, you can also download the necessary drivers from this link. After you’ve downloaded and installed the appropriate driver, Xbox 360 Controller should start working again.
If this method doesn’t work or you do not have the necessary computer skills to update/fix the drivers manually, we strongly suggest to do it automatically by using Tweakbit’s Driver Updater tool.
This tool is approved by Microsoft and Norton Antivirus. After several tests, our team concluded that this is the best automatized solution. Below you can find a quick guide on how to do it.
- Download and install TweakBit Driver Updater
- Once installed, the program will start scanning your PC for outdated drivers automatically. Driver Updater will check your installed driver versions against its cloud database of the latest versions and recommend proper updates. All you need to do is wait for the scan to complete.
- Upon scan completion, you get a report on all problem drivers found on your PC. Review the list and see if you want to update each driver individually or all at once. To update one driver at a time, click the Update driver link next to the driver name. Or simply click the Update all button at the bottom to automatically install all recommended updates.Note: Some drivers need to be installed in multiple steps so you will have to hit the Update button several times until all of its components are installed.
Disclaimer: some functions of this tool are not free.