Скачать virtualbox — установка множество ос на компьютер
Содержание:
- Extras (missing Guest Additions)
- VirtualBox Sources
- Miscellaneous[edit]
- Footnotesedit
- Установка «Дополнений гостевой ОС» для гостевого ALT Linux[править]
- Настройка загрузки Linux в гостевых машинах в режиме UEFI[править]
- Development branch builds (bottom of page)
- Install VirtualBox Guest Additions on Windows
- Решение проблем[править]
- Workaround
- Установка Oracle Extension Pack[править]
- Установка дополнения гостевой ОС VirtualBox в LInux
- Builds
- Настройка сети в гостевой системе Virtualbox[править]
- VirtualBox binaries
- Whonix-Custom-Workstation ™[edit]
- Preventive measures
- Stable branch builds
Extras (missing Guest Additions)
This extra section is necessary, because sometimes people have trouble finding the Guest Additions! In general,
whenever you click Install Guest Additions …, VirtualBox is supposed to mount
the Guest Additions ISO. But this may not happen. There are several ways to rectify the situation:
First, if the Guest Additions are not found, VirtualBox may prompt you to access Internet and download the ISO
file. You only have to do this once. Unfortunately, I do not have a screenshots to share on this one.
Alternatively, you can download the image yourself and then manually mount it as a CD-ROM, under the
Settings for the particular virtual machine.

Then, the next time you launch the virtual machine, the Guest Additions will be mounted as a CD-ROM. To install
the Additions, on Windows, double-click the executable; on Linux, run the scripts as demonstrated above.
From here, you’re on common grounds.
VirtualBox Sources
The VirtualBox sources are available free of charge under the terms and conditions of the GNU General Public License, Version 2. By downloading from the below links, you agree to these terms and conditions.
Source code
Browse the source code repository
This is the current development code, which is not necessarily stable.
View the latest source code changes
Download the VirtualBox OSE about logo in higher resolutions: 1024×768, 1600×1200.
Checking out from our Subversion server.
svn co https://www.virtualbox.org/svn/vbox/trunk vbox
This is the current development code, which is not necessarily stable.
After getting the sources in one of the ways listed above, you should have a look at the build instructions.
Please also take a look at our licensing FAQ, in particular regarding the use of the name VirtualBox.
Miscellaneous[edit]
TODO: document
/usr/sbin/vbox-uninstall-guest-additions
Debuggingedit
To help debug issues, inspect the following logs and services.
cat /var/log/vboxadd-install.log
cat /var/log/vboxadd-install.log
sudo systemctl status vboxadd
sudo systemctl status vboxadd
sudo systemctl status vboxadd-service.service
sudo systemctl status vboxadd-service.service
ls -la /opt/VBoxGuestAdditions-*/init/
ls -la /opt/VBoxGuestAdditions-*/init/
Issuesedit
To document any problems, utilize the following short link to this wiki page: https://www.whonix.org/wiki/ga
If the following message appears during a kernel upgrade, it is a non-issue.
/etc/kernel/postinst.d/vboxadd:
VirtualBox Guest Additions: Building the modules for kernel 5.6.0-0.bpo.2-amd64.
Failed to rename process, ignoring: Operation not permitted
update-initramfs terminated by signal TERM.
: VirtualBox guest additions from package virtualbox-guest-additions-iso installation helper by Whonix developers
TODO: document.
Footnotesedit
- Host -> Whonix-Gateway clipboard sharing enable by default?
-
https://forums.whonix.org/t/security-risks-of-virtualbox-shared-folders/10119
-
To learn more about VirtualBox shared folders, see: .
-
Admittedly, this recommendation does not have a strong rationale. Disabling additional features in other virtualizers or general applications will similarly lead to less code paths being utilized and arguably increasing security. VirtualBox software is not special in this regard.
- Because otherwise you cannot change VirtualBox VM settings.
- Using /lib/systemd/system/mnt-shared-vbox.service .
-
If the option is unavailable, upgrade VirtualBox.
-
Alternatively folder can be chosen. The VirtualBox default means that folder would be owned by owner and group .
-
This is specific to the VirtualBox version; newer versions do not have this option anymore.
Check if this setting should persist after restart of the virtual machine. Otherwise this setting will be temporary. -
This step is required. Quote :
-
- Package .
- Installing VirtualBox Guest Addition by Default?
- http://www.webcitation.org/6HqJVN0br
- https://www.whonix.org/w/index.php?title=Ga&action=edit
Whonix is Supported by Evolution Host DDoS
Protected VPS. Stay private and get your VPS with Bitcoin or Monero.
Search engines: YaCy | Qwant | ecosia | MetaGer | peekier | Whonix Wiki
Follow:
Donate:
Share:
|
Have you read our Documentation , Technical Design and Developer Portal links yet?
This is a wiki. Want to improve this page? Help is welcome and volunteer contributions are happily considered! Read, understand and agree to , then Edit! Edits are held for moderation. Policy of Whonix Website and Whonix Chat and Policy On Nonfreedom Software applies.
Copyright (C) 2012 — 2020 ENCRYPTED SUPPORT LP. Whonix is a trademark. Whonix is a licensee of the Open Invention Network . Unless otherwise noted, the content of this page is copyrighted and licensed under the same Freedom Software as Whonix itself. (Why?)
Whonix is a derivative of and not affiliated with Debian . Debian is a registered trademark owned by Software in the Public Interest, Inc .
Whonix is produced independently from the Tor anonymity software and carries no guarantee from The Tor Project about quality, suitability or anything else.
By using our website, you acknowledge that you have read, understood and agreed to our Privacy Policy, Cookie Policy, Terms of Service, and E-Sign Consent. Whonix is provided by ENCRYPTED SUPPORT LP. See Imprint, Contact.
Установка «Дополнений гостевой ОС» для гостевого ALT Linux[править]
- 1. Установите модуль ядра kernel-modules-virtualbox-addition-<тип ядра> и вспомогательные пакеты для интеграции
apt-get install kernel-modules-virtualbox-addition-$(uname -r|cut -f2,3 -d-) virtualbox-guest-additions xorg-drv-vboxvideo
Перед любыми операциями с установкой модуля ядра, надо обновить ядро с помощью команд:
apt-get update
update-kernel
И ни в коем случае не устанавливать модуль от другой ядерной сборки подробнее смотри: Обновление_ядра
- 2. Выберите в Центре управления системой ⇒ Дисплей драйвер vboxvideo.
Примечание:
Драйвер можно выбрать и в командной строке (под правами root):
alterator-cmdline /x11 action write _objects driver driver vboxvideo
Примечание:
Если пункта «Дисплей» нет в Центре управления системой, установите пакет alterator-x11
- 3. Перезагрузите гостевую систему или только сеанс
- 4. Включите в меню виртуальной машины
- Устройства ⇒ Общий буфер обмена ⇒ Двунаправленный
- Устройства ⇒ Drag’n’Drop ⇒ Двунаправленный.
Общие папкиправить
- 1. Установите в гостевой операционной системе дополнения гостевой операционной системы и virtualbox-guest-utils
apt-get install kernel-modules-virtualbox-addition-$(uname -r | cut -d "-" -f2,3) virtualbox-guest-utils
Этот пункт не нужен, если уже установлен пакет virtualbox-guest-additions, как описано выше.
- 2. Добавьте в свойствах виртуальной машины (раздел «Общие папки») папку. Для этого выберите путь и укажите имя папки (по умолчанию используется имя последней папки в указанном пути). Если хотите чтобы папка осталась настроенной и после перезагрузки гостевой операционной системы, установите флажок «Создать постоянную папку».
- 3. Для монтирования общих папок VirtualBox должен быть загружен модуль vboxsf
modprobe vboxsf
- 4. В гостевой операционной системе выполните
mount -t vboxsf <имя папки> /mnt
Внимание! Использование параметра -t в команде mount разрешено только пользователю root.
Если необходимо обеспечить доступ на чтение/запись от имени обычного пользователя, то добавьте в команду монтирования опции uid и gid.
Например, если у пользователя user uid=500 и gid=500, то команда будет выглядеть так:
mount -t vboxsf -o uid=500,gid=500 <имя папки> /mnt
- 5. Общая папка становится доступна в /mnt.
Краткая инструкция для установки дополнений вручнуюправить
Внимание! идеологически неправильное решение!!!
Запускаем гостевой Линукс, и удаляем пакеты:
xorg-drv-vboxvideo
- Ставим пакет kernel-headers-modules для своего ядра.
- В окне VirtualBox, в меню «Устройства», выбираем «Установить дополнения гостевой ОС».
- В гостевом Линуксе заходим на CD-ROM, находим там файл VBoxLinuxAdditions-x86.run (-amd64.run для соответствующей архитектуры), копируем его в /tmp.
- В гостевом Линуксе открываем терминал, переходим в нём в рута (командой su -) и выполняем команду:
chmod a+x /tmp/VBoxLinuxAdditions-x86.run
/tmp/VBoxLinuxAdditions-x86.run
- Далее исполняется скрипт, который сам все распакует, скомпилирует и установит.
- Убеждаемся, что в гостевом Линуксе xorg.conf прописаны драйвер vboxvideo для видео.
- Перезагружаем виртуальную машину.
- Наслаждаемся автоизменением размеров окна, и «незалипающей» мышкой.
Настройка загрузки Linux в гостевых машинах в режиме UEFI[править]
Основная статья UEFI
Следует отметить, что NVRAM на виртуальном железе VirtualBox не переживает выключение экземпляра (это известная проблема). Т.е. установщик/efibootmgr не может добавить ссылку на grub, а если добавить её руками, она исчезнет при следующем запуске экземпляра.
Решение:
1-ый вариант выполнить в ещё загруженной системе
echo «fs0:\EFI\altlinux\grubx64.efi» > /boot/efi/startup.nsh
Или то же самое сделать потом, из EFI Shell:
echo «fs0:\EFI\altlinux\grubx64.efi» > fs0:\startup.nsh
2-ой вариант (подсмотрено в | VirtualBox (Русский) на wiki.archlinux.org
- Если существует файл /boot/efi/boot/BOOTX64.EFI дать ему другое имя
- Скопировать /EFI/altlinux/grubx64.efi в /boot/efi/boot/BOOTX64.EFI
Development branch builds (bottom of page)
If you make any sort of mission-critical use of VirtualBox — particularly if you do not have a support contract — you are advised to regularly try out our development branch builds to make sure that everything you depend on still works as you expect. Catching problems at the development stage greatly improves your chances of having them solved before they reach a stable release, and increases your voice in the development process. The builds are usually usable for day-to-day work — we use them ourselves — for people who can deal with occasional surprises. Please report development build problems on IRC or the developer mailing list, not on the bug tracker.
A list of things worth testing for in test builds can be found here: .
Pick out your area of interest.
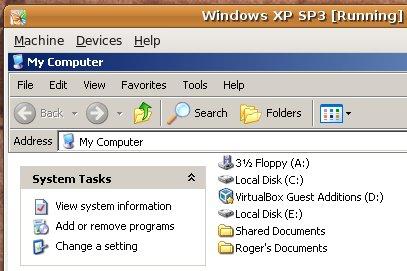
Install VirtualBox Guest Additions on Windows
One thing to keep in mind is that Guest Additions, as the name says, are additions to the Guest OS and not the host OS. Therefore, in this case the guest OS running on the virtual machine is Windows (7, 8.X, and 10). The host OS on which VirtualBox is installed can be anything. This is a perfect setup where your host OS is Linux and would like to get on to Windows for few tasks here and there.
Windows VirtualBox Guest Additions setup is extremely simple. You do not have to download Oracle VirtualBox Guest Additions CD. All you have to do is, when Windows virtual appliance is running, go to -> as shown in the picture below. This will mount the VBox Guest Additions CD as a drive for installation.
Insert VBox Guest Additions CD
Now open or , and open the Guest Additions CD. The picture below shows VBox Windows 10 with Guest Additions CD open. Find executable file and double click it to run it. Alternatively, you may also click on the executable file for your architecture (amd64 or x86) to install VirtualBox Guest Additions on Windows.
Run VBox Guest Additions Installer for Windows
Leave the default options as is and click through the steps to start Guest Additions installation. That is it, just sit and watch. The installer will automatically prepare and install VBox Guest Additions on Windows.
Install VirtualBox Guest Additions on Windows
Once the installation finishes, reboot your guest OS, and you are done. You should now be able to run the guest OS in fullscreen mode, drag and drop things between guest and host OS, share clipboards, and do much more. In my opinion, if you use VirtualBox then Guest Additions are a must-have. VirtualBox also offers what is known as , which adds some advanced features. But most users do not need the Extension Pack. Go ahead install VirtualBox Guest Additions on Windows guest OS and enjoy added performance and features.
Решение проблем[править]
- При запуске дистрибутивов на Седьмой платформе как гостевых ОС в VirtualBox после загрузки ядра показывается чёрный экран, в журнале пишется
Guest Log: BIOS: KBD: unsupported int 16h function 03
Для современных ядер, на которых основаны дистрибутивы Седьмой платформы, нужно указывать в настройках виртуальной машины Система ⇒ Материнская плата ⇒ Чипсет: ICH9 (заодно там же включите IO APIC). По умолчанию в альтовом VirtualBox стоит PIIX3, что и является причиной указанного поведения.
- При запуске гостевой ОС на Седьмой платформе VirtualBox показывает сообщение о не достаточных правах доступа для /dev/vboxdrv и просит запустить «/etc/init.d/vboxdrv setup» которого нет
Необходимо выполнить:
 chkconfig virtualbox on
 service virtualbox start
- В гостевой ОС после выбора подсказки Установка или LiveCD чёрный экран и ничего не происходит.
Выберите PIIX3, и при запуске установки (или загрузки с LiveCD) выберите клавишеей F5 загрузка «Без локального APIC»
- В гостевой системе не работает звук
- Откройте регулятор громкости PulseAudio (pavucontrol) и на вкладке «Проигрывание» включите звук для виртуальной машины.
Примечание:
VirtualBox через PulseAudio позволяет настраивать вывод звука для каждой виртуальной машины. При этом включение для первой машины включает звук и для других запускаемых виртуальных машин
- Плохо работает микрофон в гостевой системе (заикается)
- Всё дело в PulseAudio. Для того, чтобы микрофон работал без заиканий, для виртуальной машины выставьте ALSA: Аудио ⇒ Аудиодрайвер: ALSA и выключите на время работы PulseAudio: в терминале
pulseaudio -k
- Если служба virtualbox запускается, но модули не загружаются, отключите автозапуск службы virtualbox и создайте файл /etc/modules-load.d/virtualbox.conf такого содержания
vboxdrv
vboxpci
vboxnetflt
vboxnetadp
- Происходит зависание гостевой ОС на словах Local IPI:
Workaround
In my case I couldn’t use the mouse and most of the keyboard was disabled but I found a workaround that probably works for everyone.
Basically the idea is to prevent the logitech drivers from running without using the guest keyboard/mouse.
I did it by using the utility VBoxManage guestcontrol to execute any command on the guest system.
Microsoft has a command line utility that is an alternative to the device manager. It can be found here: http://support.microsoft.com/kb/311272
Extract the exe file and put the devcon.exe somewhere the guest system can access (I used a network share, p:\).
Then I listed all drivers in the system with:
VBoxManage guestcontrol execute "VM name goes here" "c:\winnt\system32\cmd.exe" --arguments "/c p:\devcon driverfiles *" --username Administrator --password 1234 --wait-for stdout > driverfiles2.txt
Inside the listing I found:
ACPI\PNP0F03\4&1D401FB5&0
    Name: Logitech-compatible Mouse PS/2
    Driver installed from c:\winnt\inf\oem4.inf . 6 file(s) used by driver:
        C:\WINNT\system32\DRIVERS\i8042prt.sys
        C:\WINNT\system32\DRIVERS\mouclass.sys
        C:\WINNT\system32\DRIVERS\L8042pr2.sys
        C:\WINNT\system32\DRIVERS\lmouflt2.sys
        C:\WINNT\system32\DRIVERS\lkbdflt2.sys
        C:\WINNT\system32\lcoinst.dll
I tried to remove ACPI\PNP0F03\4&1D401FB5&0 from the system but it didn’t work as it got automatically reinstalled after the required reboot.
So I deleted c:\winnt\inf\oem4.inf so windows wouldn’t find the information how to reinstall the Logitec drivers.
I did it like this:
VBoxManage guestcontrol execute "VM name goes here" "c:\winnt\system32\cmd.exe" --arguments "/c del c:\winnt\inf\oem4.inf" --username Administrator --password 1234 --wait-for stdout
The windows installation on the guest was located at c:\winnt but that could be different on others. If you don’t know you can check it with the %SYSTEMROOT% variable.
Like this:
VBoxManage guestcontrol execute "VM name goes here" "c:\winnt\system32\cmd.exe" --arguments "/c echo %SYSTEMROOT%" --username Administrator --password 1234 --wait-for stdout
Установка Oracle Extension Pack[править]
# VirtualBox extpack install /path/to/Oracle_VM_VirtualBox_Extension_Pack-...vbox-extpack
Для установки дополнения необходимо запустить VirtualBox с правами администратора, иначе установка не удастся с ошибкой:
The installer failed with exit code 127: Error creating textual authentication agent:
Error opening current controlling terminal for the process (`/dev/tty'): No such device or address.
Примечание:
новые версии Virtualbox умеют устанавливать это расширение от обычного пользователя
Если в системе установлена программа gksu или kdesudo, то VirtualBox попытается с их помощью поднять уровень привилегий для выполнения установки
На данный момент Oracle VM VirtualBox Extension Pack является единственным дополнением. Оно обеспечивает следующую функциональность:
- USB 2.0 EHCI
- VirtualBox Remote Desktop Protocol, VRDP
- Intel PXE boot ROM с поддержкой контроллера E1000
- экспериментальная поддержка «проброса» PCI с хост-системы
Установка дополнения гостевой ОС VirtualBox в LInux
Перед тем, как начать работу с Linux, вы должны убедиться, что у вас установлены базовые инструменты. Вы можете обратиться к документации, доступной для вашего дистрибутива, чтобы увидеть, как это сделать.
В строке меню VirtualBox перейдите в меню «Устройство», затем выберите «Вставить образ компакт-диска с гостевыми дополнениями». На рабочем столе должен появиться значок диска.
Вы можете получить всплывающее окно с предложением запустить компакт-диск. Если нет, дважды щелкните значок компакт-диска, и он должен запуститься. Терминал запустится. Следуйте инструкциям для завершения установки.
Builds
Latest 6.1.x test builds
| Windows | 6.1.x revision 139930 |
| macOS | 6.1.x revision 139930 |
| Linux 64-bit | 6.1.x revision 139930 |
| Linux EL6 64-bit | 6.1.x revision 139930 |
| Linux EL7 64-bit | 6.1.x revision 139930 |
| Linux EL8 64-bit | 6.1.x revision 139930 |
| Solaris | 6.1.x revision 139930 |
| Guest Additions | 6.1.x revision 139928 |
| Extension Pack | 6.1.x revision 139930 |
| SDK | 6.1.x revision 139930 |
Latest 6.0.x test builds
| Windows | 6.0.x revision 139674 |
| macOS | 6.0.x revision 139674 |
| Linux 64-bit | 6.0.x revision 139674 |
| Linux EL6 64-bit | 6.0.x revision 139674 |
| Linux EL7 64-bit | 6.0.x revision 139674 |
| Linux EL8 64-bit | 6.0.x revision 139674 |
| Solaris | 6.0.x revision 139674 |
| Guest Additions | 6.0.x revision 139674 |
| Extension Pack | 6.0.x revision 139674 |
| SDK | 6.0.x revision 139674 |
Latest 5.2.x test builds
| Windows | 5.2.x revision 139677 |
| macOS | 5.2.x revision 139677 |
| Linux 32-bit | 5.2.x revision 139677 |
| Linux 64-bit | 5.2.x revision 139677 |
| Linux EL6 64-bit | 5.2.x revision 139677 |
| Linux EL7 64-bit | 5.2.x revision 139677 |
| Linux EL8 64-bit | 5.2.x revision 139677 |
| Solaris | 5.2.x revision 139677 |
| Guest Additions | 5.2.x revision 139677 |
| Extension Pack | 5.2.x revision 139436 |
| SDK | 5.2.x revision 139677 |
Development snapshots
| Windows | development revision 139669 |
| macOS | development revision 139664 |
| Linux 64-bit | development revision 139787 |
| Linux EL6 64-bit | development revision 139663 |
| Linux EL7 64-bit | development revision 139659 |
| Linux EL8 64-bit | development revision 139659 |
| Solaris | development revision 139668 |
| Guest Additions | development revision 139787 |
| Extension Pack | development revision 139662 |
| SDK | development revision 139678 |
Настройка сети в гостевой системе Virtualbox[править]
- Чтобы гостевая система получила доступ к подсети, в которой находится хост-система, можно поступить следующим образом
Настроить в хост-системе туннель и бридж, как описано в пунктах и
статьи Etcnet — соответственно, сначала необходимо запустить интерфейс туннеля tap0 а затем объединить его в мост с интерфейсом вашей физической сетевой карты (например, eth0).
После того, как вы убедитесь, что сеть на хост-системе после этой настройки работает как и раньше, вы можете использовать туннель в Virtualbox:
зайдите в свойства виртуальной машины, раздел «сеть» и выберите «Подсоединён к» — «Хост-интерфейс», а ниже, в поле «Хост-интерфейсы» выберите tap0.
После этого, при загрузке, гостевая система получит доступ к той же подсети, что и хост-система, и будет выступать равноправным компьютером в сети со своим IP адресом. IP адрес и другие настройки интерфейсу следует назначать средствами гостевой системы.
VirtualBox binaries
By downloading, you agree to the terms and conditions of the respective license.
If you’re looking for the latest VirtualBox 6.0 packages, see VirtualBox 6.0 builds. Please also use version 6.0 if you need to run VMs with software virtualization, as this has been discontinued in 6.1. Version 6.0 will remain supported until July 2020.
If you’re looking for the latest VirtualBox 5.2 packages, see VirtualBox 5.2 builds. Please also use version 5.2 if you still need support for 32-bit hosts, as this has been discontinued in 6.0. Version 5.2 will remain supported until July 2020.
VirtualBox 6.1.12 platform packages
- Windows hosts
- OS X hosts
- Linux distributions
- Solaris hosts
See the changelog for what has changed.
You might want to compare the checksums to verify the integrity of downloaded packages.
The SHA256 checksums should be favored as the MD5 algorithm must be treated as insecure!
SHA256 checksums, MD5 checksums
Note: After upgrading VirtualBox it is recommended to upgrade the guest additions as well.
VirtualBox 6.1.12 Oracle VM VirtualBox Extension Pack
All supported platforms
VirtualBox Personal Use and Evaluation License (PUEL)Please install the same version extension pack as your installed version of VirtualBox.
Whonix-Custom-Workstation ™[edit]
If you are using a Whonix-Custom-Workstation additional steps are required. Please click on expand on the right.
Two options exist: automatic mounting or manual mounting. The automatic mounting method is described below. For additional information on shared folders refer to the . Any additional questions are unspecific to Whonix and should be addressed as per the Free Support Principle.
- Install VirtualBox guest additions inside the VM.
-
Add the user that will utilize shared folders from inside the VM to group :
sudo addgroup user vboxsf
sudo addgroup user vboxsf
- A reboot is required to make group changes take effect.
- Follow the instructions above.
Preventive measures
I just wanted to add that cleaning up the drivers before installing the guest additions is another option.
This is one way to do it:
1) Remove unused software like Logitech Mouseware under the windows control panel > add/remove programs.
2) Remove unused drivers with the Device Manager. You need to add an environment variable before starting to be able to see unused devices in the system.
From a command window:
set devmgr_show_nonpresent_devices=1
or add devmgr_show_nonpresent_devices under properties for «My Computer»>System Properties>Adavnced>Environment Variables. Set value to 1.
Then start the Device Manager and select View > Show Hidden Devices.
Unused devices will be greyish.
Uninstall those not present in the system.
When converting a physical machine to a virtual there will be a bunch on unused drivers in the system.
Stable branch builds
If you are experiencing some problem with VirtualBox and want to find out whether it has been fixed before you file a bug report, if you want to help our quality testing, or if you just want a particular fix early, you may wish to try out a test build of the current release series.
These builds are expected to be almost as stable as released versions, and we accept bug reports against them. They may contain some features which we plan to include in a future stable release but not necessarily the next. For any mission critical use of VirtualBox we of course always recommend purchasing a support contract.