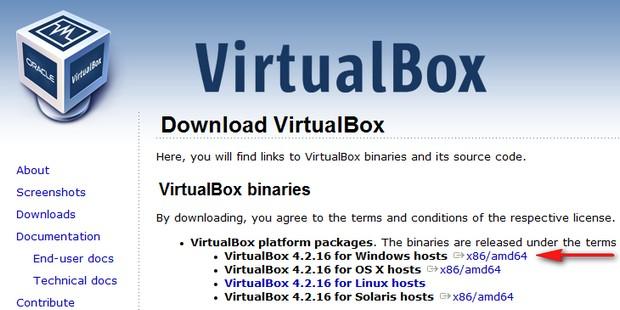
Скачать virtualbox для windows 7
Содержание:
Minimap Mod
The Minimap Mod in XVM lets you to show vehicle name, nicks, “last spotted” markers, horizontal traverse, gun facing and spotting range as well as other minimap elements.
The Minimap Mod in XVM had already achieved massive popularity before it was even included in the official release, as the extensive customization features allow you to configure it for maximum convenience.
No longer limited in area, users with various size monitors and display resolutions can re-size it to their liking, unhindered by the limitations of the standard interface.The spotting range indicator aids in choosing positions and allows you to quickly take stock of battle progression while also informing you of your vehicle’s spotting characteristics.
Players and field commanders alike will find the ability to show tank names as well as player nicks on the minimap to be one of the most invaluable features of the Minimap Mod.“Last known position” icons help with being able to retain a fuller picture of what is happening during the battle.And finally, you can utilize not only standard macros and text in any minimap text field, but also include images using the tag.
agp440.sys / intelppm.sys
There are a few Windows device drivers that does not play nice on VirtualBox’ hardware. Many physical PC systems (and VMware) have a AGP graphics bus which will cause agp440.sys to be installed. VirtualBox’ virtual graphics card is on the PCI bus and the driver will cause a system crash. The most correct approach is to boot the recovery console from the Windows installation CD and disable this service. However, it is also possible to just rename/delete agp440.sys the C:\Windows\SYSTEM32\drivers directory. Here is a knowledge base article containing more information: http://support.microsoft.com/kb/324764
A similar problem may exist with intelppm.sys, which can also cause a hang of the guest OS.
Step By Step Instructions For Windows XP
This should work for Win2k Vista and Windows 7 as well, but it’s untested.
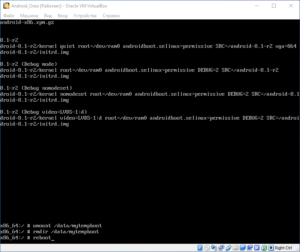
- Run the MergeIDE utility as mentioned above on existing windows machine.
- Shut down windows machine.
- Either pull the drive from the windows machine or copy the data with a low level image tool (like dd) to a USB drive or other removable media. If making an image, DO NOT image just the partition, this will not work!
- Use VBoxMange convertfromraw to convert the image or to copy from the drive you pulled from the windows machine.
- If you are converting from the image, the syntax is just
VBoxManage convertfromraw ImageFile.dd OutputFile.vdi
- If you are converting from the drive, you need to use
cat /dev/sdg | VBoxManage convertfromraw stdin OutPutFile.vdi NUMBEROFBYTES
Note, if you use fdisk -l in Linux you can see how many bytes each drive is to supply this parameter. Example:
# fdisk -l /dev/sda
Disk /dev/sda: 1500.3 GB, 1500301910016 bytes
To determine the same information on a Mac OS X host, you do
# diskutil list
# diskutil info /dev/disk0
to list available disks and to show the number of bytes under Total Size:.
- If you are converting from the image, the syntax is just
- Then use the media manager in VirtualBox to add the newly converted drive.
- Make a new virtual machine, using the drive you just added with the media manager.
- Once it is created, go in and turn on “Enable IO APIC”, select the # of processors you want etc.
- Try to boot the new virtual machine. It may “just work”, or you may get a BSOD. If it just works install guest additions and you are done. Depending on your license you might need to re-activate Windows.
- If it did not work, and you got a BSOD. Shutdown the virtual machine and boot up from a windows CD. Go through until you get to the select a partition, select the existing partition, and choose “repair”. It will basically reinstall windows and configure it for your new hardware (virtual hardware).
- Reinstall patches (Service packs) and updates.
- Install guest additions
◆ checkFirmwarePresent()
| void IVirtualBox::checkFirmwarePresent | ( | in | firmwareType, |
| in wstring | version, | ||
| out wstring | url, | ||
| out wstring | file, | ||
| out boolean | result | ||
| ) |
Check if this VirtualBox installation has a firmware of the given type available, either system-wide or per-user.
Optionally, this may return a hint where this firmware can be downloaded from.
- Parameters
-
firmwareType Type of firmware to check. version Expected version number, usually empty string (presently ignored). url Suggested URL to download this firmware from. file Filename of firmware, only valid if result == TRUE. result If firmware of this type and version is available.
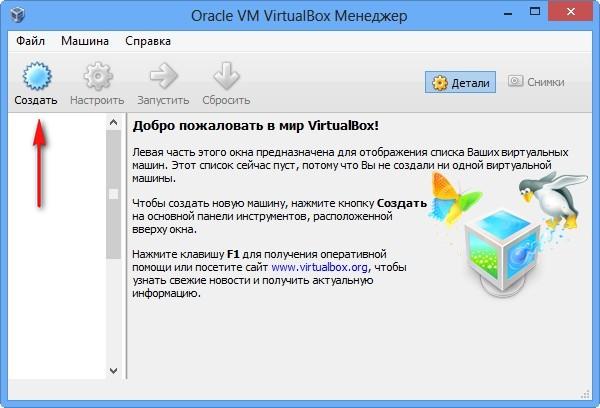
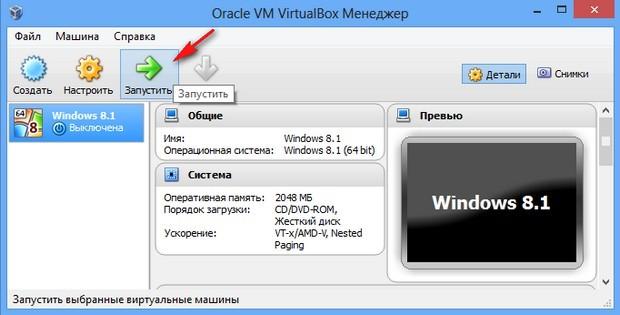
Как установить виртуальную машину
Друзья, если вы ни разу не имели дело с виртуальной машиной, то объясню вам в двух словах, что это такое. Виртуальная машина, это настоящий компьютер, созданный внутри вашей основной операционной системы и в этот компьютер, вы можете установить другие операционные системы (несколько!) и не только Windows. Вы можете, как хотите экспериментировать с установленной в виртуальную машину операционной системой, выходить из неё в интернет, устанавливать различное программное обеспечение, не боясь заразить свой компьютер вирусом, короче подключите свою фантазию и вы найдёте ей применение.
К примеру, один мой знакомый, научился заново устанавливать операционную систему и делить жёсткий диск на несколько разделов только при помощи виртуальной машины.
Что касается выбора виртуальной машины, про каждую из существующих, на нашем сайте будет написана статья. Рекомендую вам установить виртуальную машину VirtualBox, её возможностей хватит не только начинающему, но и опытному пользователю, к тому же она бесплатна. Начните с неё. Простые и интуитивно понятные настройки, стабильная работа, сделали её одной из самых популярных.
Примечание: На нашем сайте есть статьи о VirtualBox, которые Вам могут пригодится
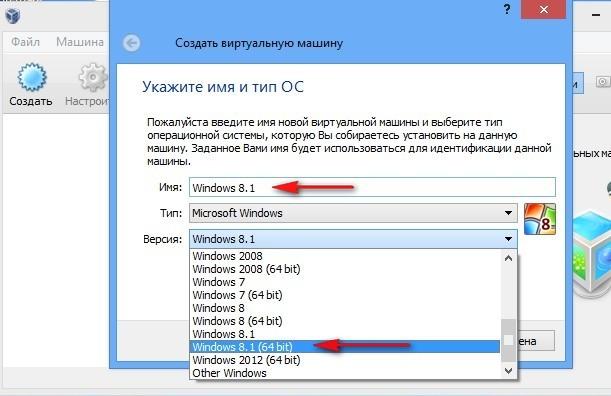
1. Как установить на виртуальную машину операционные системы Windows 7 и Windows 8
2. Как скачать готовую виртуальную машину с Windows 8.1
3.
4. Как установить Windows 10 на виртуальную машину
5. Как загрузить виртуальную машину VirtualBox с USB-флешки
6. Как создать в VirtualBox общую папку соединяющую виртуальную машину и действующую операционную систему
7. Как в VirtualBox подключить флешку
Какие существуют виртуальные машины?
Virtual PChttp://www.microsoft.com/ru-ru/download/details.aspx?id=3702VMware Workstaion
VirtualBoxhttps://www.virtualbox.org/
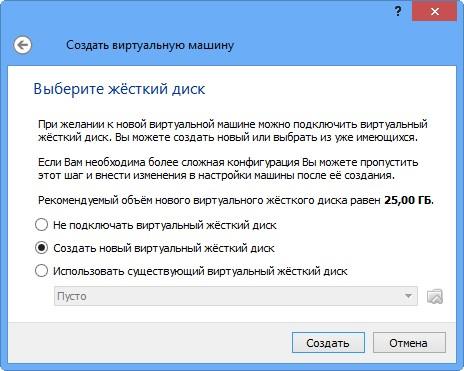
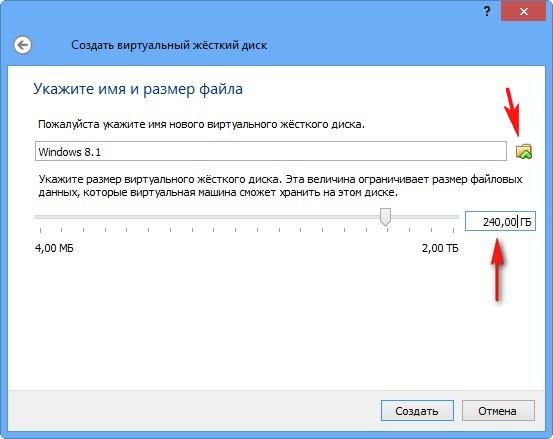
Указываем размер виртуального жёсткого диска. Если вы в первый раз создаёте виртуальную машину, укажите 50 ГБ, этого для установки Windows 8 вполне хватит. Но я лично укажу для себя больший объём. Почему? В процессе работы с виртуальной машиной, я буду устанавливать много операционных систем, поэтому я укажу объём 240 ГБ.
Можете создать виртуальный диск на отличном от системного диске, это очень просто, нажмите на жёлтую папочку и откроется проводник, в нём укажите для размещения виртуального жёсткого диска любой раздел на вашем винчестере.
Создать.
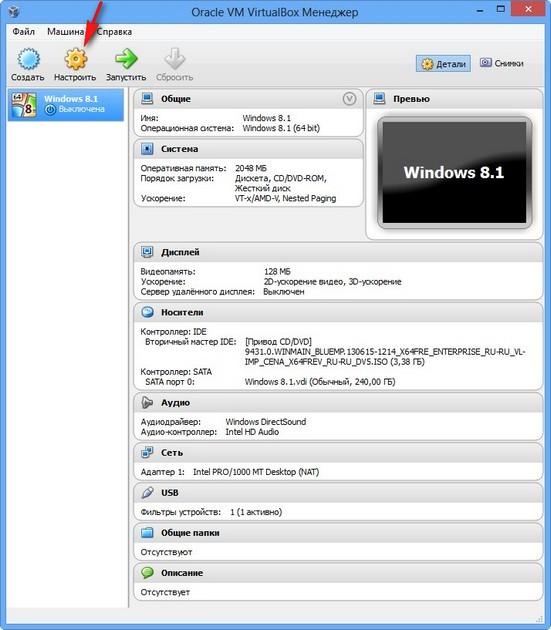

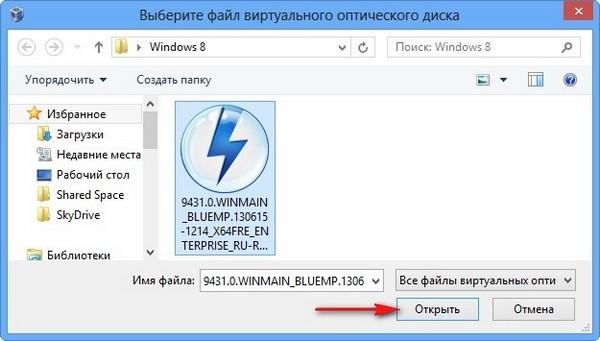
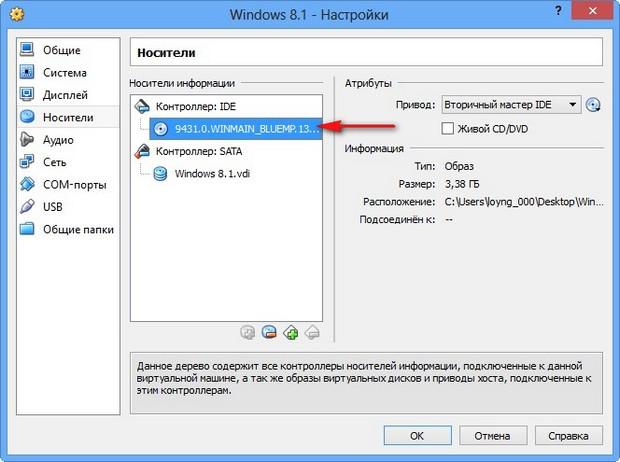
Носители. Немного вашего внимания!

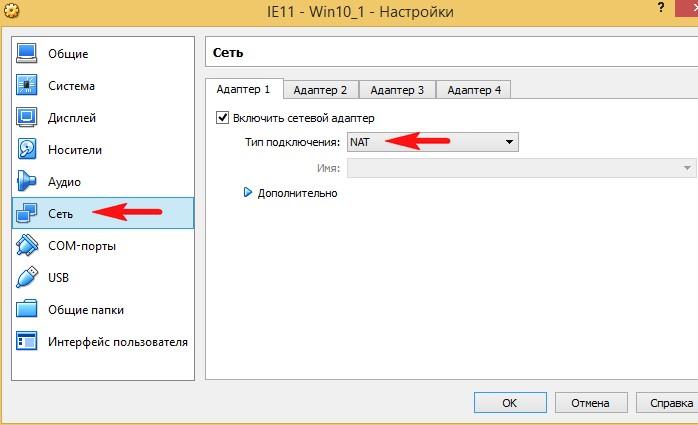
Сеть
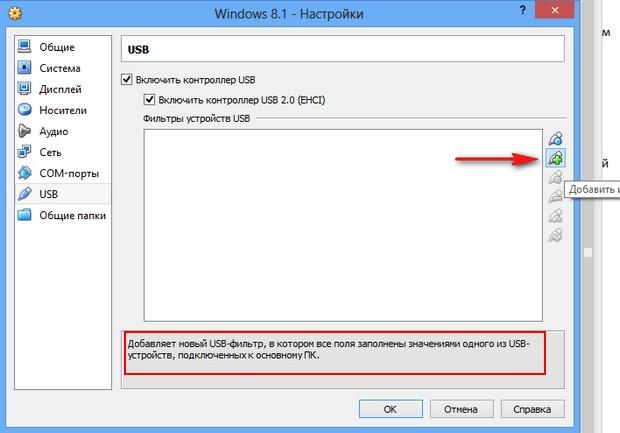
USBЧто такое USB-фильтр? Представьте себе такую ситуацию, все USB устройства, подключенные к вашему компьютеру, определятся в операционной системе, которая установлена на вашу виртуальную машину. Естественно вам это не нужно. USB-фильтры будут определять, какое именно USB устройство должно определиться в виртуальной машине, а какое в основной вашей системе. Чтобы увидеть, как всё это работает на деле, нужно сначала установить в нашу виртуальную машину операционную систему Windows 8.1, а далее вам всё станет понятно, читаем дальше.
Примечание: Друзья, если Вы захотите загрузить виртуальную машину с USB-флешки, тогда прочтите нашу статью Загрузка c USB в VirtualBox
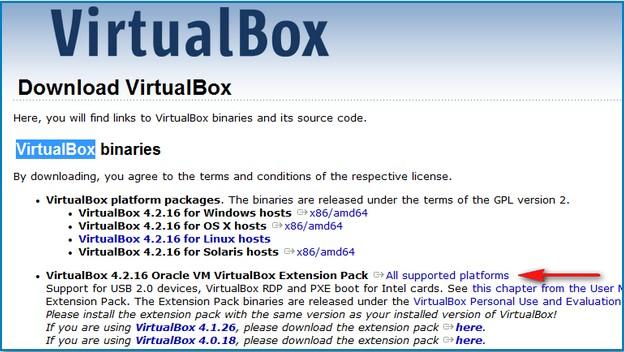
установите себе плагин VirtualBox 4.2.16 Oracle VM VirtualBox Extension Packhttps://www.virtualbox.org/
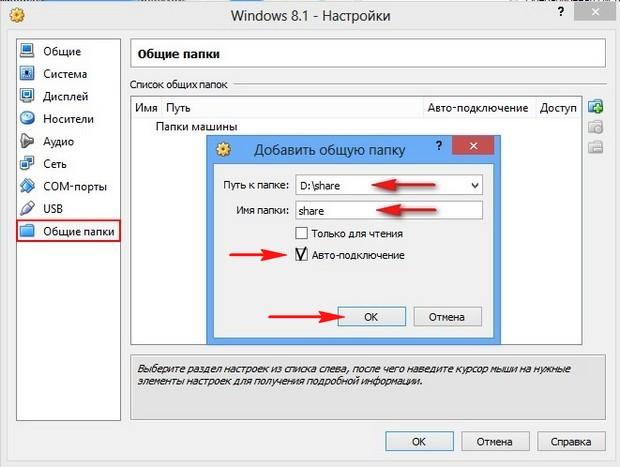
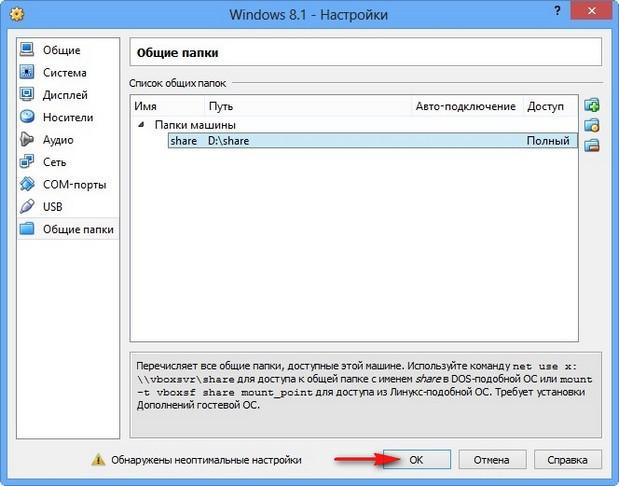
Общие папки. Этот параметр обязательно нужно настроить. Так как общаться наша виртуальная машина с установленной у нас Windows будет через эти папки. Жмём на плюсик и вводим полный путь к нашей общей папке, например D:\share. Папка с названием share, в это время уже должна быть создана в корне диска (D:)
Обязательно поставьте галочку на пункте Авто-подключение и общая папка появится в окне Компьютер сразу после загрузки установленной в виртуальную машину операционной системы.
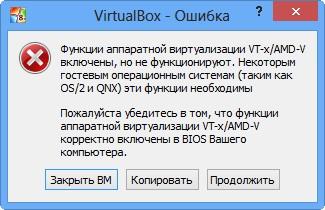
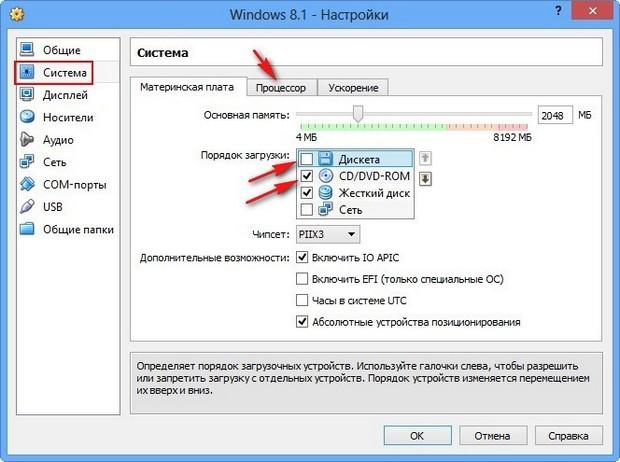
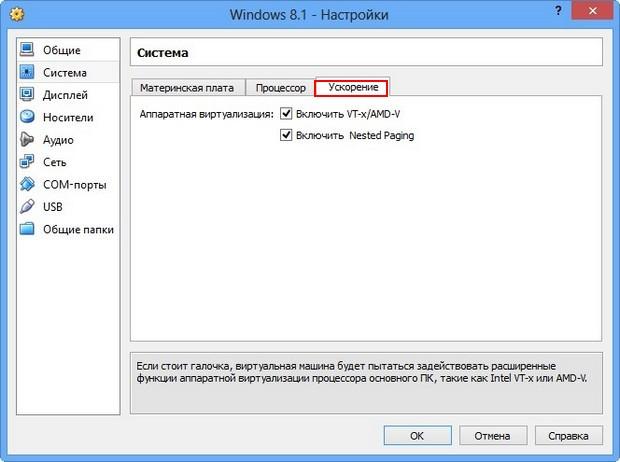
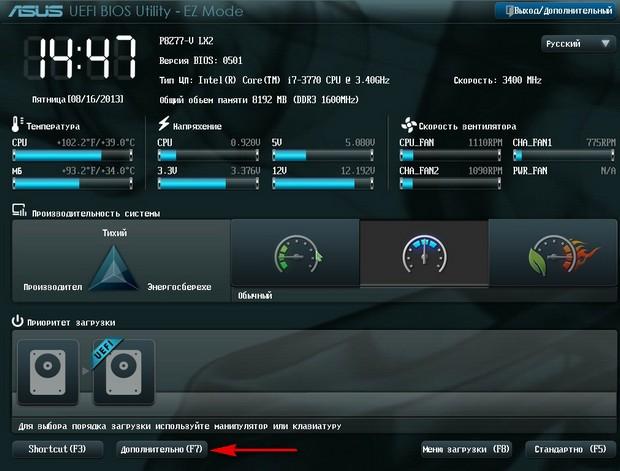
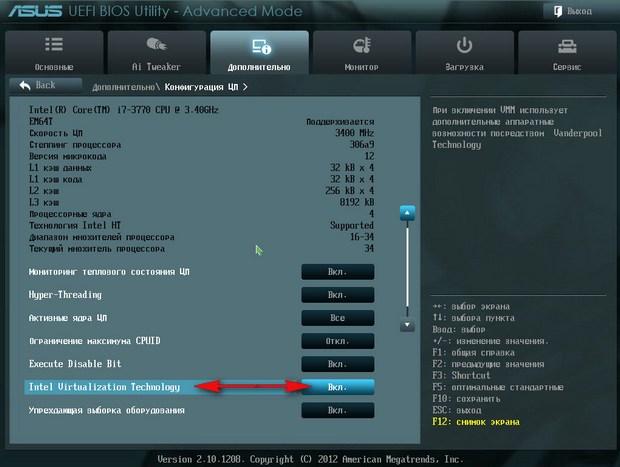
идём в БИОС

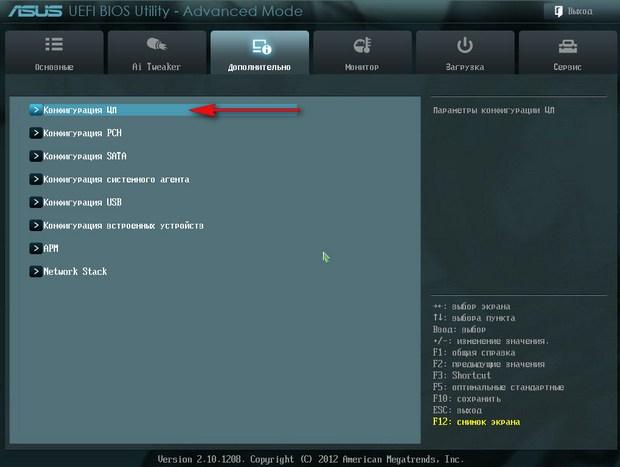

Intel Virtualization TechnologyВкл

Secure Virtual Machines

Камрады, чтобы статья была не слишком длинной, я разделил её на две части, в следующей статье, мы продолжим установку Windows 8.1 на нашу виртуальную машину.
◆ composeMachineFilename()
| void IVirtualBox::composeMachineFilename | ( | in wstring | name, |
| in wstring | group, | ||
| in wstring | createFlags, | ||
| in wstring | baseFolder, | ||
| out wstring | file | ||
| ) |
Returns a recommended full path of the settings file name for a new virtual machine.
This API serves two purposes:
- It gets called by if or empty string (which is recommended) is specified for the settingsFile argument there, which means that API should use a recommended default file name.
- It can be called manually by a client software before creating a machine, e.g. if that client wants to pre-create the machine directory to create virtual hard disks in that directory together with the new machine settings file. In that case, the file name should be stripped from the full settings file path returned by this function to obtain the machine directory.
    See @link IMachine::name IMachine::name@endlink<b></b> and @link #createMachine createMachine@endlink<b></b> for more
    details about the machine name.

    @a groupName defines which additional subdirectory levels should be
    included. It must be either a valid group name or @c null or empty
    string which designates that the machine will not be related to a
    machine group.

    If @a baseFolder is a @c null or empty string (which is recommended), the
    default machine settings folder
    (see @link ISystemProperties::defaultMachineFolder ISystemProperties::defaultMachineFolder@endlink<b></b>) will be used as
    a base folder for the created machine, resulting in a file name like
    "/home/user/VirtualBox VMs/name/name.vbox". Otherwise the given base folder
    will be used.

    This method does not access the host disks. In particular, it does not check
    for whether a machine with this name already exists.
- Parameters
-
name Suggested machine name. group Machine group name for the new machine or machine group. It is used to determine the right subdirectory. createFlags Machine creation flags, see (optional). baseFolder Base machine folder (optional). file Fully qualified path where the machine would be created.
◆ getGuestOSType()
| void IVirtualBox::getGuestOSType | ( | in wstring | id, |
| out IGuestOSType | type | ||
| ) |
Returns an object describing the specified guest OS type.
The requested guest OS type is specified using a string which is a mnemonic identifier of the guest operating system, such as or . The guest OS type ID of a particular virtual machine can be read or set using the attribute.
The collection contains all available guest OS type objects. Each object has an attribute which contains an identifier of the guest OS this object describes.
While this function returns an error for unknown guest OS types, they can be still used without serious problems (if one accepts the fact that there is no default VM config information).
- Parameters
-
id Guest OS type ID string. type Guest OS type object.
- Expected result codes:
-
E_INVALIDARG id is not a valid Guest OS type.
Кастомизируемые панели игроков, таблица статистики и экран загрузки
Пример панели игроков и экрана загрузки в XVM. Пользовательские конфигурации.
Экран загрузки боя — одна из важнейших частей интерфейса, позволяющая оценить обстановку предстоящего сражения и придумать план действий ещё до начала раунда.
XVM позволяет расширить информативность и полезность экрана загрузки: каждый пользователь может добавить отображение статистики игроков, что позволит максимально точно оценить соотношение сил и принять правильное решение в начале боя.
Также информацию о статистике игроков вы можете выводить и в боевых списках игроков: в так называемых «ушах» (боковых панелях) и в таблице боевой статистики (Tab). Для дополнительного удобства все значения статистики, а также ники игроков и название техники могут быть окрашены с использованием ваших собственных настраиваемых цветовых градаций.
Из-за возможности получения статистики игроков прямо во время боя модуль статистики XVM также широко известен как «оленемер», «оленеметр», «пользомер», «пользометр», «нубомер». Мы настоятельно рекомендуем не использовать эти названия при общении о модификации, и просим использовать правильное название: XVM. Это поможет избежать путаницы и введения в заблуждение начинающих пользователей.