Актуальные техники взлома wifi
Содержание:
- Инструменты автоматизации взлома Wi-FI, инструменты с графическими интерфейсами
- Deauth Attack
- Reset the Router and Default Passwords
- Smartkey WiFi Password Recovery
- 2 Hack WiFi from Windows Aircrack-ng
- Программа для взлома WiFi — слушаем эфир WIFI
- AirSnort
- WEP
- Как защититься?
- Способ для компьютера – BackTrack 5 Live CD
- Attribution
- Reset the Router
Инструменты автоматизации взлома Wi-FI, инструменты с графическими интерфейсами
WiFite – это инструмент для автоматизированной беспроводной атаки. Главной целью является пароль от Wi-Fi сети. Для его получения сначала атакуются слабые технологии защиты (если они имеются), а затем захватывается рукопожатие для подбора пароля.
airgeddon – это многофункциональный Баш скрипт для систем Linux по аудиту беспроводных сетей. Умеет выполнять все популярные атаки на Wi-Fi. Автоматизирует рутинные процессы для аудита Wi-Fi.
AtEar – программа с настоящим графическим веб-интерфейсом, позволяющая автоматизировать многие атаки на Wi-Fi, а также выявлять атаки на беспроводные сети.
besside-ng взламывает WEP или WPA ключ без вмешательства пользователей. Точнее говоря, ключи для сетей WEP действительно взламываются на компьютере, а для WPA захватываются рукопожатия.

Fern Wifi Cracker – это программное обеспечение для аудита беспроводной безопасности, написано с использованием языка программирования Python и библиотеки Python Qt GUI. Программа способна взламывать и восстанавливать WEP/WPA/WPS ключи и также запускать другие сетевые атаки на беспроводные или проводные сети.


Deauth Attack
A deauth attack sends forged deauthentication packets from your machine to a client connected to the network you are trying to crack. These packets include fake «sender» addresses that make them appear to the client as if they were sent from the access point themselves. Upon receipt of such packets, most clients disconnect from the network and immediately reconnect, providing you with a 4-way handshake if you are listening with .
Use to monitor a specific access point (using ) until you see a client () connected. A connected client look something like this, where is the client MAC.
Now, leave running and open a new terminal. We will use the command to send fake deauth packets to our victim client, forcing it to reconnect to the network and hopefully grabbing a handshake in the process.
# -0 2 specifies we would like to send 2 deauth packets. Increase this number
# if need be with the risk of noticeably interrupting client network activity
# -a is the MAC of the access point
# -c is the MAC of the client
aireplay-ng -0 2 -a 9C:5C:8E:C9:AB:C0 -c 64:BC:0C:48:97:F7 mon0
You can optionally broadcast deauth packets to all connected clients with:
# not all clients respect broadcast deauths though
aireplay-ng -0 2 -a 9C:5C:8E:C9:AB:C0 mon0
Once you’ve sent the deauth packets, head back over to your process, and with any luck you should now see something like this at the top right: . Now that you’ve captured a handshake you should be ready to .
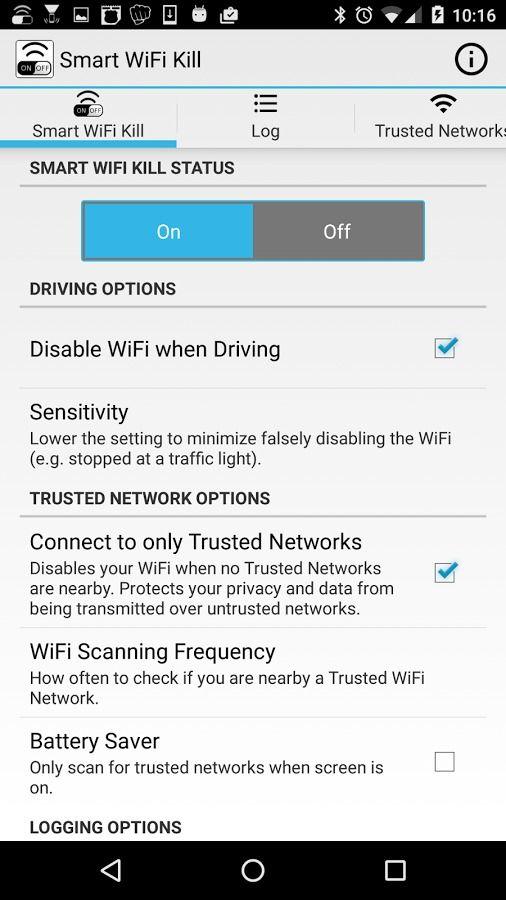
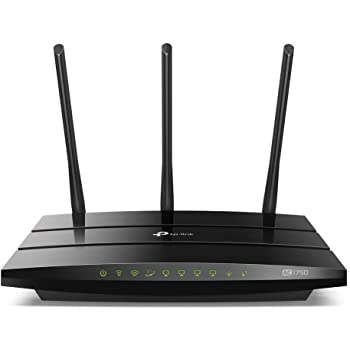
Reset the Router and Default Passwords
WiFi Router Passwords 2016
This app allows you to discover the default keys and passwords of the best selling WiFi Routers in the world. You forgot the password for your router and now can not access it, with this application now get it easy and in a fast way. If you never changed your password, try a username and password which we provide to the brand of your WiFi Router , if you changed it, you must reset the WiFi router by inserting a sharp object into the small hole with a button that usually have all the router WiFi in the back side, or keep the on-Off button pressed for a few seconds. Following these steps and entering the username and default password of your Wifi router brand you’ll be able to access to the configuration screen. Enjoy this app for free
Developer:
Price:
Free
You can also get default router passwords list from this website.
Routerpasswords.com
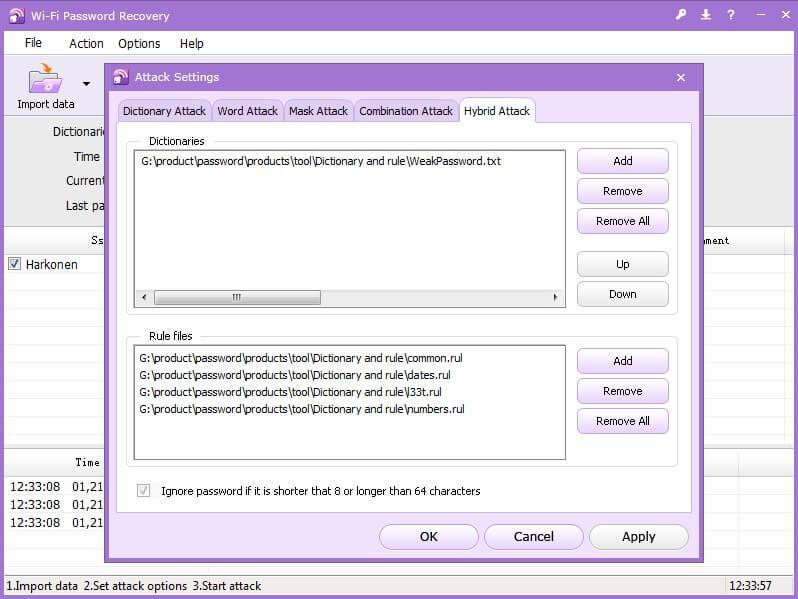
Smartkey WiFi Password Recovery
This is actually a Wifi password recovery app but you can use WiFi Password recovery as a hacking software to hack WiFi password of a WiFi connection. It is a very powerful WiFi password hacking tool for Windows. The software claims to crack any type of high security WiFi password.
The software provides 5 different attack methods to crack password of a WiFi. The attaks are: dictionary attack, word attack, mask attack, combination attack and hybrid attack to crack the WiFi password.
The dictionary attack tries every word from the dictionary to crack the password. Word attack tries all the anagrams and mutations of a word. Mask attack is used when you have some knowledge of the WiFi password. For example, the length of password, starting letter, ending letter, number of vowels, etc.
Combination attack uses all possible mutations of two words and the hybrid attack tries all the mutations of the dictionary. You can even provide more than one dictionary to crack the WiFi password.
2 Hack WiFi from Windows Aircrack-ng
You can also Hack WiFi Password from Window PC with the help of Aircrack-ng Software.
Aircrack-ng is an 802.11 WEP and WPA-PSK keys cracking program that can recover keys once enough data packets have been captured. The application works by implementing the standard FMS attack along with some optimizations such as KoreK attacks, as well as the PTW attack. This will then make the attack much faster compared to other WEP cracking tools.
Aircrack-ng is a set of tools for auditing wireless networks. The interface is standard and some command use skills will be required in order to operate this application.
Download Aircrack-ng for Windows – Filehippo.com
See this Video and know how this works.
https://youtube.com/watch?v=ujWejNe0Euc
Программа для взлома WiFi — слушаем эфир WIFI
И так, что мы имеем? Наш мощный Wi-Fi адаптер настроен на максимальную мощность в режиме monitor mode и ожидает приказаний на интерфейсе mon0. Программа для взлома WiFi готова и ждет нашей отмашки на атаку. Самое время осмотреться и прослушать эфир. Командуем:
root@bt:~# airodump-ng mon0
| 1 | root@bt~# airodump-ng mon0 |
Теперь смотрим на экран!
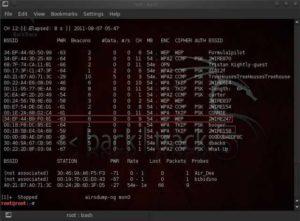
Красным выделена сеть с WEP шифрованием — большая редкость по нынешним временам (в моем районе не нашлось и создал сам)))
Ну и что же нам показывает программа для взлома WiFi? В левом верхнем углу видно как сканируются каналы (если необходимо зафиксировать канал, нужно вызывать airodump-ng с ключом —channel <номера каналов через запятую>). Потом идет таблица найденных сетей с указанием (слева направо): BSSID (MAC-адрес сети), уровень приема сигнала в dBm (зависит от чувствительности приемника, на хороших адаптерах -80 dBm это вполне нормальный уровень), количество принятых Beacon frames (это широковещательные пакеты, несущие информацию о сети), число принятых пакетов данных и скорость приема (пакетов в секунду), канал на котором вещает точка доступа, скорость точки доступа в мегабитах, тип аутентификации (OPN — открытая сеть, WEP, WPA, WPA2), тип шифрования, волшебные буковки PSK в случае с WPA/WPA2 (подробности описаны выше в гл.2) и, наконец, название сети, то есть её ESSID.
Чуть ниже основной таблицы приведена таблица текущих ассоциаций клиентов к точкам. Забегая вперед отмечу, что она тоже важна, так как по ней можно определить активность и MAC-адреса клиентов для последующей их деассоциации.
Из картинки выше следует что нам есть чего ловить — программа для взлома WiFi нашла точки доступа, и клиентов с хорошим сигналом. Осталось выбрать нашу цель (чтобы файл сильно не разбухал можно записывать пакеты только от одной точки доступа дав ключ —bssid или ограничив каналы как указано чуть выше) и дать команду записывать пакеты в файл добавив к вызову ключ -w
Важно: если вы загрузились с DVD запись файла с пакетами необходимо вести на внешнюю флешку или жесткий диск, предварительно примонтировав их командой mount:
root@bt:~# mkdir /mnt
root@bt:~# mount /dev/sda1 /mnt
root@bt:~# cd /mnt
|
1 |
root@bt~# mkdir /mnt root@bt~# mount /dev/sda1 /mnt root@bt~# cd /mnt |
где /dev/sda1 — файл устройства внешней флешки (найти куда подцепилась флешка в вашем случае можно покопавшись в результатах вывода команды dmesg).
Для примера запустим airodump-ng на запись пакетов только одной сети из списка в файл testcap.cap:
root@bt:~# airodump-ng —bssid a0:21:b7:a0:71:3c -w testcap mon0
| 1 | root@bt~# airodump-ng —bssid a0:21:b7:a0:71:3c -w testcap mon0 |
Теперь можно заняться своими делами ожидая пока очередной клиент не пожелает прицепиться к точке доступа и подарить нам вожделенный хендшейк. Кстати, после получения хендшейка в правом верхнем углу появится предупреждающая надпись: WPA handshake: A0:21:B7:A0:71:3C. Все, дело сделано, и можно переходить к следующей главе.
Когда все дела переделаны а хендшейка нет и нет, в голову приходит светлая мысль что неплохо бы поторопить клиента с хендшейком. Для этого наша программа для взлома WiFi — aircrack-ng содержит специальную утилиту, позволяющую отправлять клиентам запросы на деассоциацию (отсоединение) от точки доступа, после чего клиент снова захочет соединиться, а именно этого мы и ждем. Утилита эта называется aireplay-ng и запускать ее нужно в отдельном окне параллельно с запуском airodump-ng чтобы можно было одновременно записать результаты работы. Запускаем деассоциацию:
root@bt:~# aireplay-ng —deauth 5 -a a0:21:b7:a0:71:3c -c 00:24:2b:6d:3f:d5 wlan1
| 1 | root@bt~# aireplay-ng —deauth 5 -a a0:21:b7:a0:71:3c -c 00:24:2b:6d:3f:d5 wlan1 |
где очевидно, что мы проводим 5 сеансов деассоциации клиента 00:24:2b:6d:3f:d5 от точки доступа с BSSID a0:21:b7:a0:71:3c (адрес клиента мы взяли из нижней таблицы ассоциаций airodump-ng, его можно вообще не указывать, тогда деассоциация будет проводиться широковещательным запросом что не так эффективно как хотелось бы).
После проведения подобной процедуры (а ничто не мешает нам повторить ее еще разок на всякий случай) вероятность словить хендшейк значительно возрастает.
AirSnort
AirSnort is a wireless LAN tool which cracks encryption keys on 802.11b WEP networks. This software works well with Linux and Microsoft Windows for decrypting WEP encryption on 802.11b network. AirSnort saves data in two formats. First, all the packets captured by AirSnort is saved in pcap dump file. It also saves data to capture session in the form of crack files.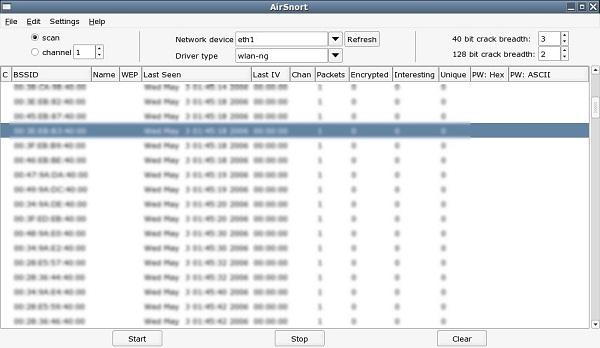
Running AirSnort is quiet easy, once launched AirSnort must be configured to work with wireless NIC so that it could make attempts to crack password. AirSnort operates by passively monitoring the entire transmissions and computing the encryption key as soon as enough packers are gathered.
WEP
WEP is the acronym for Wired Equivalent Privacy. It was developed for IEEE 802.11 WLAN standards. Its goal was to provide the privacy equivalent to that provided by wired networks. WEP works by encrypting the data been transmitted over the network to keep it safe from eavesdropping.
WEP Authentication
Open System Authentication (OSA) – this methods grants access to station authentication requested based on the configured access policy.
Shared Key Authentication (SKA) – This method sends to an encrypted challenge to the station requesting access. The station encrypts the challenge with its key then responds. If the encrypted challenge matches the AP value, then access is granted.
WEP Weakness
WEP has significant design flaws and vulnerabilities.
- The integrity of the packets is checked using Cyclic Redundancy Check (CRC32). CRC32 integrity check can be compromised by capturing at least two packets. The bits in the encrypted stream and the checksum can be modified by the attacker so that the packet is accepted by the authentication system. This leads to unauthorized access to the network.
- WEP uses the RC4 encryption algorithm to create stream ciphers. The stream cipher input is made up of an initial value (IV) and a secret key. The length of the initial value (IV) is 24 bits long while the secret key can either be 40 bits or 104 bits long. The total length of both the initial value and secret can either be 64 bits or 128 bits long.The lower possible value of the secret key makes it easy to crack it.
- Weak Initial values combinations do not encrypt sufficiently. This makes them vulnerable to attacks.
- WEP is based on passwords; this makes it vulnerable to dictionary attacks.
- Keys management is poorly implemented. Changing keys especially on large networks is challenging. WEP does not provide a centralized key management system.
- The Initial values can be reused
Because of these security flaws, WEP has been deprecated in favor of WPA
Как защититься?
Получается, что почти каждое устройство почти в любой сети Wi-Fi можно взломать при помощи KRACK. Звучит страшновато, но — как и в случае с любой другой атакой — это еще не конец света. Вот пара советов, как защититься от KRACK:
- во-первых, всегда проверяй, чтобы в адресной строке браузера была зеленая иконка замка. Если используется HTTPS, значит, KRACK не позволит расшифровать трафик;
- во-вторых, обязательно ставь последние обновления безопасности.
И конечно, для критичных сессий ты можешь не доверять беспроводному соединению вообще. Или используй VPN: с ним у тебя будет сквозное шифрование между клиентом и сервером.
Способ для компьютера – BackTrack 5 Live CD
Сажем сразу, что взлом Wi-Fi возможен не с операционной системы Windows. Для этого вам понадобится UNIX или Linux.
Но есть и универсальное средство – BackTrack 5 Live CD. Это специальный набор утилит для разработчиков и тестировщиков систем безопасности.
Помимо всего прочего, в него входит программа, которая позволяет увидеть пароль определенной точки доступа.
Также сразу скажем, что данному набору утилит требуется порядка 10 часов для работы. Вы должны учитывать это!
Процесс использования BackTrack 5 Live CD пошагово выглядит следующим образом:
- После этого необходимо создать загрузочную флешку или загрузочный диск (DVD). Сделать это можно, например, при помощи Rufus (подробную инструкцию найдете здесь), WinSetupFromUSB, UltraISO, Universal USB Installer или Unetbootin (инструкция по этим программам тут).
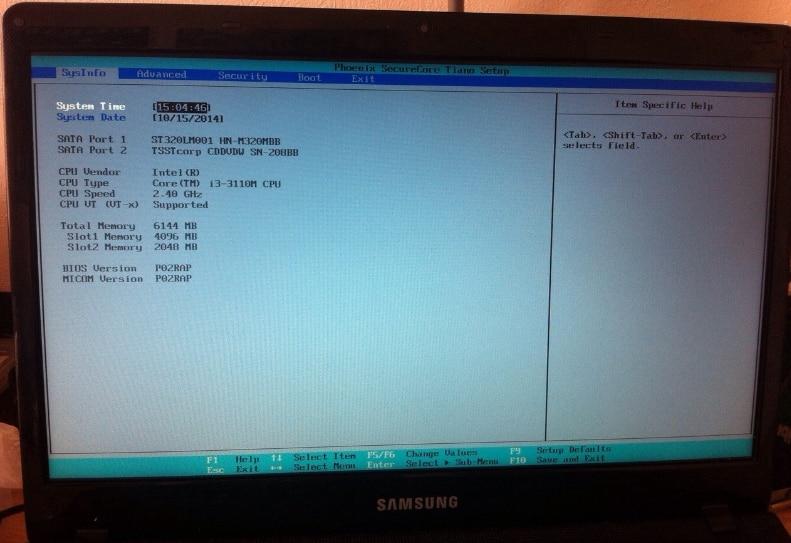
- После создания загрузочного носителя потребуется загрузиться с него. Как это сделать, описано в (раздел 3). Если сказать коротко, потребуется выбрать загрузку с флешки или диска в BIOS или UEFI.
- Когда BackTrack 5 Live CD загрузится, вы увидите терминал. Сначала в него нужно ввести команду «iwconfig». После ввода жмите кнопку «Enter» на клавиатуре. Вообще, вы должны понять, что здесь все выполняется так же, как в командной строке или в терминале Linux. Первая команда даст программе понять, с чем мы будем работать.
- Дальше следует перевести сетевую карту в режим монитора. То есть она станет таким себе исследователем и сможет видеть конфигурацию доступного для подключения оборудования. Для этого предназначена команда «airmon-ng start ». В большинстве случаев ваша карта будет называться «wlan0». Это верно в том случае, когда у вас всего лишь одна сетевая карта. Тогда команда будет выглядеть так: «airmon-ng start wlan0».
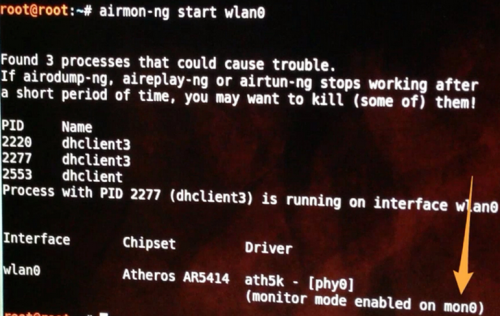
Рис. 1. Ввод команды для перевода карты в режим монитора
- В левом нижнем углу будет указано имя интерфейса режима монитора. В нашем случае он называется «mon0». Пока что просто запомните его.
- Дальше потребуется узнать BSSID, то есть зашифрованный пароль роутера того, чью сеть мы будем ломать. Для этого предназначены две команды (если одна не помогает, используйте другую): «airodump-ng » (в нашем случае, как вы помните, имя карты «wlan0») и «airodump-ng mon».
- В появившемся списке вы увидите имена и BSSID всех доступных сетей. Выберете нужную. Вы можете понять это по количеству доступных каналов, типу шифрования и другим характеристикам. Главной из них является «PWR». Это power, то есть сила. Она отражает то, насколько близко к вам расположен источник сигнала. Все просто – чем он ближе, тем сильнее. В общем, запомните BSSID нужного роутера.
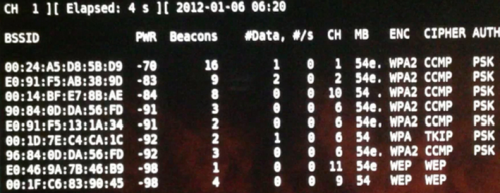
Рис. 2. Ввод команды на просмотр BSSID
- Дальше введите команду «reaver -i -b -vv». Как вы помните, в нашем случае имя интерфейса режима монитора «mon0». Для примера мы возьмем самый сильный роутер с силой 98 (он самый нижний в вписке на рисунке 2). В таком случае команда будет выглядеть так: ««reaver -i mon0 -b 00:1F:C6:83:90:45 -vv».
- А дальше самое интересное. Вы можете идти и заниматься своими делами. Программа может работать до 10 часов! Зато в конце вы увидите PIN, он же пароль. Также пароль может находиться в строке «WPA PSK» (или другое, если используется иной тип шифрования).

Рис. 3. Результат работы BackTrack 5 Live CD
Как видите, ничего сложного в использовании данного набора утилит нет. Да, работает он долго, но эффективно.
Не забудьте в конце поставить в своем БИОС загрузку с жесткого диска, а не с флешки или DVD.
Это важно, так как в противном случае система будет работать неправильно
Дальше мы сосредоточим свое внимание на приложениях для смартфона или планшета. Для компьютера другие способы выполнения поставленной задачи, возможно, есть, но все, что вы найдете в интернете, окажется вирусом или просто неработающим способом
BackTrack 5 Live CD действительно работает
Для компьютера другие способы выполнения поставленной задачи, возможно, есть, но все, что вы найдете в интернете, окажется вирусом или просто неработающим способом. BackTrack 5 Live CD действительно работает.
Но через мобильное устройство ломать Вай-Фай намного проще и быстрее, поэтому лучше используйте его.
Attribution
Much of the information presented here was gleaned from Lewis Encarnacion’s awesome tutorial. Thanks also to the awesome authors and maintainers who work on Aircrack-ng and Hashcat.
Shout out to DrinkMoreCodeMore, hivie7510, cprogrammer1994, hartzell, flennic, bhusang, tversteeg, gpetrousov, crowchirp and Shark0der who also provided suggestions and typo fixes on Reddit and GitHub. If you are interested in hearing some proposed alternatives to WPA2, check out some of the great discussion on this Hacker News post.
Originally posted: https://medium.com/@brannondorsey/crack-wpa-wpa2-wi-fi-routers-with-aircrack-ng-and-hashcat-a5a5d3ffea46
Reset the Router
This isn’t for getting on someone else’s Wi-Fi. You need physical access to the router for this to work. But, before you do a full router reset simply to get on your own Wi-Fi, try to log into the router first. From there, you can easily reset your Wi-Fi password/key if you’ve forgotten it.
That’s not possible if you don’t know the password for the router. (The Wi-Fi password and router password are not the same thing—unless you assigned the same password to both). Resetting the router only works if you have access via Wi-Fi (which we’ve just established you don’t have) or by physically utilizing an Ethernet cable.
If you’ve got a router that came from your internet service provider (ISP), check the stickers on the unit before a reset—the ISP might have printed the SSID and network security key right on the hardware.
Or use the nuclear option: Almost every router in existence has a recessed reset button. Push it with a pen or unfolded paperclip, hold it for about 10 seconds, and the router will reset to the factory settings.
Once a router is reset, you’ll need that other username/password combo to access the router itself. Again, do this via a PC attached to the router via Ethernet—you’ll need to, since the reset probably killed any potential Wi-Fi connection for the moment. The actual access is typically done with a web browser.
(Some routers may also have a sticker with that default Wi-Fi network name (SSID) and network security key (password) so you can indeed go back on the Wi-Fi after a reset; that’s the case with my own Netgear Nighthawk, for example.)
The URL to type into the browser to access a router’s settings is typically 192.168.1.1 or 192.168.0.1, or some variation. Try them randomly; that generally works. To determine which one, on a PC connected to the router via Ethernet, open a command prompt and type «ipconfig» without the quotes. Look among the gobbledygook for an «IPv4 Address,» which will start with 192.168. The other two spaces, called octets, are going to be different numbers between 0 and 255. Note the third octet (probably a 1 or 0). The fourth is specific to the PC you’re using to log into the router.
In the browser, type 192.168.x.1, replacing the X with the number you found in the ipconfig search. The 1 in the last octet should point at the router—it’s the number one device on the network. (For full details, read How to Access Your Wi-Fi Router’s Settings.)
At this point, the router should then ask for that username and password (which, again, is probably not the same as the Wi-Fi SSID and network security key). Check your manual, assuming you didn’t throw it away, or go to RouterPasswords.com, which exists for one reason: to tell people the default username/password on every router ever created. You’ll need the router’s model number.
You will quickly discern a pattern among router makers of utilizing the username of «admin» and a password of «password,» so feel free to try those first. Since most people are lazy and don’t change an assigned password, you could try those options even before hitting the reset button. (But c’mon, you’re better than that.)Once you’re in the Wi-Fi settings, turn on the wireless network(s) and assign strong but easy-to-recall passwords. After all, you don’t want to share with neighbors without your permission.
Make that Wi-Fi password easy to type on a mobile device, too. Nothing is more frustrating than trying to get a smartphone connected to Wi-Fi with some cryptic, impossible to key-in-via-thumbs nonsense, even if it is the most secure password you’ve ever created.