Включение и настройка защиты от антивирусной программы «защитник майкрософт» в групповой политикеenable and configure microsoft defender antivirus always-on protection in group policy
Содержание:
- Use Defender Control to disable Windows Defender
- Disabling Windows Defender
- Disable Windows Defender on Windows 10
- Method 1 — Tweaking the Registry
- Отключение Защитника Windows через реестр
- Другие Рекомендуемые параметры конфигурацииOther recommended configuration settings
- Устройства блокирование доступа сотрудника с помощью групповой политикиOffboard devices using Group Policy
- Зачем нужен Защитник Windows?
- NoDefender Download – stoppt den Windows 10 Defender
- Method 3 — Using NoDefender
- Через параметры
- Наблюдение за устройствами с помощью порталаMonitor devices using the portal
- Arbeit und Usability des Tools
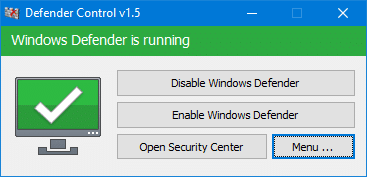
Use Defender Control to disable Windows Defender
Step 1: Get the latest version of Defender Control from this official page (download button provided towards the end of the page). Unzip the zip file and then run the Defender Control.
Step 2: Once the Defender Control is launched, click on the Disable Windows Defender button to disable the Windows Defender in Windows 10.
Once its job is done, the program will display “Windows Defender is turned off” message.
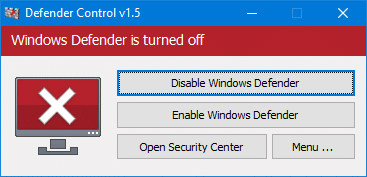
To enable the Windows Defender again, launch Defender Control, and then click the Enable Windows Defender button.
If the Defender Control fails to disable the Windows Defender, it’s likely because the Tamper Protection is turned on in Windows Defender. To turn it off, open the Windows Security app, switch to Virus & threat protection tab. In the Virus & threat protection section, click on the Manage settings link. Finally, turn off the tamper protection toggle switch.
Disabling Windows Defender
- Double-click the DisableDefender.cmd batch file saved in the DefenderExclusions location setup previously.
-
When Windows Defender opens, click on the Settings option and be sure the Windows Defender option is selected on the left.
-
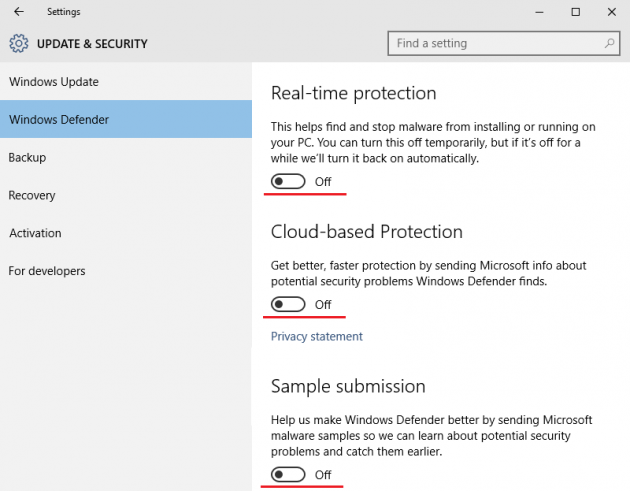
Turn off Real-Time Protection, Cloud-based Protection, and the Automatic sample submission options.
-
It is expected to see the warning message pop up in the lower right-hand corner of the task bar indicating that Spyware and unwanted software protection may be disabled with the red X.
-
You will notice the Windows Defender app screen is more red than green now, the PC Status: At risk is showing, and the Real-time protection is off; just minimize that window for now.
- Double-click the NoDefender.exe file previously saved in the DefenderExclusions location. If the User Account Control message pops up select the Yes option to run it
-
Select Next in the NoDefender app window
-
Select Next again in the NoDefender app window
-
Click on the Disable Window Defender option in the NoDefender app window and then select the Next option.
-
You should then see the NoDefender app window saying it’s Done and that Window Defender should be disabled, select the Exit option.
-
Now if you go back to the Windows Defender app window, you should notice that the Virus and spyware definitions with an Out of date status
- Now it is time to run the process(es) or whatever that needs to run with Windows Defender being disabled. Let everything finish and then once you are ready to re-enable Windows Defender, follow the Enabling Windows Defender section below.
Disable Windows Defender on Windows 10
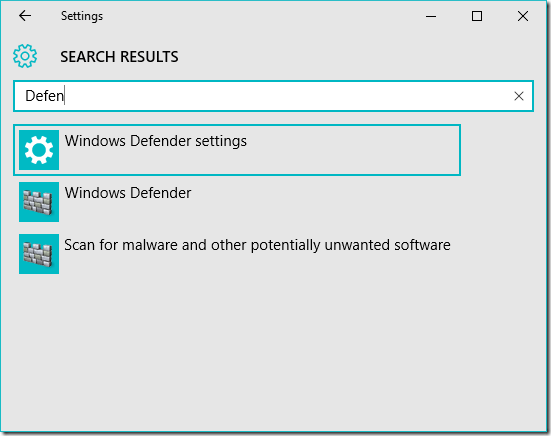
Step 1: Click on the Start Menu and select Settings to open the Modern Settings in Windows 10. Here search for Windows Defender Settings and launch it.

Step 2: Here turn off the Real-time protection and Cloud-based protection. Once you save the settings, a notification window will appear stating that your computer might be at risk and you will be asked to activate the protection once again. You must choose to ignore the notification.
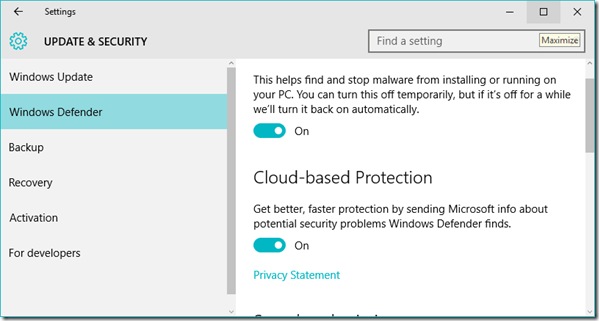
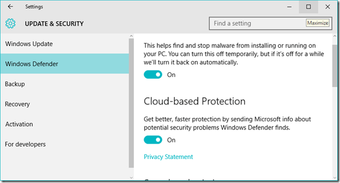
Now if you open Windows Defender, you will see that the real-time protection is turned off. But I noticed that it turns on automatically after you reboot your computer. So let’s see how to disable it permanently once and for all.
Method 1 — Tweaking the Registry
In this method you’ll learn how to disable Windows Defender by making changes in the registry.
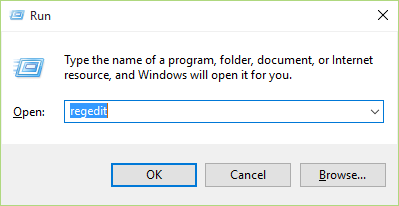
Step 1: Open the Registry Editor
Press Win + R (“Win” is the Windows key in your keyboard) to open the Run dialog box, type “regedit” in it (without quotes) and press Enter. The Registry Editor will appear.
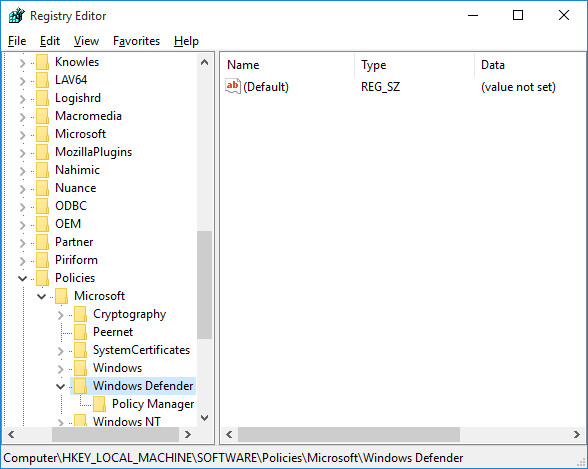
On the left pane in the Registry Editor, navigate to the following directory:
HKEY_LOCAL_MACHINE\SOFTWARE\Policies\Microsoft\Windows Defender
Step 3: Create a New DWORD Value
Right-click anywhere on the empty space in the Registry Editor’s right pane and choose New > DWORD (32-bit) Value. This DWORD will be named as New Value #1 and will have a default value of 0. Rename the DWORD to DisableAntiSpyware and change its value to 1 (right-click on it > Modify… and type 1 in the Value data box, then click OK).
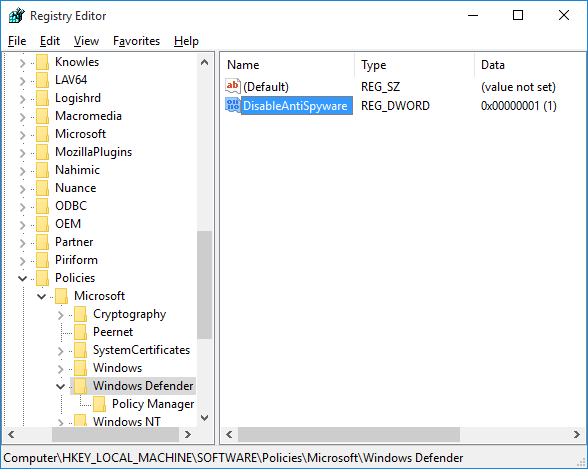
To turn Windows Defender back on, simply change the value of the DWORD to (0: Enabled, 1: Disabled).
Below are two registry files that automatically turn on and off Windows Defender. Simply download and double-click on the one you wish to use:
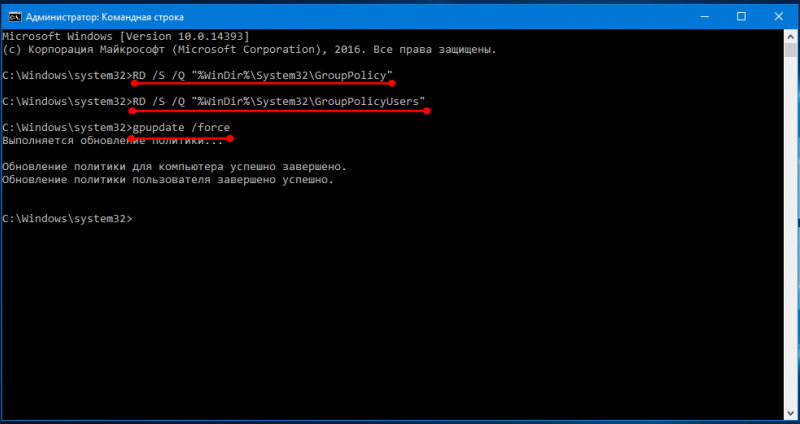
Отключение Защитника Windows через реестр
Для того, чтобы воспользоваться этим методом, нужно запустить программу «Редактор реестра». Сделать это можно несколькими способами:
- Способ 1: Открываем меню Пуск, и там вводим . В результатах поиска отобразится вариант с выполнением команды regedit.
- Способ 2: Нажимаем комбинацию клавиш Win+R, и вводим туда . После этого нажимаем «Ок» и ждем запуска программы.
Если появится окошко с вопросом на разрешение программе внести изменения на этом компьютере, то отвечаем утвердительно.
В открывшемся редакторе реестра отправляемся по следующему адресу — HKEY_LOCAL_MACHINE\SOFTWARE\Policies\Microsoft\Windows Defender, и смотрим, есть ли там параметр «DisableAntiSpyware». Если есть, то открываем его двойным щелчком и ставим ему значение «1». Если же его нет, то нажимаем правой кнопкой мыши по пустому пространству, выбираем пункт меню «Создать» — «Параметр DWORD (32 бита)». Меняем его имя на «DisableAntiSpyware», а значение на «1».
После этого Редактор реестра можно закрыть.
Для того, чтобы включить обратно Защитник Windows, нужно сменить значение параметра «DisableAntiSpyware» с «1» на «».
Другие Рекомендуемые параметры конфигурацииOther recommended configuration settings
Обновление конфигурации Endpoint ProtectionUpdate endpoint protection configuration
После настройки встроенного сценария Продолжайте вносить изменения в эту же групповую политику для добавления конфигураций Endpoint Protection.After configuring the onboarding script, continue editing the same group policy to add endpoint protection configurations. Чтобы убедиться в том, что у вас есть все необходимые возможности антивирусной программы «защитник Майкрософт», выполните изменения групповой политики из системы под управлением Windows 10 или Server 2019.Perform group policy edits from a system running Windows 10 or Server 2019 to ensure you have all of the required Microsoft Defender Antivirus capabilities. Возможно, потребуется закрыть и снова открыть объект групповой политики, чтобы зарегистрировать параметры конфигурации для пакета ATP.You may need to close and reopen the group policy object to register the Defender ATP configuration settings.
Все политики находятся в разделе .All policies are located under .
Расположение политики: \Windows для защитника с ПАКЕТом анализаPolicy location: \Windows Components\Windows Defender ATP
| ПолитикаPolicy | ПараметрSetting |
|---|---|
| Пример коллекции Enable\DisableEnable\Disable Sample collection | Enabled-«включить сбор образцов на компьютерах» установленEnabled — «Enable sample collection on machines» checked |
Расположение политики: \Windows \ Defender AntivirusPolicy location: \Windows Components\Windows Defender Antivirus
| ПолитикаPolicy | ПараметрSetting |
|---|---|
| Настройка обнаружения для потенциально нежелательных приложенийConfigure detection for potentially unwanted applications | Включено, блокироватьEnabled, Block |
Расположение политики: \Windows Antivirus\MAPS DefenderPolicy location: \Windows Components\Windows Defender Antivirus\MAPS
| ПолитикаPolicy | ПараметрSetting |
|---|---|
| Присоединиться к Microsoft MAPSJoin Microsoft MAPS | Включено, дополнительные картыEnabled, Advanced MAPS |
| Отправлять образцы файлов, если требуется дальнейший анализSend file samples when further analysis is required | Включено, отправляйте безопасные примерыEnabled, Send safe samples |
Расположение политики: \Windows Antivirus\Real-Time, защита от защитникаPolicy location: \Windows Components\Windows Defender Antivirus\Real-time Protection
| ПолитикаPolicy | ПараметрSetting |
|---|---|
| Отключить защиту в реальном времениTurn off real-time protection | ОтключеноDisabled |
| Включить наблюдение за поведениемTurn on behavior monitoring | ВключеноEnabled |
| Проверять все загруженные файлы и вложенияScan all downloaded files and attachments | ВключеноEnabled |
| Наблюдать за действиями файлов и программ на компьютереMonitor file and program activity on your computer | ВключеноEnabled |
Расположение политики: \Windows Antivirus\Scan DefenderPolicy location: \Windows Components\Windows Defender Antivirus\Scan
Эти параметры используются для настройки периодических просмотров конечной точки.These settings configure periodic scans of the endpoint. Мы рекомендуем использовать еженедельное быстрое сканирование, но это не поувеличивает производительность.We recommend performing a weekly quick scan, performance permitting.
| ПолитикаPolicy | ПараметрSetting |
|---|---|
| Проверка наличия последней версии службы безопасности вирусов и шпионских программ перед выполнением запланированной проверкиCheck for the latest virus and spyware security intelligence before running a scheduled scan | ВключеноEnabled |
Расположение политики: \Windows \ защитник Antivirus\Windows эксплойт Guard\Attack Surface Сокращенное использование защитникаPolicy location: \Windows Components\Windows Defender Antivirus\Windows Defender Exploit Guard\Attack Surface Reduction
Получение списка GUID, из которого уменьшается направление атак, с целью настройки правил сокращения для уязвимой зоныGet the current list of attack surface reduction GUIDs from Customize attack surface reduction rules
- Откройте политику » Настройка сокращения направлений атак «.Open the Configure Attack Surface Reduction policy.
- Выберите Включено.Select Enabled.
- Нажмите кнопку Показать…Select the Show… .button.
- Добавьте каждый GUID в поле » имя значения » со значением 2.Add each GUID in the Value Name field with a Value of 2.
Эти настройки будут настраиваться только для аудита.This will set each up for audit only.
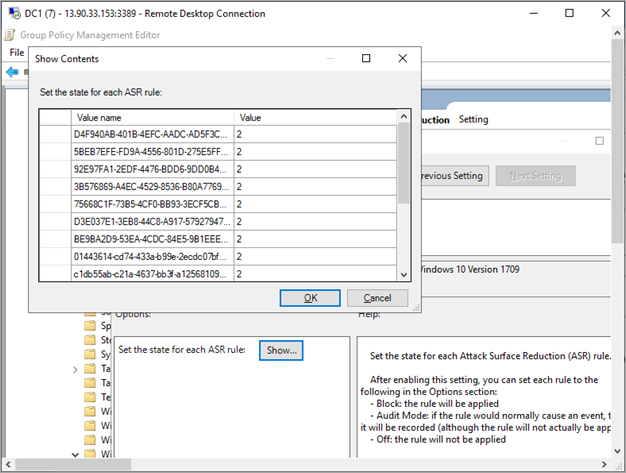
| ПолитикаPolicy | ПараметрSetting |
|---|---|
| Настройка доступа к контролируемым папкамConfigure Controlled folder access | Включен, режим аудитаEnabled, Audit Mode |
Устройства блокирование доступа сотрудника с помощью групповой политикиOffboard devices using Group Policy
По соображениям безопасности срок действия пакета, используемого для блокирование доступа сотрудника устройств, истекает через 30 дней после того, как будет загружена Дата его загрузки.For security reasons, the package used to Offboard devices will expire 30 days after the date it was downloaded. Недействительные пакеты отключения, отправленные на устройство, будут отклонены.Expired offboarding packages sent to a device will be rejected. При скачивании пакета отключения вы получите уведомление о дате окончания срока действия пакетов. Кроме того, эта дата будет включена в имя пакета.When downloading an offboarding package you will be notified of the packages expiry date and it will also be included in the package name.
Примечание
В то же время не следует разворачивать политики для встроенного и выключенного устройства на одном устройстве, иначе это приведет к непредсказуемым конфликтам.Onboarding and offboarding policies must not be deployed on the same device at the same time, otherwise this will cause unpredictable collisions.
-
Получение пакета отключения от центра безопасности защитника (Майкрософт):Get the offboarding package from Microsoft Defender Security Center:
а.a. В области навигации выберите параметры отключения Settings > Offboarding.In the navigation pane, select Settings > Offboarding.
б.b. Выберите Windows 10 в качестве операционной системы.Select Windows 10 as the operating system.
в.c. В поле метод развертывания выберите пункт Групповая политика.In the Deployment method field, select Group policy.
г.d. Нажмите кнопку загрузить пакет и сохраните ZIP-файл.Click Download package and save the .zip file.
-
Извлеките содержимое ZIP-файла в общее место, доступное только для чтения, которое может быть доступно устройству.Extract the contents of the .zip file to a shared, read-only location that can be accessed by the device. У вас должен быть файл WindowsDefenderATPOffboardingScript_valid_until_ГГГГ-ММ-ДД.cmd.You should have a file named WindowsDefenderATPOffboardingScript_valid_until_YYYY-MM-DD.cmd.
-
Откройте консоль управления групповыми политиками, щелкните правой кнопкой мыши групповую политику, которую вы хотите настроить, а затем щелкните Изменить.Open the Group Policy Management Console (GPMC), right-click the Group Policy Object (GPO) you want to configure and click Edit.
-
В редакторе Управление групповыми политиками последовательно выберите пункты Конфигурация компьютера, Настройки и Параметры панели управления.In the Group Policy Management Editor, go to Computer configuration, then Preferences, and then Control panel settings.
-
Щелкните правой кнопкой мыши Запланированные задачи, наведите курсор на пункт Создать и щелкните Немедленная задача.Right-click Scheduled tasks, point to New, and then click Immediate task.
-
В открывшемся окне задачи перейдите на вкладку Общие . Выберите локальную системную учетную запись (BUILTIN\SYSTEM) в разделе Параметры безопасности.In the Task window that opens, go to the General tab. Choose the local SYSTEM user account (BUILTIN\SYSTEM) under Security options.
-
Выберите Выполнять вне зависимости от регистрации пользователя, а затем установите флажок Выполнять с наивысшими правами.Select Run whether user is logged on or not and check the Run with highest privileges check-box.
-
Откройте вкладку Действия и щелкните Создать…. Убедитесь, что в поле Действие выбран пункт Запустить программу.Go to the Actions tab and click New…. Ensure that Start a program is selected in the Action field. Введите имя и расположение общего файла WindowsDefenderATPOffboardingScript_valid_until_ГГГГ-ММ-ДД.cmd.Enter the file name and location of the shared WindowsDefenderATPOffboardingScript_valid_until_YYYY-MM-DD.cmd file.
-
Щелкните OK и закройте все открытые окна консоли управления групповыми политиками.Click OK and close any open GPMC windows.
Важно!
Отключение останавливает передачу данных датчиков на портал, но данные с устройства, в том числе ссылку на все оповещения, которые он имел, в течение 6 месяцев.Offboarding causes the device to stop sending sensor data to the portal but data from the device, including reference to any alerts it has had will be retained for up to 6 months.
Зачем нужен Защитник Windows?
Здесь будут рассматриваться только задачи, возложенные именно на антивирусную программу, а не на прочие системные модули, также связанные с обеспечением безопасности — «Брандмауэр», «Производительность и работоспособность» и т.д. Дело в том, что с 2019 года Microsoft объединила все эти отдельные модули в единый «Центр обеспечения безопасности», в котором «Windows Defender» размещен в разделе «Защита от вирусов и угроз».
Согласно официальным данным Microsoft, в задачу встроенного антивируса «Защитник Windows» входит:
- Полное или выборочное сканирование (автоматическое или по требованию пользователя) всех файлов, хранящихся и загружающихся на жесткие диски и другие накопители данных.
- Отслеживание поведения и сканирование программ, стартующих при запуске операционной системы (каждый раз при включении компьютера), а также запускаемых пользователей во время работы за компьютером.
- Отслеживание процессов установки обновлений Windows, связанные с модулями обеспечения безопасности (по сути, система проверяет сама себя).
- Отслеживание настроек безопасности, сканирование дополнений (плагинов) для системного браузера Microsoft Edge
- Отслеживание действий устанавливаемых пользователем служб и драйверов.
- Отслеживание системных файлов и специализированных инструментов, отвечающих за регистрацию программ в операционной системе.
Другими словами, «Защитник Windows» — вполне себе обыкновенный антивирус. Основные его отличия от аналогичных программ заключаются в том, что он не требует отдельной установки, постоянных денежных вливаний (впрочем, так говорить не совсем правильно, т.к. пользователь оплачивает саму систему), а также потребляет минимальное количество компьютерных ресурсов. С последним тоже можно поспорить, т.к. некоторые функции «Защитника» выполняются другими модулями операционной системы.
NoDefender Download – stoppt den Windows 10 Defender
Der Windows Defender wird mit dem Betriebssystem von Microsoft einfach mitgeliefert: Ob gewollt oder nicht, die Antispyware ist vorinstalliert und läuft automatisch. Möchte ein Nutzer nun lieber ein Antivirenprogramm eines anderen Herstellers verwenden, kann es zu Problemen führen. Die Programme können sich unter Umständen gegenseitig aushebeln. Der PC-Schutz wäre damit in Gefahr. Daher ist es nötig, den Windows Defender abzuschalten. Wer das Programm dauerhaft stoppen will, muss entweder in das System eingreifen oder sucht sich entsprechende Hilfssoftware. Unter Windows 10 übernimmt der kostenlose NoDefender diese Aufgabe. Er sorgt dafür, dass die Antispyware nicht nur kurzfristig, sondern dauerhaft und vollständig abgeschaltet wird.
Download und Installation vom NoDefender
Die Freeware wurde mit Hilfe des Entwicklers Sergey Tkachenko fertiggestellt und über WinAero veröffentlicht. Beim NoDefender Download handelt es sich um eine relativ kleine ZIP-Datei (rund 700 KB), die schnell heruntergeladen ist. Eine Installation ist nicht nötig. Der Nutzer muss die Datei lediglich entpacken und dann öffnen. Ist das erledigt, kann der Defender seine Arbeit schon aufnehmen. Das Deaktivieren des Windows Defenders dauert nur ein paar Momente.
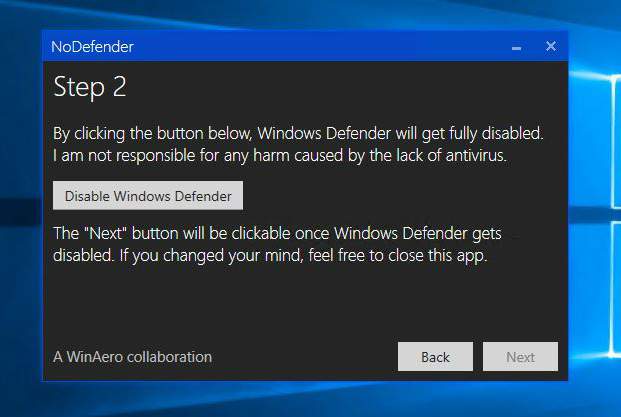
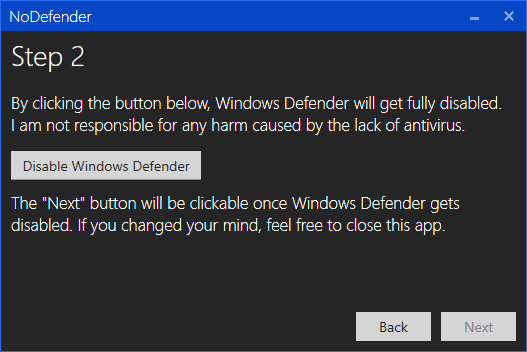
Method 3 — Using NoDefender
In this method we’ll use NoDefender, a third-party app which disables Windows Defender. Keep in mind that you can’t enable Windows Defender after using NoDefender, unless you use a restore point.
Step 2: Disable Windows Defender from its Settings
Once you run NoDefender, it will first ask you to go to Windows Defender’s settings and disable Real-Time Protection, Cloud-based Protection and Sample Submission. To reach those settings, simply click on the Open Windows Defender Settings button in NoDefender’s window.
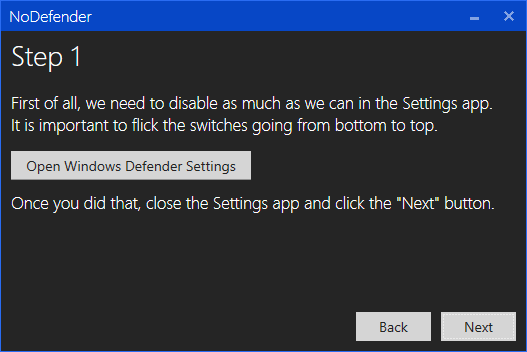
Once you disabled the required options, click Next.
Step 3: Disable Windows Defender
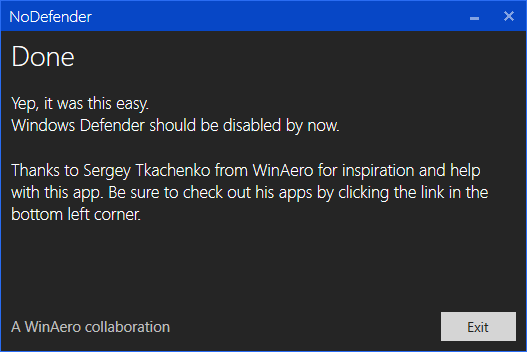
NoDefender’s next screen has a Disable Windows Defender button. Click on it, and wait until the Next button at the bottom right corner is clickable (i.e. when the process is finished).
Clicking on it will take you to the last screen, after which you can close the program. Windows Defender is now completely turned off.
Personally, I haven’t installed any protection suite in my Windows 10 machine yet, but I’ll keep Windows Defender enabled in the meantime, since it’s my only line of defense for the time being.
Do you have any alternative ways of turning off Windows Defender? Any suggestions or comments? Let us know!
Через параметры
Самый очевидный способ как включить защитник Виндовс 10 – воспользоваться встроенным графическим интерфейсом, предусмотренным для управления службой.
Сначала нужно запустить центр его управления. Это можно сделать в окне параметров, а можно воспользоваться поиском.
Слева размещается пиктографическое меню. Значок щита означает переход в область настроек защиты. На главном экране вы видите предупреждение, что необходимо включить защитник Windows 10.
Нажимайте кнопку включения. Предупреждение останется, так как защитник состоит из двух параметров: сам антивирус и облачная.
Первый клик позволил включить Windows Defender в Windows 10, теперь кликаем еще раз, чтобы закончить его активацию.
Все это можно сделать в дополнительных параметрах.
При таком отключении службы она будет автоматически запущена при перезагрузке – разработчики предусмотрели автоматизацию установки безопасности.
Однако иногда мы оказываемся в ситуации, когда никак не включается защитник Windows 10. Вы видите сообщение, что служба управляется кем-то другим или появляется сообщение об ошибке при попытке перезапуска.
Это связано с тем, что пользователь или программа отключили сервис на уровне системы, в реестре или редакторе групповой политики. Значит, включить защитник Windows в Windows 10 следует тем же способом.
Наблюдение за устройствами с помощью порталаMonitor devices using the portal
- Перейдите в Центр безопасности защитника (Майкрософт).Go to Microsoft Defender Security Center.
- Щелкните список устройств.Click Devices list.
- Убедитесь в том, что устройства отображены.Verify that devices are appearing.
Примечание
Отображение устройств в списке устройствможет занять несколько дней.It can take several days for devices to start showing on the Devices list. Сюда входит время, необходимое для распространения политик на устройство, время, необходимое перед входом пользователя, и время, необходимое для начала создания отчетов конечной точкой.This includes the time it takes for the policies to be distributed to the device, the time it takes before the user logs on, and the time it takes for the endpoint to start reporting.
Arbeit und Usability des Tools
Die Software ist optimal für Einsteiger und weniger versierte Nutzer geeignet. Da Windows selbst keine einfache Möglichkeit bereitstellt, den Windows 10 Defender dauerhaft abzuschalten, ist das Tool der optimale Partner für diese Aufgabe. Der NoDefender sorgt dafür, dass der Windows 10 Defender seine Arbeit einstellt. Um das zu bewerkstelligen, sind keine Vorkenntnisse nötig. Die Freeware führt den User Schritt für Schritt durch den Prozess, der selbst auch nur wenige Minuten in Anspruch nimmt.
Die Benutzeroberfläche besteht im Grunde genommen nur aus vier kleinen Fenstern, die komplett schwarz gehalten sind. Jedes Fenster sagt dem Nutzer genau, was zu tun ist. Wer es sich doch noch anders überlegt und den Defender nicht deaktivieren will, kann zudem einfach das Programm schließen.
Hinweis: Wer den NoDefender nutzt, sollte dafür Sorge tragen, dass ein anderes Anti-Virenprogramm mit Antispyware auf dem Rechner installiert wird.