Calibre
Содержание:
- Debugging tips
- Другие настройки
- Как пользоваться Calibre
- Search & replace
- ВЫХОДНЫЕ НАСТРОЙКИ
- restore_database
- export
- Global Options
- macOS development environment
- list
- catalog
- The Live preview panel
- Checkpoints
- Having separate “normal” and “development” calibre installs on the same computer
- add_custom_column
- Page setup
- Special features in the code editor
- Features
- The Live CSS panel
- Using functions in templates — template program mode
- Windows development environment
- Accessing the Content server from other devices
Debugging tips
Python is a
dynamically typed language with excellent facilities for introspection. Kovid wrote the core calibre code without once
using a debugger. There are many strategies to debug calibre code:
This is Kovid’s favorite way to debug. Simply insert print statements at points of interest and run your program in the
terminal. For example, you can start the GUI from the terminal as:
calibre-debug -g
Similarly, you can start the e-book-viewer as:
calibre-debug -w pathtofiletobeviewed
The e-book-editor can be started as:
calibre-debug -t pathtobeedited
You can insert the following two lines of code to start an interactive Python session at that point:
from calibre import ipython
ipython(locals())
When running from the command line, this will start an interactive Python interpreter with access to all
locally defined variables (variables in the local scope). The interactive prompt even has TAB completion
for object properties and you can use the various Python facilities for introspection, such as
, , , etc.
You can use the builtin Python debugger (pdb) as a remote debugger from the
command line. First, start the remote debugger at the point in the calibre code
you are interested in, like this:
from calibre.rpdb import set_trace
set_trace()
Then run calibre, either as normal, or using one of the calibre-debug commands
described in the previous section. Once the above point in the code is reached,
calibre will freeze, waiting for the debugger to connect.
Now open a terminal or command prompt and use the following command to start
the debugging session:
calibre-debug -c "from calibre.rpdb import cli; cli()"
You can read about how to use the Python debugger in the .
Note
By default, the remote debugger will try to connect on port 4444. You can
change it, by passing the port parameter to both the set_trace() and the
cli() functions above, like this: and
.
Note
The Python debugger cannot handle multiple threads, so you have to
call set_trace once per thread, each time with a different port number.
It is possible to use the builtin debugger in your favorite Python IDE, if it
supports remote debugging. The first step is to add the calibre src checkout to
the in your IDE. In other words, the directory you set as
above, must also be in the of your IDE.
Then place the IDE’s remote debugger module into the subdirectory
of the calibre source code checkout. Add whatever code is needed to launch the
remote debugger to calibre at the point of interest, for example in the main
function. Then run calibre as normal. Your IDE should now be able to connect to
the remote debugger running inside calibre.
Другие настройки
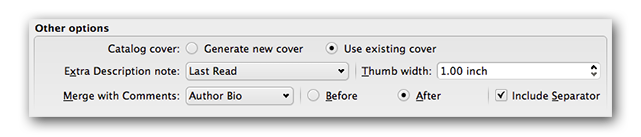
Catalog cover указывает, следует ли создавать новую обложку или использовать существующую обложку. Можно создать пользовательскую обложку для ваших каталогов — см. для получения дополнительной информации. Если вы создали пользовательскую обложку, которую хотите повторно использовать, выберите Использовать существующую обложку. В противном случае выберите :guilabel: Сгенерировать новую обложку.
Extra Description note`указывает содержимое настраиваемого столбца, которое должно быть вставлено на страницу «Описание», рядом с миниатюрой обложки. Например, вы можете отобразить дату, когда вы последний раз читали книгу, используя пользовательский столбец :guilabel:`Last Read. Для расширенного использования функции Description note см. этот пост на форуме calibre <https://www.mobileread.com/forums/showpost.php?p=1335767&postcount=395>`_.
:guilabel:Thumb width`задает предпочтение ширины для эскизов обложки, включенных в страницы описаний. Миниатюры кэшируются для повышения производительности. Чтобы поэкспериментировать с разной шириной, попробуйте создать каталог всего для нескольких книг, пока вы не определите предпочитаемую ширину, а затем сгенерируйте полный каталог. В первый раз, когда каталог создается с новой шириной эскиза, производительность будет медленнее, но последующие сборки этого каталога будут использовать кэш эскизов.
Как пользоваться Calibre
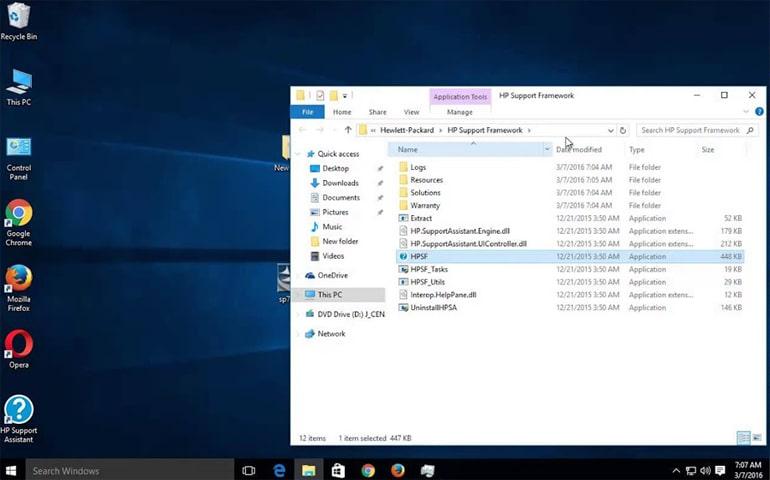
После запуска программы Calibre открывается окно «Calibre». В верхней части окна программы расположено меню с кнопками для управления программой.
Работа с программой Calibre начинается с кнопки «Добавить книги». В программу следует добавить книги для создания электронной библиотеки, и для начала использования программы.
Ниже панели меню располагается поле «Поиск» для быстрого поиска книг в библиотеке. После ввода названия произведения, потребуется нажать на кнопку «Пуск!», или по-другому, нажать для этого на клавиатуре на кнопку «Enter». Рядом с полем поиска, расположена кнопка для сброса быстрого поиска.
Электронные книги, в библиотеку, можно добавлять поодиночке, выбирая отдельные электронные книги в открывшемся окне Проводника.
Если нажать на стрелку рядом с кнопкой Добавить книги», то из контекстного меню можно выбрать нужный вариант добавления книг в библиотеку.
В программе Calibre можно настроить автоматическое добавление электронных книг в создаваемую библиотеку.
Основным режимом добавления книг в библиотеку является групповое добавление книг из выбранных директорий. Программа будет копировать книги, и выбранные электронные книги будут добавляться в библиотеку.
Добавленные в библиотеку книги, будут отражены в виде списка. По каждой книге, добавленной в библиотеку, можно просмотреть ее данные — «Название», «Автор(ы)», «Дата» добавления в библиотеку, «Размер (МБ)», «Оценка», «Теги», «Серия».
Электронные книги, добавленные в библиотеку, копируются из места их первоначального размещения.
После запуска программы, вы увидите, что в библиотеку уже добавлена одна книга — инструкция по использованию программы Calibre на английском языке.
После того, как я добавил электронную книгу в библиотеку, она попала в список книг библиотеки. В правом боковом поле отображается информация о добавленной электронной книге. Здесь отображается изображение обложки (если такое изображение есть), формат книги, серия, теги, месторасположение книги в библиотеке, и ее краткое описание (если такое описание уже имеется).
Следующая кнопка «Редактировать метаданные» позволяет упорядочить использование библиотеки с помощью тегов. Электронным книгам присваиваются определенные теги, например, по жанрам, для более удобного использования библиотеки.
Вы можете самостоятельно добавлять теги к книгам, которые их не имеют, или редактировать уже присвоенные книгам теги.
Для редактирования метаданных книги необходимо нажать на книгу правой кнопкой мыши, и в контекстном меню выбрать нужный вариант действий — «Редактировать метаданные» => «Редактировать метаданные индивидуально».
После этого откроется окно «Редактирование метаданных», для редактирования метаданных выбранной электронной книги. В этом окне вы можете поменять метаданные электронной книги, добавить новые теги, удалить уже имеющиеся, добавить свое описание к книге, или оставить свой комментарий.
Используя кнопки «Предыдущая» и «Следующая», в нижней части окна, можно перемещаться между книгами, которые были добавлены в библиотеку. После изменений метаданных нужно нажать на кнопку «ОК».
При нажатии правой кнопкой мыши по книге, открывается контекстное меню. С помощью контекстного меню можно совершать с книгой определенные действия, например, удалить книгу из библиотеки.
В программе Calibre можно просматривать добавленные в библиотеку книги. Для этого необходимо нажать на кнопку «Просмотр». После этого откроется окно программы E-book Viewer, которая устанавливается вместе с программой Calibre.
«Просмотрщик электронных книг» позволяет просматривать или читать книги из библиотеки. На вертикальной правой панели расположены кнопки для управления «Просмотрщиком электронных книг», с помощью которых можно будет управлять этим процессом.
Программа просмотрщик открывает книги не всех форматов, которые поддерживает программа Calibre. Не поддерживаемые просмотрщиком форматы, открываются с помощью программ установленных в вашей операционной системе, для просмотра файлов конкретного формата.
Search & replace
Edit book has a very powerful search and replace interface that allows you to
search and replace text in the current file, across all files and even in a
marked region of the current file. You can search using a normal search or
using regular expressions. To learn how to use regular expressions for advanced
searching, see .

Start the search and replace via the Search → Find/replace menu
entry (you must be editing an HTML or CSS file).
Type the text you want to find into the Find box and its replacement into the
Replace box. You can the click the appropriate buttons to Find the next match,
replace the current match and replace all matches.
Using the drop downs at the bottom of the box, you can have the search operate
over the current file, all text files, all style files or all files. You can
also choose the search mode to be a normal (string) search or a regular
expression search.
You can count all the matches for a search expression via
Search → Count all. The count will run over whatever files/regions
you have selected in the dropdown box.
You can also go to a specific line in the currently open editor via
Search → Go to line.
Note
Remember, to harness the full power of search and replace, you will
need to use regular expressions. See .
You can save frequently used search/replace expressions (including function
mode expressions) and reuse them multiple times. To save a search simply right
click in the Find box and select Save current search.
You can bring up the saved searches via Search → Saved
searches. This will present you with a list of search and replace expressions
that you can apply. You can even select multiple entries in the list by holding
down the Ctrl Key while clicking so as to run multiple search and replace
expressions in a single operation.
Function mode allows you to write arbitrarily powerful Python functions that
are run on every Find/replace. You can do pretty much any text manipulation you
like in function mode. For more information, see Function mode for Search & replace in the Editor.
ВЫХОДНЫЕ НАСТРОЙКИ
Настройки для контроля обработки выходного файла epub
-
Выключить разбиение при разрыве страниц. Обычно входные файлы автоматически разбиваются на каждый разрыв страницы на два файла. Это дает выходную электронную книгу, которая может анализироваться быстрее и с меньшими ресурсами. Однако разбиение происходит медленно, и если ваш исходный файл содержит очень большое количество разрывов страниц, вы должны отключить разбиение на разрыве страниц.
-
Этот параметр нужен только если EPUB-файл будет использован с FBReaderJ. Файловая структура внутри EPUB файла будет сплющена, все файлы разместятся в корне.
-
Добавить встроенное оглавление, которое появится как часть основного содержания книги.
-
Поместить встроенное оглавление в конце книги, а не в начале.
-
Версия файла EPUB для генерации. EPUB 2 — наиболее широко совместим, используйте EPUB 3, только если вы знаете, что он вам действительно нужен.
-
Извлечь содержимое созданного файла EPUB в указанную директорию. Имейте в виду, что содержимое директории будет удалено.
-
Разбить все HTML файлы, размер которых превышает заданный (в КБ). Это необходимо сделать, поскольку большинство читалок EPUB не могут обрабатывать большие файлы. По умолчанию 260KB определяется как размер, необходимый для Adobe Digital Editions. Установите параметр в 0, чтобы отключить разбиение файлов.
-
Обычно, если входной файл не имеет обложки, и вы её не указали, то по умолчанию обложка генерируется из названия, авторов и т.д. Этот параметр отключает генерацию такой обложки.
-
Не использовать файл SVG в качестве обложки. Используйте эту опцию только, если файл EPUB будет использоваться на устройстве не поддерживающем SVG, таком как iPhone или JetBook Lite. Без включенной опции, подобные устройства будут отображать обложку в виде пустой страницы.
-
При использовании обложки в формате SVG, настройка растянет обложку по всей площади экрана, но сохранит соотношения сторон. Т.е. могут появиться белые поля у границ изображения, но останется без искажений. Без включенной опции, изображение обложки может быть слегка искажено, но у него не будет пустых полей по краям.
-
Если отмечено, модуль вывода попытается форматировать вывод в удобном для чтения виде. Может не работать на некоторых модулях вывода.
restore_database
calibredb restore_database
Restore this database from the metadata stored in OPF files in each
directory of the calibre library. This is useful if your metadata.db file
has been corrupted.
WARNING: This command completely regenerates your database. You will lose
all saved searches, user categories, plugboards, stored per-book conversion
settings, and custom recipes. Restored metadata will only be as accurate as
what is found in the OPF files.
Whenever you pass arguments to calibredb that have spaces in them, enclose the arguments in quotation marks. For example: “/some path/with spaces”
export
calibredb export ids
Export the books specified by ids (a comma separated list) to the filesystem.
The export operation saves all formats of the book, its cover and metadata (in
an opf file). You can get id numbers from the search command.
Whenever you pass arguments to calibredb that have spaces in them, enclose the arguments in quotation marks. For example: “/some path/with spaces”
-
Export all books in database, ignoring the list of ids.
-
Normally, calibre will convert all non English characters into English equivalents for the file names. WARNING: If you turn this off, you may experience errors when saving, depending on how well the filesystem you are saving to supports unicode. Specifying this switch will turn this behavior off.
-
Normally, calibre will save the cover in a separate file along with the actual e-book files. Specifying this switch will turn this behavior off.
-
Normally, calibre will update the metadata in the saved files from what is in the calibre library. Makes saving to disk slower. Specifying this switch will turn this behavior off.
-
Normally, calibre will write the metadata into a separate OPF file along with the actual e-book files. Specifying this switch will turn this behavior off.
-
Comma separated list of formats to save for each book. By default all available formats are saved.
-
Report progress
-
Replace whitespace with underscores.
-
Export all books into a single directory
-
The template to control the filename and directory structure of the saved files. Default is {author_sort}/{title}/{title} — {authors} which will save books into a per-author subdirectory with filenames containing title and author. Available controls are: {author_sort, authors, id, isbn, languages, last_modified, pubdate, publisher, rating, series, series_index, tags, timestamp, title}
-
The format in which to display dates. %d — day, %b — month, %m — month number, %Y — year. Default is: %b, %Y
-
Export books to the specified directory. Default is .
Global Options
-
show this help message and exit
-
Path to the calibre library. Default is to use the path stored in the settings. You can also connect to a calibre Content server to perform actions on remote libraries. To do so use a URL of the form: for example, . library_id is the library id of the library you want to connect to on the Content server. You can use the special library_id value of — to get a list of library ids available on the server. For details on how to setup access via a Content server, see https://manual.calibre-ebook.com/generated/en/calibredb.html.
-
Password for connecting to a calibre Content server. To read the password from standard input, use the special value: <stdin>. To read the password from a file, use: <f:/path/to/file> (i.e. <f: followed by the full path to the file and a trailing >). The angle brackets in the above are required, remember to escape them or use quotes for your shell.
-
Username for connecting to a calibre Content server
macOS development environment
Note
You must also get the calibre source code separately as described above.
Install calibre normally using the provided .dmg. Then open a Terminal and change to
the previously checked out calibre code directory, for example:
cd Userskovidworkcalibre
calibre is the directory that contains the src and resources sub-directories.
The calibre command line tools are found inside the calibre app bundle, in
you should add this directory to your PATH environment variable, if you want to
run the command line tools easily.
The next step is to create a bash script that will set the environment variable to the absolute path of the src directory when running calibre in debug mode.
Create a plain text file:
#!/bin/sh
export CALIBRE_DEVELOP_FROM="/Users/kovid/work/calibre/src"
calibre-debug -g
Save this file as , then set its permissions so that it can be executed:
chmod +x usrbincalibre-develop
Once you have done this, run:
calibre-develop
list
calibredb list
List the books available in the calibre database.
Whenever you pass arguments to calibredb that have spaces in them, enclose the arguments in quotation marks. For example: “/some path/with spaces”
-
Sort results in ascending order
-
The fields to display when listing books in the database. Should be a comma separated list of fields. Available fields: author_sort, authors, comments, cover, formats, identifiers, isbn, languages, last_modified, pubdate, publisher, rating, series, series_index, size, tags, timestamp, title, uuid Default: title,authors. The special field all can be used to select all fields. In addition to the builtin fields above, custom fields are also available as *field_name, for example, for a custom field #rating, use the name: *rating
-
Generate output in JSON format, which is more suitable for machine parsing. Causes the line width and separator options to be ignored.
-
The maximum number of results to display. Default: all
-
The maximum width of a single line in the output. Defaults to detecting screen size.
-
The prefix for all file paths. Default is the absolute path to the library folder.
-
Filter the results by the search query. For the format of the search query, please see the search related documentation in the User Manual. Default is to do no filtering.
-
The string used to separate fields. Default is a space.
catalog
calibredb catalog /path/to/destination.(csv|epub|mobi|xml...)
Export a catalog in format specified by path/to/destination extension.
Options control how entries are displayed in the generated catalog output.
Note that different catalog formats support different sets of options.
Whenever you pass arguments to calibredb that have spaces in them, enclose the arguments in quotation marks. For example: “/some path/with spaces”
-
Comma-separated list of database IDs to catalog. If declared, is ignored. Default: all
-
Filter the results by the search query. For the format of the search query, please see the search-related documentation in the User Manual. Default: no filtering
-
Show detailed output information. Useful for debugging
The Live preview panel
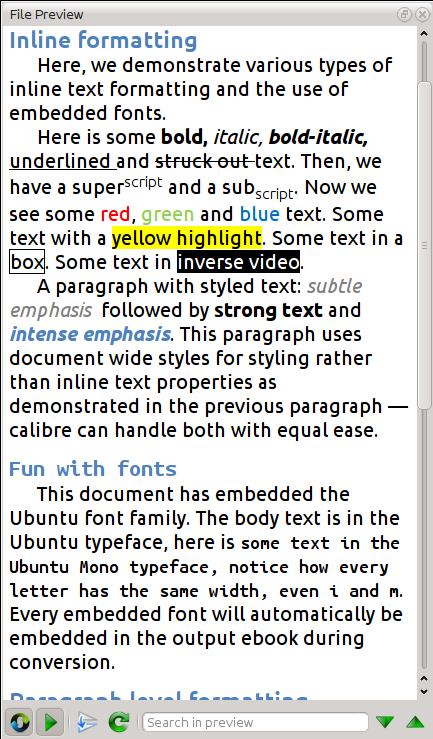
The File preview gives you an overview of the various files inside
The live preview panel shows you the changes you are making live (with a second
or two of delay). As you edit HTML or CSS files, the preview panel is updated
automatically to reflect your changes. As you move the cursor around in the
editor, the preview panel will track its location, showing you the
corresponding location in the book. Clicking in the preview panel, will cause
the cursor in the editor to be positioned over the element you clicked. If you
click a link pointing to another file in the book, that file will be opened in
the edit and the preview panel, automatically.
You can turn off the automatic syncing of position and live preview of changes
– by buttons under the preview panel. The live update of the preview
panel only happens when you are not actively typing in the editor, so as not to
be distracting or slow you down, waiting for the preview to render.
The preview panel shows you how the text will look when viewed. However, the
preview panel is not a substitute for actually testing your book an actual
reader device. It is both more, and less capable than an actual reader. It will
tolerate errors and sloppy markup much better than most reader devices. It will
also not show you page margins, page breaks and embedded fonts that use font
name aliasing. Use the preview panel while you are working on the book, but
once you are done, review it in an actual reader device or software emulator.
Note
The preview panel does not support embedded fonts if the name of the font
inside the font file does not match the name in the CSS @font-face rule.
You can use the Check Book tool to quickly find and fix any such
problem fonts.
Checkpoints
Checkpoints are a way to mark the current state of the book as “special”. You
can then go on to do whatever changes you want to the book and if you don’t like
the results, return to the checkpointed state. Checkpoints are automatically
created every time you run any of the automated tools described in the
previous section.
You can create a checkpoint via Edit → Create checkpoint. And go back
to a previous checkpoint with Edit → Revert to …
The check pointing functionality is in addition to the normal Undo/redo
mechanism when editing individual files. Checkpoints are particularly useful
for when changes are spread over multiple files in the book or when you wish to
be able to revert a large group of related changes as a whole.
Having separate “normal” and “development” calibre installs on the same computer
The calibre source tree is very stable and rarely breaks, but if you feel the need to run from source on a separate
test library and run the released calibre version with your everyday library, you can achieve this easily using
.bat files or shell scripts to launch calibre. The example below shows how to do this on Windows using .bat files (the
instructions for other platforms are the same, just use a shell script instead of a .bat file)
To launch the release version of calibre with your everyday library:
calibre-normal.bat:
calibre.exe "--with-library=C:\path\to\everyday\library folder"
calibre-dev.bat:
add_custom_column
calibredb add_custom_column label name datatype
Create a custom column. label is the machine friendly name of the column. Should
not contain spaces or colons. name is the human friendly name of the column.
datatype is one of: bool, comments, composite, datetime, enumeration, float, int, rating, series, text
Whenever you pass arguments to calibredb that have spaces in them, enclose the arguments in quotation marks. For example: “/some path/with spaces”
-
A dictionary of options to customize how the data in this column will be interpreted. This is a JSON string. For enumeration columns, use {\ enum_values\ :} There are many options that can go into the display variable.The options by column type are: composite: composite_template, composite_sort, make_category,contains_html, use_decorations datetime: date_format enumeration: enum_values, enum_colors, use_decorations int, float: number_format text: is_names, use_decorations The best way to find legal combinations is to create a custom column of the appropriate type in the GUI then look at the backup OPF for a book (ensure that a new OPF has been created since the column was added). You will see the JSON for the display for the new column in the OPF.
Page setup
The Page setup options are for controlling screen layout, like margins and screen sizes. There are
options to setup page margins, which will be used by the output plugin, if the selected output format
supports page margins. In addition, you should choose an Input profile and an output profile. Both sets
of profiles basically deal with how to interpret measurements in the input/output documents, screen sizes
and default font rescaling keys.
If you know that the file you are converting was intended to be used on a particular device/software platform,
choose the corresponding input profile, otherwise just choose the default input profile. If you know the files
you are producing are meant for a particular device type, choose the corresponding output profile. In particular, for MOBI output files, you should choose the Kindle, for LIT the Microsoft Reader and for EPUB the Sony Reader. In the case of EPUB, the Sony Reader profile will result in EPUB files that will work everywhere. However, it has some side effects, like inserting artificial section breaks to keep internal components below the size threshold, needed for SONY devices. In particular for the iPhone/Android phones, choose the SONY output profile. If you know your EPUB files will not be read on a SONY or similar device, use the default output profile. If you are producing MOBI files that are not intended for the Kindle, choose the Mobipocket books output profile.
Special features in the code editor
The calibre HTML editor is very powerful. It has many features that make
editing of HTML (and CSS) easier.
The HTML editor has very sophisticated syntax highlighting. Features include:
You can right click on an HTML tag name or a CSS property name to get help for that tag or property.
You can also hold down the Ctrl key and click on any filename inside a link tag
to open that file in the editor automatically.
When editing an e-book, one of the most tedious tasks is creating links to other
files inside the book, or to CSS stylesheets, or images. You have to figure out
the correct filename and relative path to the file. The editor has
auto-complete to make that easier.
As you type a filename, the editor automatically pops up suggestions. Simply
use the Tab key to select the correct file name. The editor even offers
suggestions for links pointing to an anchor inside another HTML file. After you
type the character, the editor will show you a list of all anchors in the
target file, with a small snippet of text to help you choose the right anchor.
Note that unlike most other completion systems, the editor’s completion system
uses subsequence matching. This means that you can type just two or three
letters from anywhere in the filename to complete the filename. For example,
say you want the filename , you can simply type
and press Tab to complete the filename. When searching for matches, the
completion system prioritizes letters that are at the start of a word, or
immediately after a path separator. Once you get used to this system, you will
find it saves you a lot of time and effort.
The calibre editor supports snippets. A snippet is a
piece of text that is either re-used often or contains a lot of redundant
text. The editor allows you to insert a snippet with only a few key strokes.
The snippets are very powerful, with many features, such as placeholders you
can jump between, automatic mirroring of repeated text and so on.
For more information, see Snippets.
Features
- Bootstrap 3 HTML5 interface
- full graphical setup
- User management with fine-grained per-user permissions
- Admin interface
- User Interface in czech, dutch, english, finnish, french, german, hungarian, italian, japanese, khmer, polish, russian, simplified chinese, spanish, swedish, turkish, ukrainian
- OPDS feed for eBook reader apps
- Filter and search by titles, authors, tags, series and language
- Create a custom book collection (shelves)
- Support for editing eBook metadata and deleting eBooks from Calibre library
- Support for converting eBooks through Calibre binaries
- Restrict eBook download to logged-in users
- Support for public user registration
- Send eBooks to Kindle devices with the click of a button
- Sync your Kobo devices through Calibre-Web with your Calibre library
- Support for reading eBooks directly in the browser (.txt, .epub, .pdf, .cbr, .cbt, .cbz)
- Upload new books in many formats, including audio formats (.mp3, .m4a, .m4b)
- Support for Calibre Custom Columns
- Ability to hide content based on categories and Custom Column content per user
- Self-update capability
- «Magic Link» login to make it easy to log on eReaders
- Login via LDAP, google/github oauth and via proxy authentication
The Live CSS panel
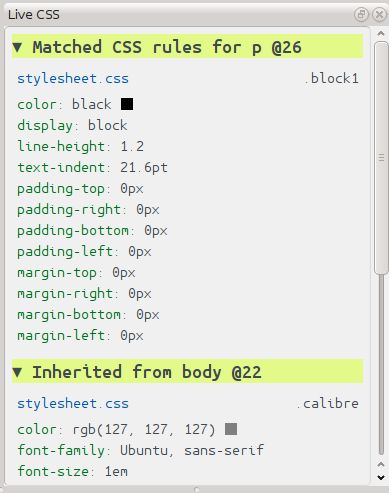
The Live CSS panel shows you all the style rules that apply to the
tag you are currently editing. The name of tag, along with its line number in
the editor are displayed, followed by a list of matching style rules.
It is a great way to quickly see which style rules apply to any tag. The view
also has clickable links (in blue), which take you directly to the location
where the style was defined, in case you wish to make any changes to the style
rules. Style rules that apply directly to the tag, as well as rules that are
inherited from parent tags are shown.
The panel also shows you what the finally calculated styles for the tag are.
Properties in the list that are superseded by higher priority rules are shown
with a line through them.
You can enable the Live CSS panel via View → Live CSS.
Using functions in templates — template program mode
The template language program mode differs from single-function mode in that it permits you to write template expressions that refer to other metadata fields, modify values, and do arithmetic. It is a reasonably complete programming language.
You can use the functions documented above in template program mode. See below for details.
Beginning with an example, assume that you want your template to show the series for a book if it has one, otherwise show the value of a custom field #genre. You cannot do this in the basic language because you cannot make reference to another metadata field within a template expression. In program mode, you can. The following expression works:
{#series:'ifempty($, field('#genre'))'}
The example shows several things:
The language is similar to languages in that it is built almost entirely from functions. A statement is a function. An expression is a function. Constants and identifiers can be thought of as functions returning the value indicated by the constant or stored in the identifier.
The syntax of the language is shown by the following grammar:
constant   ::= " string " | ' string ' | number
identifier ::= sequence of letters or ``_`` characters
function   ::= identifier ( statement * )
expression ::= identifier | constant | function | assignment
assignment ::= identifier '=' expression
statement  ::= expression *
program    ::= statement
Comments are lines with a ‘#’ character at the beginning of the line.
An always has a value, either the value of the constant, the value contained in the identifier, or the value returned by a function. The value of a is the value of the last expression in the sequence of statements. As such, the value of the program (statement):
1; 2; 'foobar'; 3
is 3.
Another example of a complex but rather silly program might help make things clearer:
{series_index:'
    substr(
        strcat($, '->',
            cmp(divide($, 2), 1,
                assign(c, 1); substr('lt123', c, 0),
                'eq', 'gt')),
        0, 6)
   '| prefix | suffix}
This program does the following:
For various values of series_index, the program returns:
All the functions listed under single-function mode can be used in program mode. To do so, you must supply the value that the function is to act upon as the first parameter, in addition to the parameters documented above. For example, in program mode the parameters of the test function are . The x parameter, which is the value to be tested, will almost always be a variable or a function call, often field().
The following functions are available in addition to those described in single-function mode. Remember from the example above that the single-function mode functions require an additional first parameter specifying the field to operate on. With the exception of the parameter of assign, all parameters can be statements (sequences of expressions). Note that the definitive documentation for functions is available in the section :
Windows development environment
Note
You must also get the calibre source code separately as described above.
Install calibre normally, using the Windows installer. Then open a Command Prompt and change to
the previously checked out calibre code directory. For example:
cd C\Users\kovid\work\calibre
calibre is the directory that contains the src and resources sub-directories.
The next step is to set the environment variable to the absolute path of the src directory.
So, following the example above, it would be . to setting environment
variables on Windows.
Once you have set the environment variable, open a new command prompt and check that it was correctly set by using
the command:
echo %CALIBRE_DEVELOP_FROM%
Setting this environment variable means that calibre will now load all its Python code from the specified location.
That’s it! You are now ready to start hacking on the calibre code. For example, open the file
in your favorite editor and add the line:
print ("Hello, world!")
near the top of the file. Now run the command calibredb. The very first line of output should be .
Accessing the Content server from other devices
There are two types of remote device access that you will typically need. The
first, simpler kind is from within your home network. If you are running
calibre on a computer on your home network and you have also connected your
other devices to the same home network, then you should be easily able to
access the server on those devices.
After starting the server in calibre as described above, click the
Connect/share button again. Instead of the Start Content
server action, you should see a Stop Content server action
instead. To the right of this action will be listed an IP address
and port number. These look like a bunch of numbers separated by periods. For
example:
Stop Content server 192.168.1.5, port 8080
These numbers tell you what address to use to connect to the server in your
devices. Following the example above, the address becomes:
http//192.168.1.58080
The first part of the address is always the next part is the IP
address, which is the numbers before the comma and finally we have the port
number which must be added to the IP address with a colon (). If you are
lucky, that should be all you need and you will be looking at the
calibre libraries on your device. If not, read on.