V380 ip camera installation manual
Содержание:
V380 — программа для видеонаблюдения для мобильных устройств. Скачать. Инструкция
V380 — программа для подключения p2p панорамных и ptz камер видеонаблюдения. Приложение доступно для мобильных платформ на ios и android, крайне просто в обращении благодаря чему организовать удаленное видеонаблюдение не составит труда.
Принцип создания подключения происходит следующим образом: Камера подключается к сети wi-fi, приложение на телефоне находит его внутри той же сети и сохраняет устройство в памяти программы. Удаленное подключение к камере после добавления устройства в приложении становится доступным из любой точки мира благодаря p2p технологии.
Скачать программу под Android можно по этой ссылке, под iOS — здесь.
Инструкция настройки
Запускаем v380, проходим регистрацию или жмем «Локально» для быстрого добавления, никакой разницы нет. Создание учетной записи облегчает перенос приложения с добавленным устройством на любой другой смартфон или планшет на ios и android.
Для быстрого добавления устройства жмем «Добавить вручную». Подключите камеру к адаптеру питания.
Для ручного добавления в Device ID: Вводим серийный номер указанный на наклейке в основании нашей камеры. Вводим логин и пароль от устройства, «Add to list» — добавит камеру.
Для автоматического добавления жмем «Lan Search», программа сама найдет wi-fi сеть устройства и добавит камеру.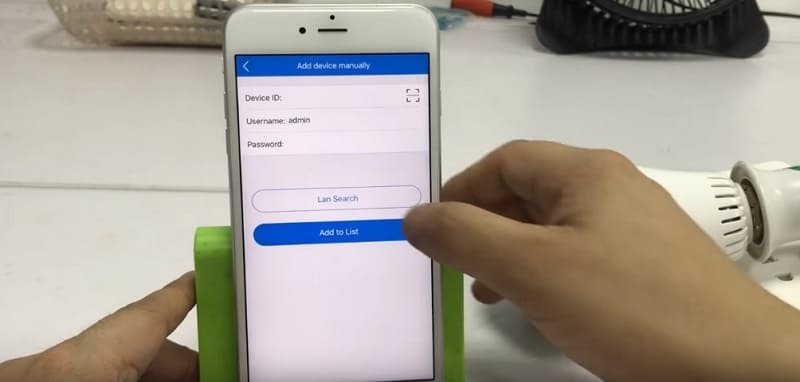
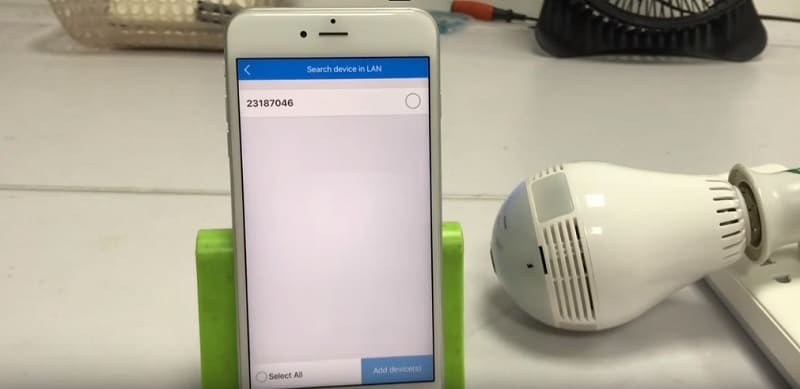
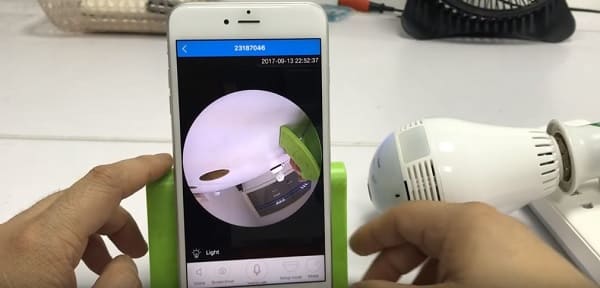
Ставим галку напротив номера камера жмем Add, тем самым получаем доступ к камере. Программа попросит сменить пароль на камере, делаем по желанию.
 Что бы камера начала работать удаленно, следует перейти в настройки «Settings», выбрать пункт настройки сети «Network settings»
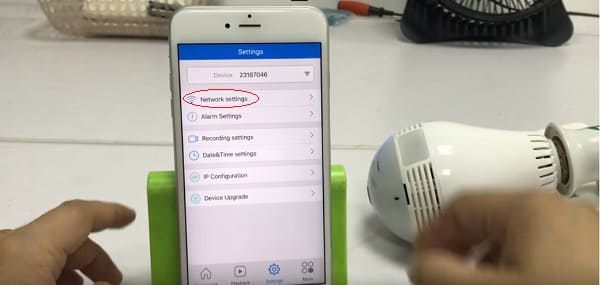
Ставим галку на «Station mode» для поиска нашей wi-fi сети.
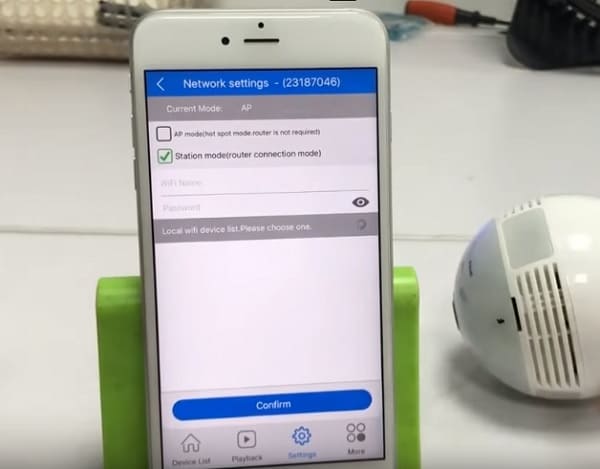
Выбираем нашу сеть, вбиваем пароль от нее, подтверждаем «Confirm».

Вот и все! Мы получили доступ к устройству при любом мобильном или wi-fi интернет соединении по всему миру.
Более подробно о настройках Вы можете посмотреть в видео ниже.
5, Сентябрь, 2018|Программы для видеонаблюдения|
Connecting to your V380 IP camera*
Try the following connection options in iSpy or Agent to connect to your V380 IP camera. If an FFMPEG option is available we recommend you try that first as it will often be faster and include audio support. You can also try the VLC plugin in iSpy if the FFMPEG option isn’t working.
The settings for V380 cameras are built right into our surveillance software — click «Add» then «IP camera with wizard» to automatically setup your V380 cameras.
Start typing in the «Make» box to find your camera. If your camera is not listed then click «Get Latest List» in settings or when on the add camera wizard. If you need to modify the URL then add or edit the V380 camera and you can modify the connection type and URL in the video source dialog (button is top of the first tab).
Tip: Click a model to generate a URL for your camera
| Models | Type | Protocol | Path | Audio | Talk Model | Cookies | Flags |
|---|---|---|---|---|---|---|---|
| FFMPEG | rtsp:// | live/ch00_0 | Possible | None | |||
| FFMPEG | rtsp:// | live/ch00_0 | Possible | None | |||
| FFMPEG | rtsp:// | /onvif1 | Possible | None | |||
| FFMPEG | rtsp:// | /h264_stream | Possible | None | |||
| FFMPEG | rtsp:// | live/ch00_0 | Possible | None | |||
| VLC | rtsp:// | live/ch00_0 | Possible | None | |||
| FFMPEG | rtsp:// | live/ch00_0 | Possible | None | |||
| FFMPEG | rtsp:// | live/ch00_0 | Possible | None | |||
| FFMPEG | rtsp:// | live/ch00_0 | Possible | None | |||
| FFMPEG | rtsp:// | live/ch00_0 | Possible | None | |||
| FFMPEG | rtsp:// | live/ch00_0 | Possible | None | |||
| FFMPEG | rtsp:// | live/ch00_0 | Possible | None | |||
| VLC | rtsp:// | live/ch00_0 | Possible | None | |||
| FFMPEG | rtsp:// | /h264_stream | Possible | None | |||
| FFMPEG | rtsp:// | /cam/realmonitor | Possible | None | |||
| FFMPEG | rtsp:// | /onvif1 | Possible | None | |||
| FFMPEG | rtsp:// | live/ch00_0 | Possible | None | |||
| FFMPEG | rtsp:// | /11 | Possible | None | |||
| FFMPEG | rtsp:// | live/ch00_0 | Possible | None | |||
| FFMPEG | rtsp:// | /h264_stream | Possible | None |
Page:
1
* iSpyConnect has no affiliation, connection, or association with V380’s products. The connection details provided here are crowd sourced from the community and may be incomplete, inaccurate or both. We provide no warranty that you will be successful using these connection URLs or that V380 products are compatible with iSpy.
Other makes starting with V
| V | V200V360V380V600V89VacronValtronicsVanderbiltVandescVangoldVantageVantechVastseeVatelVcamVcatchVcenterVchodVcsVeevocamVeezonVehoVeiluxVellemanVelproVentechVeo/vidiVerintVerizonVeroyiVeskysVestaVesta AlarmsVevotekVgsionVguardVhodVicomVicon SecurityVictexVictureVideosec SecurityVideotecVideotrendVideotronikVidilineVido.atVidstarViewmaxViewscaViewscanVigilantVilarVimicroVip VisionVipcamViralVisicomVisionVision DigiVision GsVision Hi-tech CoVisioncool CctvVisionhitech AmericasVisioniteVisionliteVisionxipVisiotechVisiotysVisonicVista CctvVistacamVisualintVitekVitek CctvVitorcamVivintVivotekVlcVonnicVonnincVonzVoor/keukenVoordeurVoyagerVoycamVplVr CamVr360VsonicVstarVstarcamVtaVtech |
|---|
All rights reserved. No part of this database may be reproduced, distributed, or transmitted in any form or by any means, including photocopying, recording, or other electronic or mechanical methods, without the prior written permission of the publisher, except in the case of brief quotations embodied in critical reviews and certain other noncommercial uses permitted by copyright law.
iPhone IOS Smart Phone Installation
WiFi smart link installation (with WiFi Network)
1. Open Apple App Store, search, download, and install V380
2. Connect the power plug to the camera and place the camera “right next” to your WiFi router.Camera sound: “System is starting”Camera sound: “System startup completed”3. Press and hold the reset button on the back of the camera until you hear the following sound:Camera sound: “Restore factory default setting”Camera sound: “Waiting for WiFi smart link configuration”4. Open the app V380
Click on “WiFi Smart Link”5. Your phone has to be connected to your WiFi network. You should then see your network name under WiFi Name. Enter your WiFi password and press next on the following screen:
6. You will see the following screen, searching for the camera through your WiFi connection
Camera sound: “Configuration received”Camera sound: “WiFi connecting”Camera sound: “WiFi connected”7. Successfully installed
Note: “Add manually” option is for when a camera is already connected to your home network and you would like add the camera to another phone. You can simply press “Lan Search” or Type in the Device ID (located on the bottom of the camera) and click “Add to list” on the following page to add an already configured camera to your phone.
AP (Access Point) installation (withor without WiFi Network)
1. Open Apple App Store, search, download, and install V380
2. Connect the power cableto the cameraCamera sound: “System is starting”Camera sound: “System startup completed”3. Press and hold the reset button on the back of the camera to until you hear the following sound:Camera sound: “Restore factory default setting”Camera sound: “Waiting for WiFi smart link configuration”4. Press and hold the reset button againon the back of the camera for 1-2 seconds Camera sound: “Access point establishing”Camera sound: “Access point established”5. On your phone, go to Settings -> WLAN and connect to the WiFi network that starts with MV and ends with 8 digits. For example MV12345678. This is your camera access point.
6. Open the app V380
Click on “Add Manually”7. Your phone has to beconnected to the camera access point. On the following screen, you can simply press “Lan Search” or Type in the Device ID (located on the bottom of the camera) and click Add to list on the following screen to add the camera to your device list:
8. When your phone successfully connects to the camera, you will see your camera on the Device List.
Now your camera is setup to connect directly to your phone and can only be accessed when your phone is near the camera access point signal. To configure your camera to your WiFi network, please place the camera next to your WiFi router and. continue the following steps.9. Click “Settings” on the bottom menu will bring you to this screen.You will see your device ID at the top. Click “Network.”10. Check “Station (Work with router). The “WIFI List Near the device” will populate with nearby networks. Choose your WiFi network and type in your WiFi password and press return. Then click “Save” at the very top. Camera sound: “WiFi Connecting”Camera sound: “WiFi Connected”11. On your phone, go to Settings ->WLAN and connect to your WiFi network. Reopen the V380 app and click “Device List” at the bottom. You should see the camera on the device list. 12. Successfully Installed
V380 FAQs
1. How can I watch my v380s on my PC?
Step 1: download an android emulator on your PC.Step 2: go to google play store and download the app for PC. You can also visit the App Store to download the app for Mac.Step 3: once you find the app, click on install.
2. How do I download v380s Pro for PC?
Download Bluestacks on your PC and then follow the prompts above to download the app on your PC. Bluestacks is not the only emulator that you can use; you can also use the Nox App Player, Memu Player, and other emulators.
3. How do I download v380s?
This will completely depend on the device you will be used to operate the application. If you are using an android device, you will need to download the app from Google Play Store. If you are using an iOS device, you can download the app from the App store.
Currently, there is no v380 version for PC, but you can use an android emulator to download the V380 for PC.
4. How do I connect my wifi camera to my computer?
Once you ensure that your IP camera is charged, connect the internet cable to the wifi router. You can now watch the IP camera on any of your devices. Go up into the WIFI settings and remove the internet cable.
Related App: V380 App for PC and Mac
Ivcho Georgiev
A professional app developer, tech author, and writer who talks about technology and innovation in the world of hardware and software.
His expertise is in software, mobile apps, and games running and operating on operating systems like Windows and Mac.
You can reach me on social media.
More Posts — Website
5/5
(1 Review)
Choosing the Right Browser
The first thing that you need to do when downloading an app that you will be using for your device is to ensure that you use the right browser. While the different browsers have the capability to help you get the application that you need, not all of them can do the job efficiently. Mozilla Firefox and Google Chrome can be the best option for you. Once you have identified the right browser, then you can follow the following procedure.
1. Type in your browser the V380s for PC and you will get several options. Here, you will have to specify the operating system that you intend to run your application; it can be V380s for PC, or V380s for Windows, or V380s for MacOS. It all depends on the type of operating system that you are using on your PC.
2. Once you have done that, you will get a link that will ask you to click if you want to download it. If you are sure that this is the application that is good for your device, then you need to click on it.
3. After clicking on the link, the browser should start downloading the link. In some instances depending on the type that you are using, the browser will want you to confirm what you want to do with the file you are downloading.
4. Once the download I complete, you just need to locate the position of the file and click on it to complete the installation process.
Android Smart Phone Installation
WiFi smart link installation (with WiFi Network)1. Open Google Play Store, search, download, and install V3802. Connect the power plug to the cameraand place the camera “right next” to your WiFi router.Camera sound: “System is starting”Camera sound: “System startup completed”3. Press and hold the reset button on the back of the camera until you hear the following sound:Camera sound: “Restore factory default setting”Camera sound: “Waiting for WiFi smart link configuration”4. Open the app V380Click on “WIFI quick setup”5. Your phone has to be connected to your WiFi network. You should then see your network name under WiFi name. Enter your WiFi password and press “Next step” on the following screen:6. You will see the following screen, searching for the camera through your WiFi connectionCamera sound: “Configuration received”Camera sound: “WiFi connecting”Camera sound: “WiFi connected”7. Successfully installedNote: “Searching device” and “Device Linked” option is for when a camera is already connected to your home network and you would like add the camera to another phone. Simply clicking “Searching device” will add an already configured camera to your phone. Or you can click the + icon on the top right and click Device Linked, then click “Lan Search” or Type in the Device ID (located on the bottom of the camera) and click “Confirm Add” on the following screen to add analready configured camera to your phone.AP (Access Point) installation (with or without WiFi Network)1. Open Google Play Store, search, download, and install V3802. Connect the power cable to the cameraand place the camera next to your WiFi router.Camera sound: “System is starting”Camera sound: “System startup completed”3. Press and hold the reset button on the back of the camera to until you hear the following sound:Camera sound: “Restore factory default setting”Camera sound: “Waiting for WiFi smart link configuration”4. Press and hold the reset button again on the back of the camera for 1-2 secondsCamera sound: “Access point establishing”Camera sound: “Access point established”5. On your phone, go to Settings -> WLAN and connect to the WiFi network that starts with MV and ends with 8 digits. For example MV12345678. This is your camera access point.6. Open the app V380Click on “WIFI quick setup”Click on “AP Quick Setup” will bring you to the Quick Configuration screen.7. You will see the camera access point name under Quick Configuration. Click on the name to connect to the camera.8. You should see a list of nearby WiFi networks. Choose your WiFi network and type in your WiFi password and press return. Then click “Save” at the very top. If you don’t see your network, press the back arrow and repeat step 7. Camera sound: “WiFi Connecting”Camera sound: “WiFi Connected”9. On your phone, go to Settings -> WLAN and connect to your WiFi network. Reopen the V380 app and click “My Device” at the bottom. You should see the camera on the there.10. Successfully Installed
Download V380 for PC Windows using BlueStacks:
- First, Download and install BlueSacks on your Windows or Mac.Bluestacks Offline Installer | Rooted Bluestacks |Bluestacks App Player.
- Once you’ve installed BlueStack, launch it from your desktop. You have to add your Google Account to use Google Play on BlueStack. Goto->Settings->Accounts-Gmail.
- When BlueStacks screen loads up, Click on the Search icon.
- Now you have to type in the app name. I am looking for V380 so, in the search bar, I’ll type V380 and hit enter.
- On the next screen, you’ll see the list of all the apps containing V380 name, Click on the first one which is developed by V380.
Now you’ll be at app page, here you have to click on install. It will start downloading the app and once the downloading is complete, V380 will be installed.
Techbeasts: Installing V380 for PC using BlueStacks.
Before moving on you have to give permission to V380 in order to access your system information. Click on Accept when you’ll see the pop-up.
Now, wait for the installation process to be complete, once the V380 is download and installed, you’ll see a notification as you do on your Android devices. Goto BlueStacks homepage and there you’ll see the V380 logo in your apps. Click on the V380 logos to start using it.