Функции
Содержание:
How to use a third-party VPN along with AdGuard?
If you are already using a VPN for other purposes, then in order for AdGuard filtering to work, you can change it to the HTTP proxy server mode. The filtering mode can be changed in the Advanced Settings.
In this mode, there are two ways to set up a proxy: automatic and manual.
Automatic mode
In the automatic mode, enabling of filtering does not require any action from you. Filtering will work in both mobile and Wi-Fi networks. The problem is that the automatic mode can be operated only on rooted devices.
Manual mode
This approach may not work in some situations. It depends on your firmware and the actual VPN app. In some cases traffic bypasses a manually configured proxy.
In the manual mode, filtering will only work in Wi-Fi networks. You will have to manually configure the use of a proxy server for each Wi-Fi network.
How does AdGuard protection work?
AdGuard filters your browser traffic by blocking requests to phishing and malicious websites and removing intrusive browser advertising. AdGuard can use two modes of traffic filtering.
-
Local VPN mode.
- Local HTTP proxy mode.
Local VPN mode
If you are using this mode, AdGuard does not need ROOT privileges to carry out filtering. At the same time, a VPN-server is located on your device, so that there is no need to pass your traffic through a remote server in order to filter it.
Local HTTP proxy mode
In this mode AdGuard launches a local HTTP proxy server on your device. This mode is recommended, if you use a rooted device. Otherwise, manual adjustment of an HTTP proxy will be needed to use this mode, the filtering in mobile networks (Edge/3G/4G) will also be impossible.
How does DNS filtering work?
AdGuard can filter domain resolution requests to the Domain Name System servers, handle them locally, and block requests to phishing, malicious, advertising and tracking systems on such domains.
Blocking is implemented by sending back a specially crafted response that redirects all traffic to local network interface (with 127.0.0.1 IP address).
Then the browser or app that intended to connect to such a domain will try to connect to a server on this particular device, and eventually get an error.
Q: If this seems like a best way to filter ads, why use something else?
A: Because there are many advertising systems that use the same domains for advertising and also some useful services. The DNS filtering can be used just to speed up overall filtering process and to save some battery juice.
Q: Why can’t I use DNS-filtering with a Local HTTP proxy mode?
A: Because we need to filter all traffic (all network packets) sent from your device for DNS-filtering. Only VPN mode can accomplish such a thing.
Xiaomi
Чтобы приложение успешно работало в фоновом режиме, настройте следующие параметры:
Управление питанием
Пожалуйста, включите:
-
Настройки > Расширенные настройки > Battery manager > установите План электропитания на Производительность
-
Настройки устройства > Расширенные настройки > Battery Manager > Защищённые приложения – ваше устройство должно быть в списке
-
Настройки устройства > Приложения > ваше приложение > Батарея > Энергосберегающая подсказка и Продолжить работу после выключения экрана
- Настройки > Дополнительные настройки > Батарея и производительность > Управлять использованием батареи приложениями. И здесь:
-
Отключите режимы энергосбережения
- Выберите следующие параметры: Энергосбережение в фоновом режиме > Выбрать приложение > выберите своё приложение > Фоновые настройки > Нет ограничений
Закрепление приложения
Чтобы настроить фоновую работу AdGuard для устройств Xiaomi, обратите внимание на Батарею и права дос. Нажмите на кнопку «Недавние задачи» проведите вниз, AdGuard, чтобы сделать опции видимыми (как показано на скриншоте):
Нажмите на кнопку «Недавние задачи» проведите вниз, AdGuard, чтобы сделать опции видимыми (как показано на скриншоте):
- Перейдите в раздел Батарея
- Выберите Battery saver»
- Найдите и выберите AdGuard
- Настройте следующие Фоновые параметры:
- Перейдите в Разрешения
- Выберите Автозапуск
- Убедитесь, что эта функция включена для AdGuard:
How to manually configure a local HTTP proxy?
If your device does not support automatic proxy configuration, then you can configure a proxy server manually, using the instructions below:
In the AdGuard Settings select Local HTTP Proxy mode and Proxy setup mode — Manual.
Go to your phone settings and choose Wi-Fi. A list of wireless networks will be opened.
If the device is not yet connected, connect to the Wi-Fi network that you need. Open the network setting by pressing the line with this network. The following menu of the selected Wi-Fi network will appear.
Select Modify network. In the new window select Show advanced options.
In Proxy select Manual.
Enter 127.0.0.1 in Proxy hostname and enter the port that is showed in proxy settings in AdGuard application itself (port 8080 is used in AdGuard setting by default).
A proxy server has been set up. Now all Wi-Fi traffic will be filtered by AdGuard.
What is the difference between AdGuard filtering methods?
There are three AdGuard filtering methods:
- High-quality;
- High-speed;
- Simplified.
High-quality method is able to use all sorts of filtering rules and can filter everything. This method allows to change the HTML-code of a page cutting out all unwanted elements before the browser even loads the page.
High-quality method can increase the pages loading time, so it is recommended to use only on powerful devices.
High-speed method is able to use all rules save for and filters everything except page content. This method uses so called which are used not for blocking ad requests, but for changing the page appearance. Cosmetic rules include adding some special CSS-rules (styles) which hide the unwanted advertisements on a page and mask the removed elements’ remains after blocking, such as empty fields in the place of the blocked banner, etc.
Simplified filtering method is able to use just the and lets block only ad requests.
In contrast to the High-quality and High-speed filtering methods, the Simplified one does not use cosmetic filtering rules.
How to manage AdGuard notifications?
On Android version 8 and newer AdGuard provides multiple notification channels (which are also called ‘categories’). With their help you can easily manage AdGuard notifications on your device — customize channels, prioritize them, disable secondary notifications, etc. Get more instructions on how to do that and learn about options we provide for the older Android versions below.
Android 8 and newer
AdGuard for Android 8 and newer has 6 different notification categories. Before describing them, let’s see the way you can find the appropriate settings on your device — Settings → Apps & notifications → AdGuard → App Notifications.
Apart from this way, you can get a quick and simple access to these settings when long clicking on any AdGuard notification and choosing «All categories».
Alright, you’re in the right section. Now you can see 6 different categories, which are shown on the left part of the following screenshot.
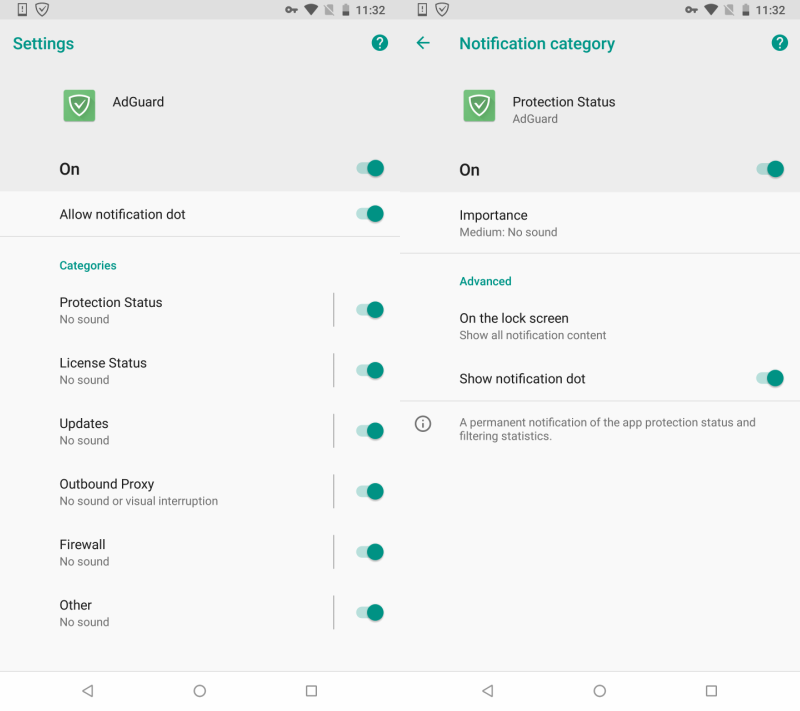
Each category includes certain notifications type:
- Protection Status (a permanent notification with the app protection status and filtering statistics);
- License Status (notifications about your license status changes);
- Updates (notifications about new application and filters updates);
- Outbound proxy (a permanent notification with the outbound proxy status);
- Firewall (notifications that let you manage network access);
- Other (notifications about critical errors, logging, conflicts with other apps etc.).
They are all enabled by default. You can customize the settings of each category (look at the right part of the above screenshot) — change its Importance status, set any supported sound of notifications, choose whether notifications should vibrate your phone or not, etc. In case you decide that some notifications are absolutely not important for you, you can disable the respective category(ies).
As mentioned, you can also choose the Importance status which will let you give every notification category the priority needed. Please look at the screenshot.

Please note, that starting from Android 9 «Importance» renamed to «Behaviour»
There are four statuses to choose from:
- Urgent (notifications will make sound and pop up on screen);
- High (notifications will make sound);
- Medium (notifications will make no sound);
- Low (notifications will make no sound and give no visual interruption).
Please note: you can’t enable the vibration for those notifications whose Important status is determined as Medium or Low.
We do hope these notification categories will help you sort through all the AdGuard notifications and let you enjoy using our product without unnecessary distractions.
Android 7 and older
For those who have devices on Android 7 and older AdGuard has also some useful options for managing notifications.
First of all, you can open device settings — Settings → Notifications → AdGuard or Settings → Apps → AdGuard → Notifications — and activate the following options if needed:
- Show silently — means that notifications will not make sound, vibrate or peek into view;
- On the lock screen — means that notifications’ content will be shown on the lock screen;
- Override Do Not Disturb — this option lets notifications continue interrupting when Do Not Disturb is set to Priority Only;
Or you can disable all AdGuard notifications (what we would not recommend you to do) by choosing «Block all» option.
Besides, you can manage the notification of protection status in AdGuard General Settings (AdGuard → Settings → General → Notification icon).
Here you can choose from the options:
- Default icon (which means that you will see not only notification but also a notification icon in the top of the screen);
- Notification without icon (you will see only notification without the icon);
- None (you will see neither notification nor icon)
Please note: if the icon is removed, Android can stop AdGuard functioning any time. That’s why we do not recommend you to choose «None» option. Please use «Notification without icon» instead.