Dlinkap.local
Содержание:
- Where the user can find the wireless details within the Dlinkrouter.local?
- Steps to Configure Dlink Wireless Router | Dlink Login
- How to setup WPA and WPA2 Passphrase Using the D-Link DWA-125 Wireless USB Adapter
- FAQ SECTION / TECHNICAL SUPPORT
- DLink DAP 1720 Features
- How to Make Web Page Based Access for DAP-1610 AC1200 Wi-Fi Range Extender?
- DLink Router Login
- SharePort Mobile settings for D-Link DAP-1650 Wi-Fi Extender
- DLink DAP 1720 Setup
- How to Make Web Page Based Access for DAP-1610 AC1200 Wi-Fi Range Extender?
- DAP-2230: Technical Specifications
- Making Dlink Login Settings for your Wireless Routers
- How to Make Web Page Based Access for DAP-1610 AC1200 Wi-Fi Range Extender?
- Why Do You Need to Change the Network Settings for Dlink DCH-M225 Wi-Fi Audio Extender?
- DAP-1320 Wi-Fi Range Extender settings for web utility
- How to change the Wireless Settings for Dlink N300 Wireless DAP-1320 Extender?
- DLink DAP 1860 Setup With dlinkap.local
- DLink DAP 1860 Extender
- How to Setup Dlink DI-1750 Router Device?
- Dlinkap.local DAP 1860 Design Setup
Where the user can find the wireless details within the Dlinkrouter.local?
Sometimes, the users want to acknowledge their router details without even interacting with the interface of the D-Link routers. They just want to use their wireless details while recognizing the network name within the Available network list. Here are the steps to fetch the wireless details within these routers http //dlinkrouter.local
- Power off the device, in case it is on.
- Now turn over your device and locate a white sticker line behind it.
- There you can find the SSID name and the WPA Key which reveals the password of your wireless network.
Steps to manually set up the D-Link AC5300 Ultra Tri-band router?
Here are the steps to deal you out with the setup problems of AC5300
- First, attach the antennas of D-link by twisting them in the clockwise direction.
- Now, positions your router within the range of your modem. You can keep your router in an open area to for its better coverage.
- Now, find an Ethernet cable and connect it with the modem through the Internet Port of the router.
- Connect the power adapter of your D-Link router with the power outlet of your device. To verify, whether your device is either getting the power or not, you can also check the LED on the device.
- In case, you are using the PC to configure your router, then plug in one end of the Ethernet cable to the router and another end of the cable to the computer
- Or if you are using the mobile phones or laptop, then you can sue the Wireless network to establish the connection between your router and the device.
Steps to Configure Dlink Wireless Router | Dlink Login
- First of all, you will need to unplug the power supply for your modem.
- Take an Ethernet cable and create cable connection between computer system and LAN port of your Dlink wireless router.
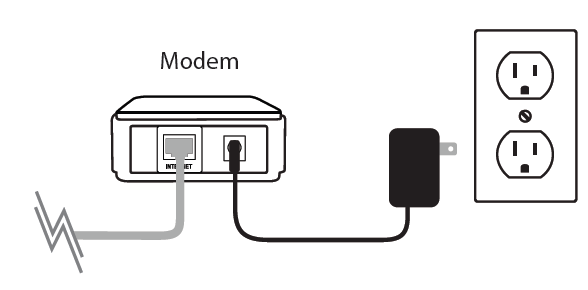
After that, using Ethernet cable create connection between your network modem and Internet port of your Dlink advance router.
Wait for at least 10 minutes after applying power supply to your network modem.
- Give power supply to your Dlink login wireless router and again wait until power LED turn in green color.
- Login to your Dlink login page using http://dlinkrouter.local web address. http dlinkrouter local com is the default address for accessing the login page for Dlink router.
- http dlinkrouter local setup wizard will loaded automatically if you are trying to login your Dlink router for the first time. You will get step by step guide for login to your Dlink router. click on “Next” button.
- You dlink router will start detecting the type of internet connection you are using for your home network. Once router finish detecting internet type, you will need to fill Dlink login name and password for your Dlink router. You will receive all the Dlink router login information for your internet service provider and you will need to fill this information in the given fields.

- There are some changes that your Dlink router don’t able to detect the type of internet connection. In that case, you will need to select option “Guide me through the Internet connection settings”. Once you select that option, you will receive a complete list of available networks for you.
- You will need to select the type internet connection from the given list. If you go for DHCP connection this is commonly used for the cable internet connection. For this type of connection, you will not need to provide any kind of extra Dlink login information.

- PPPoE type of connection is used for DSL modem connections. You will need to fill Dlink login user name and password information for your system. You will need to fill internet user name and password that will provided by internet service provider.
- After filling the information, click on “Next” button.
- You will need to choose a SSID and strong wireless password for your Dlink login access. After that, click on “Next” button.
- From the time zone, select the time zone and click on “Next” button once again.
- Click on “OK” button if you want to bookmark the router setup page for future use.
25,201 total views, 16 views today
How to setup WPA and WPA2 Passphrase Using the D-Link DWA-125 Wireless USB Adapter
if you are going to configure Dlink adapters for your home network then you will need to make sure that you are configuring the WPA and WPA2 security settings for your device. There we are going to explain the simple steps you will need to follow so that such advance configurations can be reflected to your device.
Here are the Steps you will Need to Follow | D-Link wifi extender setup
- At the desktop of your computer device you will need to select the wireless connection manager for your device.
- You will get a list of the wireless networks that are available at the moment. Select the network you want to go for and click on the next button.
There you will need to fill the WPA password that you have enabled for the D-Link DWA-125 Wireless USB Adapter device.
After filling the password click on the “OK” button.
- You can also select the TKIP and AES options for your device.
- Click on the “OK” button after filling all required details for your device.
These steps will be accessible only and only if you can have login access for your D-Link DWA-125 Wireless USB Adapter devices. we will suggest you that you must visit the blog page and have more knowledge for dlinkap login, dlinkap local wizard, dlinkap dap 1360 setup, setup dlink extender, how to setup dlink wifi extender , how to setup dlink extender, dlink extender 1520 setup and dlink extender setup
FAQ SECTION / TECHNICAL SUPPORT
- How one can change the factory password for a D-link Router?
For security reasons, it is recommended to change the factory password. Default: Login admin, password admin. The courier-adjusters must change the password to the Serial Number specified on the box (S / N) in the settings. When migrating, it is recommended that you also use it as a password for the router and Wi-Fi S / N (serial number).
In the interface of the router, go to the System tab, the Administrator password menu. In the Password field (New Password), enter the new password. In the Confirm password you need to repeat new password.
2.How to set up Wi-Fi on the D-link Router?
The router interface, you must go to the tab Wi-Fi access, the menu basic settings (Basic settings).
- SSID the name of your wireless network.
- In the Wi-Fi tab, select the security settings
- In the drop-down menu from the Network Authentication (the Network the Authentication):
- Choose WPA-PSK / WPA2-PSK mixed – it is the safest way to protect your wireless network.
- In the field the encryption key is PSK.
- You must enter any set of digits, from 8 to 63 in length. You should also remember them so that you can specify them when you connect to the network. It is recommended to use the serial number of the device.
- Click on the “Edit” button to apply and save the settings.
3.Please guide me in configuring PPTP (VPN) when automatically obtain a local IP address (DHCP)?
- Connection Type: the PPTP (the PPTP and L2TP – tunneling protocols such as Point-to-point, allowing a computer to establish a secure connection to the server by creating a special tunnel standard, unprotected network.)
- The PPP username: Your login from the contract
- Password: Your password from the contract
- Confirm password (Confirm password): password repeat
- Name service: – the IP / ISP server name.
- MTU value is 1372
- Authentication algorithm: Auto
- Save the settings with the button (Save) by pressing the Reload button to restart the router.
4.I am not able to save the changes that I made to my D-link router setting?
After making the settings, it is recommended to save them so that in case of problems, you can restore them. To do this, go to the System tab, the configuration menu.
- Select to save the current configuration, to save the current settings of the router. the settings file will be saved to the specified location on the hard disk.
- 2. To restore the settings from the file, you must click and select Load previously saved configuration in devices, specify the path to the settings file, then click the button.
DLink DAP 1720 Features
The DLink DAP 1720 Extender has ultra-fast speeds up to 1, 300 Mbps on the 5 gigahertz + 450Mbps on the 2.4 gigahertz. The dual bands of the router, both work at the same time. This helps to provide a great range and high speeds. Both bands are used for all types of streaming, downloading or gaming needs.
Another great feature of the device is that a Smart Signal Indicator is present at the front of it. This helps the extender to realise the signal strength and it will know where the highest signals are.
The external antennas help to eliminate all the areas where the signals are less. These types of areas are usually known as dead spots. You can boost the signal strength and eliminate all the dead spots at your place.
How to Make Web Page Based Access for DAP-1610 AC1200 Wi-Fi Range Extender?
If you want to make login for this device then you can follow steps that we are explaining in this article.
- Place your new DAP-1610 AC1200 Wi-Fi Range Extender device and computer device to same table.
- After that connect your dlink wifi extender device and a computer device using Ethernet cable.
- After that provide power connections to this wifi extender and computer device at same time.
- After that fill dlinkap login address to web browser but before that you will need to search for network name from your computer. Default SSID name for DAP-1610 AC1200 Wi-Fi Range Extender device is same as other dlink devices.
When you get the login page, you can fill “admin” as user name and password. You can change the default login details from web based setup page.
These are the steps to access web based settings for dlink wifi extender device that you are using. If you want to know more about dlinkap login then you can read next article from website.
DLink Router Login
- Open our web browser and type Dlinkrouter.local in the address bar. Alternatively, you can also type the default IP address as 192.168.0.1.
- Now you are shifted to Dlink router Login page where you can set your Id and password or can login using default Id and password as”admin”.
Resolving ‘internet connection not established’ issue while setting up wizard on Dlinkrouter.local
When router is not able to establish a successful internet connection, you will be able to see a list of connection type performing Dlink Router Login. So you have to choose amongst those. Your ISP (Internet Service Provider) will guide you for the type of connection.
For PPPoE, type username and password as provided to you by ISP. Click Next.
For static, enter DNS Setting and IP and click next. Now type the Wifi username and password. Click Next.
Dlink DIR 2680
Dlink DIR 2680 is an AC2600 gigabit Wi-Fi router which encompasses 4 Gigabit LAN ports and 1 gigabit WAN port. It is based upon cutting edge chip technology and McAfee secure home platform system i.e. it protects all the connected devices from scams and viruses. It also secures the IoT devices connected to it. It has inbuilt downloaded antivirus software that protects the connected devices. Its cloud based machine learning technology helps in detecting the threats and viruses and controlling them. So it the most reliable router that solve not only the purpose of Wi-Fi network but also the security purposes. So you now don’t have to buy an additional firewall and thus saving money and time.
This router enables you to streams 4K HD videos, downloading, surfing, and all other Wi-Fi enabled things with full security of your connection and devices. You can manage these security features by doing a simple step “Dlink router login”. So you don’t have to sacrifice for your privacy while working online. It possess high speed MU-MIMO and bustling 1.6 GHz Intel GRX350 processor for a great performance over the network.
It also has a voice control features i.e. you can directly give your commands and it will respond back accordingly. So you can easily manage your network at your home only via your voice. It has 4 internal antennas connected to it in perpendicular directions for delivering the maximum network speed. It achieves this by taking advantage of enhanced Wi-Fi reception when both client and router antennas are on matching planes.
It is based on smart beam-forming technology i.e. it can change the direction of the bandwidth as you change your position around the home. So you will always experience the best network speed wherever you are around your home surfing internet, playing games, streaming videos, etc. It also has an option for online content filtering. In this you are able to set the filters for individual child and separately for all the kids present in the home. It can be based upon the age and content. This option can be managed and monitored at Dlinkrouter.local by performing a simple step of Dlink Router Login.
Here are some of the main features as provided by Dlink Dir 2680. You can manage the features at Dlinkrouter.local. You just have to perform Dlink router Login step for getting access. Features are:
- Cloud-based McAfee global threat intelligence database
- Vulnerability scan
- Powerful parental controls
- IoT threat detection
- Home Away mode
- Install McAfee antivirus on computers and mobile devices
- Device fingerprinting
- PC Boost
- Password Manager
- McAfee Web advisor
- One Step Dlink router Login
- Anti-Phishing
- Unlimited installations
- File lock
When you install any Dlink router device for your home network you will find USB port at the back side of your device. If you have a storage device and you want to share files from that storage device to each computer device that is connected home network then you can use SharePort configurations for your devices. In this article we are going to explain the steps for managing the SharePort mobile settings for your D-Link DAP-1650 Wi-Fi Extender device.
You can use all these steps only and only if you can have login access for your extender device. you can use http:// dlinkap.local web address for accessing the login page for your device. you have to make sure that latest firmware file is updated for your device because if firmware file is not updated for your D-Link DAP-1650 Wi-Fi Extender device, you will definitely face issues with such kind of configurations. You can also reset to your extender device to all default settings and then you can have high speed wifi access for your devices.
- First you will need to connect your USB device to the USB port you will find at the back side of your D-Link DAP-1650 Wi-Fi Extender device.
- Make login access for your D-Link DAP-1650 Wi-Fi Extender device using http:// dlinkap.local web address.
Fill the Dlink extender login user name and password and hit on the enter key.
- After login to D-Link DAP-1650 Wi-Fi Extender device you will need to select the “Setup” button and then select “Storage” tab.
- Using the check box you can make sure that SharePort feature is enabled for your D-Link DAP-1650 Wi-Fi Extender device.
You can now download the SharePort mobile application for your device and go for the settings option.
There you can change the port settings if required and save the configurations for your device.
Make sure that all these steps are followed in a sequence and then you can go and manage the configurations for dlinkap wifi booster login, dlink ap extender login, D-Link wifi extender setup, cannot access dlinkap , dlinkap setup wizard, dlinkap 1522 , dlinkap wireless and dlinkap local wizard
DLink DAP 1720 Setup
The process of the DLink DAP 1720 Setup dlinkap.local can be completed using 3 ways. You can set up the device using both the app and the web user interface. Before setting up your device, make sure that there are no or fewer interferences. Make sure to keep the walls or ceilings between the device and the extender to a minimum. Be aware of the direct lines between the network devices. The antenna setup is also important. Keep the extender in a little open area to get the maximum speeds. Finally, ensure that the power switch is ON at the bottom of the device, before the setup process.
To easily extend an existing wireless network, you can simply press the WPS button. You can set up by using the QRS Mobile app and the DLink setup wizard.
How to Make Web Page Based Access for DAP-1610 AC1200 Wi-Fi Range Extender?
If you want to make login for this device then you can follow steps that we are explaining in this article.
- Place your new DAP-1610 AC1200 Wi-Fi Range Extender device and computer device to same table.
- After that connect your dlink wifi extender device and a computer device using Ethernet cable.
- After that provide power connections to this wifi extender and computer device at same time.
- After that fill dlinkap login address to web browser but before that you will need to search for network name from your computer. Default SSID name for DAP-1610 AC1200 Wi-Fi Range Extender device is same as other dlink devices.
When you get the login page, you can fill “admin” as user name and password. You can change the default login details from web based setup page.
These are the steps to access web based settings for dlink wifi extender device that you are using. If you want to know more about dlinkap login then you can read next article from website.
DAP-2230: Technical Specifications
The D-Link’s DAP-2230 below detailed makes it a suitable device for WiFi connectivity. This device is easy to maintain and use. And also provides the reliable and secured connectivity.
General Specification
- Inbuilt 802.11 n/g/b wireless1
- It has 10/100BaseT Fast Ethernet LAN PoE port
- It has Power and status LED indicators.
- It is based on IEEE 802.11n/g/b1 and IEEE 802.3u/af standards.
- It provides Wireless Frequency Range from 2.4 to 2.4835 GHz.
- For better network coverage this is equipped with two internal 3 dBi Antennas.
- This has a maximum output power of 20 dBm.
- For Security measures, it has several security options like:

WPA-Personal
WPA-Enterprise
WPA2-Personal
WPA2-Enterprise
WEP 64/128-bit encryption
SSID broadcast disable
MAC address access control
Network Access Protection (NAP)
It also has several Network Management features like:
Telnet
Secure Telnet (SSH)
HTTP
Secure HTTP (HTTPS)
Traffic control
SNMP
D-Link Central WiFiManager
AP Array
- Its 129 x 129 x 29 mm (5.08 x 5.08 x 1.14 inches) dimension and 101.4 grams (3.56 ounces) 213.6 grams (7.5 ounces) weight gives it a nice look.
- To create and manage multi-site and multi-tenancy wireless networks, D-Link has a free cloud enabled wireless Access Point management tool.
- To logically divide the access point into several virtual access points, it supports up to 8 SSIDs.
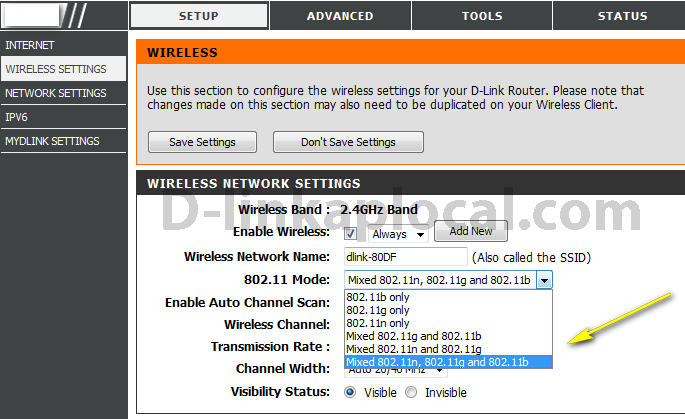
Making Dlink Login Settings for your Wireless Routers
After login to your Dlink wireless router, you will need to make settings for your Dlink router. here is the list of advance settings you will need to configure after accessing the login window for your Dlink router.
Router IP Address: This will be the IP address you will use to access the web interface for your Dlink login router. Make sure to fill correct login password for your router.
Subnet Mask: Enter the subnet mask for your home network. It will look like 255.255.255.0
Device Name: Fill the name for the Dlink router device. You can change the device name later.
Local Domain Name: This is the optional name so you can fill the local domain name if you want to enter.
How to Make Web Page Based Access for DAP-1610 AC1200 Wi-Fi Range Extender?
If you want to make login for this device then you can follow steps that we are explaining in this article.
- Place your new DAP-1610 AC1200 Wi-Fi Range Extender device and computer device to same table.
- After that connect your dlink wifi extender device and a computer device using Ethernet cable.
- After that provide power connections to this wifi extender and computer device at same time.
- After that fill dlinkap login address to web browser but before that you will need to search for network name from your computer. Default SSID name for DAP-1610 AC1200 Wi-Fi Range Extender device is same as other dlink devices.
When you get the login page, you can fill “admin” as user name and password. You can change the default login details from web based setup page.
These are the steps to access web based settings for dlink wifi extender device that you are using. If you want to know more about dlinkap login then you can read next article from website.
Why Do You Need to Change the Network Settings for Dlink DCH-M225 Wi-Fi Audio Extender?
Any dink extender login user will need to change the settings for dlink wifi extender devices when they start getting problems with these devices. From dlink login page you can also change the other kind of advance settings for these devices.
Steps to Change the Network Settings for Dlink DCH-M225 Wi-Fi Audio Extender

- Connect your Dlink DCH-M225 Wi-Fi Audio Extender with the computer device. Connect these devices only after disconnecting the power supply of these devices.
- Access dlink extender login page for Dlink DCH-M225 Wi-Fi Audio Extender. For this you will need a web browser installed at your computer device. This web browser will need active Java script so that you can access dlink login page easily.
- Fill dlink extender admin login user name and then fill the password.
- Click on “Settings” button.
- After that select “Network” button.
- You can then change the required settings for these devices and you are ready to click on “Save” button.
You can then close the setup page for http:// dlinkap.local device. If you want to make other settings for Dlink DCH-M225 Wi-Fi Audio Extender device then you can do this from the same page.
If you start having problems with your device then you will need to troubleshoot these devices also. If you want to make sure that your device will work according to your requirements then make sure to update firmware of your device time to time. You can update your device from dlink login page. You must power cycle your device time to time so that Dlink DCH-M225 Wi-Fi Audio Extender can remove common problems of your network.
DAP-1320 Wi-Fi Range Extender settings for web utility
if you want to make sure that you can have trouble free wifi access for your computer devices then you must have wifi extender device installed at your location. There is a range of extender devices available for the users and DAP-1320 Wi-Fi Range Extender device is one them. There are countless advance features that you can enjoy with this advance wifi extender device but for that you will need to make sure that you are configuring your DAP-1320 Wi-Fi Range Extender device accurately.
You can either go for the WPS settings for your device or you can also choose the manual or web based configurations for your DAP-1320 Wi-Fi Range Extender device. Using the WPS configurations you can press the WPS button located at the extender device and then you can press the WPS button for the router that is installed at your home network. If your devices do not support WPS configurations then you can go for the web browser based setup for your device.
Browser Based Setup for DAP-1320 Wi-Fi Range Extender Device
- Place your DAP-1320 Wi-Fi Range Extender device at a table and provide power supply to your device.
- At your computer device you will need to search for the wifi access available for DAP-1320 Wi-Fi Range Extender device. this network is known as SSID name for the extender device.
Click on the “Connect” button and fill the wifi network access password for your device.
Now you can access the web browser based setup for your device using the web browser. In the address bar you can fill http:// dlinkap.local web address.
Once again fill the Dlinkap login user name and password for your device and hit on the enter key.
Choose the “Manual” configurations for your DAP-1320 Wi-Fi Range Extender device and click on the “Next” button.
From the list of the wifi networks you will need to select the wifi network and click on the “Next” button.
You can configure all the settings for your DAP-1320 Wi-Fi Range Extender device and make sure that your extender device has all security settings. From the blog page of the website you will get complete details for the dlinkap local wizard, dlinkap dap 1360 setup, setup dlink extender, how to setup dlink wifi extender , how to setup dlink extender, dlink extender 1520 setup, dlink extender setup and dap 1320
95,871 total views, 0 views today
How to change the Wireless Settings for Dlink N300 Wireless DAP-1320 Extender?
If you also need to change the common wireless settings for dlink extender devices then here is the process.
- Connect your Dlink N300 Wireless DAP-1320 Extender device to your computer device. Connect your devices using LAN cable.
- After that you can access dlink extender login page from your computer device. Fill http:// dlinkap.local address to the address bar and get the login page.
- After that fill dlink extender admin login user name and password.
- After that get the setup page and click on “Settings” button.
- After that you can first change the “Wireless Mode” settings for these devices. Your Dlink N300 Wireless DAP-1320 Extender can work in many possible wireless modes. You can choose the wireless modes according to the wifi needs.
- Change the network name or SSID name. You can have different network name for both your wifi extender devices and router device that you have.
- Change the password settings for dlink login devices. From there you can easily change the dlink extender login password and wifi access password for your devices. For more security you must change the password time to time.
These are steps to change the security settings or wifi settings for Dlink N300 Wireless DAP-1320 Extender devices. There are some other wifi setting also that you can read from other articles.
DLink DAP 1860 Setup With dlinkap.local
The DLink DAP 1860 Setup is simple and easy. You can setup Dlink dlinkap.local the device using both the app and the web user interface (dlinkap.local). Before setting up your Dlink dlinkap.local device, make sure that there are no or fewer interferences. Therefore, keep the walls or ceilings between the device and the extender to a minimum. Be aware of the direct lines between the network devices. The antenna setup setup Dlink dlinkap.local is also important. Therefore, keep the extender in a little open area to get the maximum speeds. Finally, ensure that the power switch is ON at the bottom of the device, before the setup process.
DLink DAP 1860 Extender
The DLink DAP 1860 Extender comes with the wireless AC 2600 Dual-band range technology. This device is one of the best and advanced extenders by DLink. The high-performance features and the technology of the device help to provide great speed and range to your current router network. The DLink DAP 1860 configuration will help you increase the network coverage of your router without losing any signals. Routers can have smaller ranges and you can lose signals when you move to a farther place. Such spots where the network is zero or very less are called dead zones. It will act as a repeater of your current router network but will provide higher speeds and range as compared to your current router. Read on for a complete DLink DAP 1860 Review.
DLink Setup with dlinkap.local
The DLink DAP 1860 Extender will help you to finish all the network dead zones. Even if you go from one room to another or if you even shift floors, your connection will be stable and fast. It will be like you are just sitting next to the router. Similarly, you can stream or download huge files or videos with ease now. This high-speed extender will stop all the lagging or buffering forever.
How to Setup Dlink DI-1750 Router Device?
- Place your dlink wifi router device to a table where you can get power supply for your device easily.
- After that provide power supply to Dlink DI-1750 Router device. you will find the power connecting port at the back side of your device.
- When you provide supply to your device, you can check the front power LED for your device and this LED will be solid green in color.
- Using RJ45 connector you can connect your dlink wifi router login device and computer together. The RJ 45 connector you are using will have different wires for different functions.
- Open web browser and access http:// dlinkap.local web address. When you access this web address, you will automatically get status page for your dlink device. from this status page, you can easily get the configurations for your devices.
Once the configurations are done, you can change the location for your device. There are some common troubleshooting that you can use for your device any time you get wifi related issues. From other articles of this website, you will get details for resolving the wifi issues for Dlink DI-1750 Router devices.
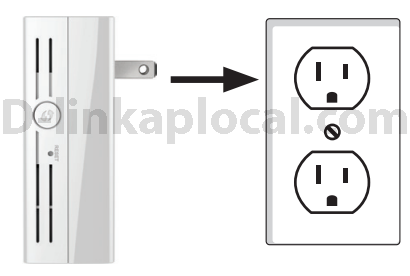
Dlinkap.local DAP 1860 Design Setup
The DLink DAP 1860 extender is a very compact and attractive adapter like extender with a 3 pin plug at the backside. Therefore, you can directly plug in the power source and you will be ready to start. Here is a hardware overview of the DLink DAP 1860 extender.
At the front side :
- WPS LED: This LED tells us about the status of the extender. It will blink if the connection is in process and it will turn solid when it is connected successfully.
- WPS BUTTON: Beneath the WPS LED is the button. Simple press and hold the button to connect to any smart device with the same technology.
- SIGNAL LEDs: These LEDs tell us about the signal strength. Furthermore, they indicate Power, Internet connection and LAN. The LEDs will show Green, Amber and Red colors for various stages of the router.
At the side :
- LAN Port: With the help of an ethernet cable, you can connect to any device for a wired connection.
At the Bottom :