Каталог устройств mikrotik
Содержание:
How to enable Serial Port
There is (unsoldered) serial port on the board, which can be used with 3.3V TTL converter. Port settings are 115200/8N1. However, by default serial port is not enabled (there is no data on it). It is possible to enable it and get full access to the mikrotik bootloader menu, including memory test, CPU frequency selection and boot sequence. To enable serial port you will have to:
- Use RouterBoot 3.27 or earlier versions. 3.29, 3.33 and 3.36 are broken, but it is possible to reflash the boot loader using openwrt.
- Download and backup “hard_config” partition. Find byte sequence and replace it to to enable serial port
- You should rebuild kernel without .mask_flags = MTD_WRITEABLE in the mach-rb941.c for the “hard_config” partition. Flash patched hard_config partition using mtd tool to the device.
That`s it, after reboot you should see loader prompt:
RouterBOOT booter 3.22

RouterBOARD 941-2nD

CPU frequency: 650 MHz
Memory speed: 200 MHz
 Memory size:  32 MiB
Storage size:  16 MiB

Press any key within 2 seconds to enter setup.

RouterBOOT-3.22
What do you want to configure?
d - boot delay
k - boot key
s - serial console
n - silent boot
o - boot device
f - cpu frequency
r - reset booter configuration
e - format storage
w - repartition nand
g - upgrade firmware
i - board info
p - boot protocol
b - booter options
t - do memory testing
x - exit setup
your choice:

loading kernel from nand... OK
setting up elf image... OK
jumping to kernel code
How reflash boot loader
It is possible to change device boot loader from the OpenWrt, e.g. to downgrade it for enabling serial access. There are 2 bootloaders in the board: routerboot2 (main loader) and routerboot (backup loader, on the beginning on the flash). I am recommending to experiment with the main (routerboot2) loader which is located on the mtd3 partition, because if it is damaged board can still be booted using routerboot. If routerboot is damaged you will have to reflash the memory chip using programmer. You can choose which loader to use using rbcfg tool or from the routeros menu. To force boot from the backup loader turn device on with button pressed and wait ~30 seconds.
To change the loader you will have to:
- Download boot loader image from the vendor web site, use url like http://i.mt.lv/routerboard/files/qca9531L_3.27.fwf. First 32 bytes of the file is a header, which should be removed before flashing, e.g. using dd command: .
- Flash protection needs to be removed in the mach-rb941.c for the routerboot2 (or routerboot) partitions. Do backup of the partition first and flash your stripped boot loader using mtd tool.
- Restart device, that’s it 🙂
This post shows how to update to the latest 6.43.7 bootloader on rb-941-2nd-tc with the routeros interface
Hardware
| Model | CPU | CPU Speed | RAM (MByte) | Serial Flash(NOR) (MByte) | Ethernet | PoE | Wireless | USB | UART | JTAG |
|---|---|---|---|---|---|---|---|---|---|---|
| RB941-2nD | QCA9531 | 650 MHz | 32MB DDR1 200MHz (Winbond W9425G6JH-5) | 16 (W25Q128) | AR8227 BuildIn Switch (10M/100M) | NONE | QCA9531 | NONE | 1x onboard(ttl) | 1x onboard |
| RB941-2nD-TC | QCA9533 | 650 MHz | 32MB DDR1 200MHz (Winbond W9425G6KH-5) | 16 (W25Q128) | AR8227 BuildIn Switch (10M/100M) | NONE | QCA9531 | NONE | 1x onboard(ttl) | 1x onboard |
| RB951Ui-2nD | QCA9531 | 650 MHz | 64MB DDR2 300MHz(NANYL NT5TU32M16EG-AC) | 16 (W25Q128) | AR934X BuildIn Switch (10M/100M) | From port 5 | QCA9531 | USB 2.0 | 1x onboard(ttl) | 1x onboard |
RB941-2nD (hAP lite)


RB941-2nD-TC (hAP lite)


RB951Ui-2nD (Full hAP)

Installation
| Model | Version | Current Release | Firmware OpenWrt Install | Firmware OpenWrt Upgrade | Firmware OEM Stock |
|---|---|---|---|---|---|
| RB941-2nD (hAP lite) | 19.07.3 | ||||
| RB941-2nD-TC (hAP lite) | 19.07.3 | ||||
| RB951Ui-2nD (hAP) | 19.07.3 |
Caveats highlighted in Common Procedures for Mikrotik RouterBoard Products apply.
Create image
$ mkdir /home/$USER/mikrotik/
$ cd /home/$USER/mikrotik/
$ git clone git://git.openwrt.org/openwrt.git
$ cd /home/$USER/mikrotik/trunk
If you want to use LuCI(Web interface):
$ ./scripts/feeds update packages luci
$ ./scripts/feeds install luci
If you get errors on dependencies later, run:
$ ./scripts/feeds update -a
$ ./scripts/feeds install -a
Configure image for booting from RAM and NOR flash
$ make menuconfig
$ make kernel_menuconfig CONFIG_TARGET=subtarget
$ make
Run OpenWrt in RAM
Create script: nano /tftp/loader.sh
#!/bin/bash
USER=user #CHANGE THIS
sudo /sbin/ip addr replace 192.168.1.10/24 dev eno1
sudo /sbin/ip link set dev eno1 up
sudo dnsmasq -i eno1 --dhcp-range=192.168.1.100,192.168.1.200 \
--dhcp-boot=openwrt-ar71xx-mikrotik-rb-941-2nd-initramfs-kernel.bin \
--enable-tftp --tftp-root=/home/$USER/mikrotik/trunk/bin/ar71xx/ -d -u $USER -p0 -K --log-dhcp --bootp-dynamic
-
Run script loader.sh from root/sudo
- Plug your Ethernet cable to port 1 (WAN/Internet)
- Unplug power jack
- Hold reset button
- Plug power jack
- The LED will turn on for several seconds, then blink for some time, then stay on for several seconds, then turn off
- Only after this LED pattern you can release the reset button
Your rb941-2nd should boot into OpenWrt with IP 192.168.1.1
Unplug Ethernet cable from port 1(WAN/Internet) and plug into port 2 (LAN) to access LUCI through browser
If the above method to force TFTPing the initramfs image doesn’t work, then:
- Open webfig (web config), and change sections mentioned.
- System → Routerboard → Settings → Boot device: Try ethernet once then NAND
-
System → Routerboard → Settings → Boot protocol: DHCP
- System → Routerboard → Settings → Force Backup Booter: Checked (if supported by your routerboard — !IMPORTANT) — it seemes that last setting is the key))
- Reboot router from the webfig (IMPORTANT!), plug-in the cable from pc to wan port, and boot openwrt via tftp (it’s better to do it all as quick as possible).
Flash OpenWrt to Mikrotik
After openwrt build you should have this files in bin/ar71xx/:
- openwrt-ar71xx-mikrotik-rb-941-2nd-initramfs-kernel.bin — ELF image with kernel and rootfs(initramfs) for boot from network
To flash openwrt-ar71xx-mikrotik-rb-941-2nd-squashfs-sysupgrade.bin:
Using ssh:
  login into router via 'ssh -l root 192.168.1.1' and then copy it(using wget or nc or...) to /tmp/
  Do: $ sysupgrade /tmp/openwrt-ar71xx-mikrotik-rb-941-2nd-squashfs-sysupgrade.bin
  After reboot you should be able to login via 'ssh -l root 192.168.1.1'
Using LuCI:
  Go to http://192.168.1.1 and login as root and no password
  Select System -> Backup / Flash Firmware and then do Flash new firmware image using openwrt-ar71xx-mikrotik-rb-941-2nd-squashfs-sysupgrade.bin file
Note that with the RB941-2nD-TC and if you netbooted openwrt-18.06.2-ar71xx-mikrotik-rb-nor-flash-16M-initramfs-kernel.bin you might encounter this error message:
$ sysupgrade -n openwrt-18.06.2-ar71xx-mikrotik-rb-nor-flash-16M-squashfs-sysupgrade.bin
Device unknown not supported by this image
Supported devices: rb-750-r2 rb-750up-r2 rb-750p-pbr2 rb-911-2hn rb-911-5hn rb-941-2nd rb-951ui-2nd rb-952ui-5ac2nd rb-962uigs-5hact2hnt rb-lhg-5nd rb-map-2nd rb-mapl-2nd rb-wap-2nd
Image check 'fwtool_check_image' failed.
In this case netboot a current snapshot, i.e. openwrt-ar71xx-mikrotik-rb-nor-flash-16M-initramfs-kernel.bin. Then you can sysupgrade any OpenWrt release.
Note also that newer RB941-2nD and RB941-2nD-TC expose slightly changed information in /proc/cpuinfo which is why e.g. the switch is not currently configured in the 18.06.2 release of OpenWrt. This was fixed in Git commit 6578f3c9 on February 8th, 2019, so you need to use a current snapshot of OpenWrt until 19.XX.X comes out or the fix is eventually backported into the 18.06.X series.
Настройка роутера MikroTik hAP lite (RB941-2nD-TC)
1 .Для настройки вайфай роутера
Mikrotik hAP Lite потребуется программа
winbox, скачать можно по адресу
https://mikrotik.com/download

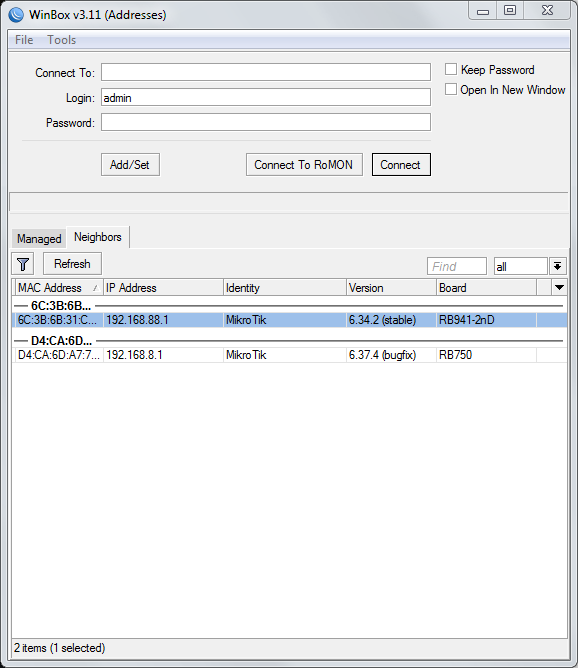
2. далее в первый порт роутера
вставляем кабель интернет провайдера, в любой другой кабель от
компьютера и запускаем winbox, в списке выбираем
обнаруженный роутер и нажимаем connect
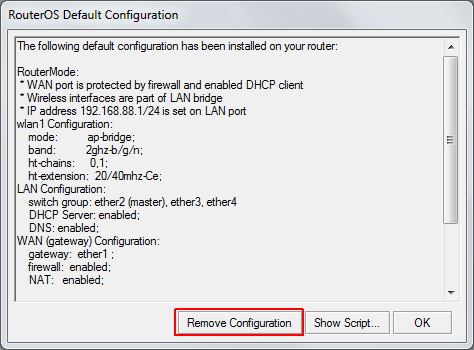
3. после подключения высветится
следующий диалог, нажать remove configuration. Это
окно может не отобразится, если роутер уже был сконфигурирован ранее
4. далее необходимо обновить прошивку,
скачать можно по адресу https://mikrotik.com/download,
для hAp Lite прошивка будет в разделе SMIPS

5. перетаскиваем скачанный файл на окно
winbox, ждем окончания передачи, и
перезагружаем роутер. Для перезагрузки в меню System
выбрать Reboot. После повторить
подключение (шаг 2)

6. далее крайне необходимо задать
пароль на подключение к роутеру, в меню System
нажать Password

7. Ввести
пароль дважды, и нажать Change

8. Далее
сконфигурируем DHCP client, в меню IP
выбрать DHCP client

9. в
открывшемся окне нажать на синий плюс, выставить опции как на
картинке и нажать OK

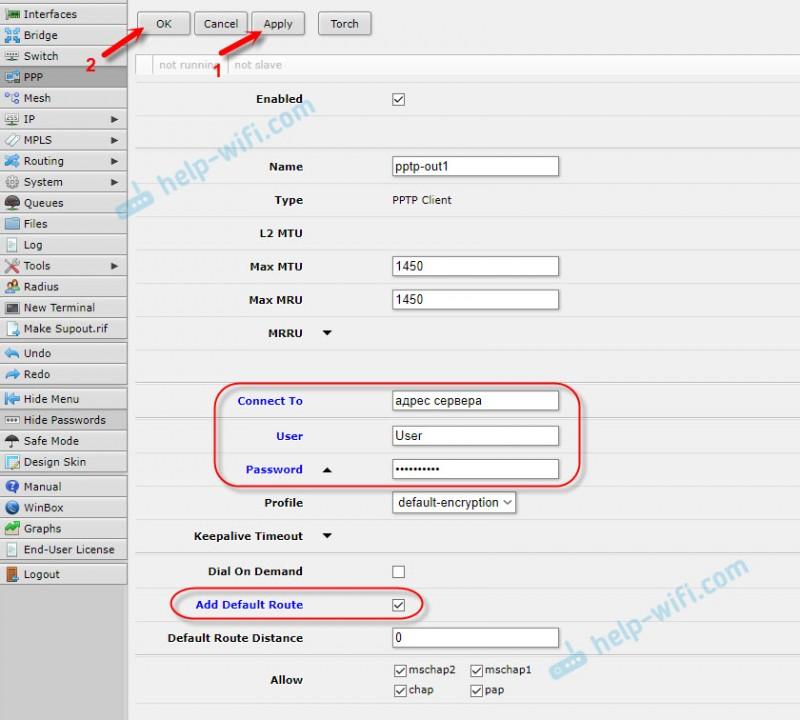
10. Далее
потребуется настроить L2TP client, для
этого нажать на меню PPP, на закладке
Interface нажать на синий плюс и в списке
выбрать L2TP client

11. Потребуется
вбить ваш логин и пароль с карточки абонента в соответствующие поля и
выставить опции как на картинке

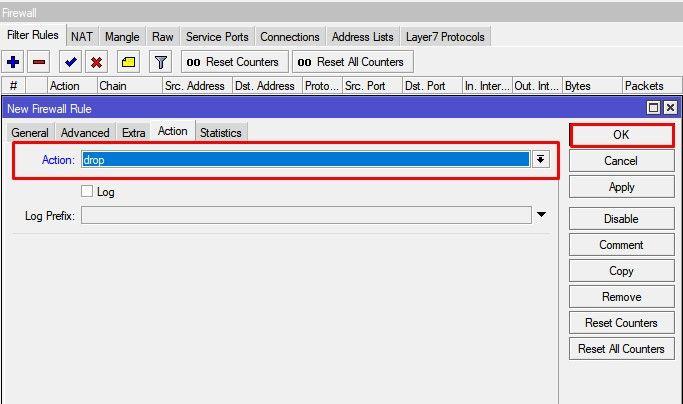
12.
Далее необходимо включить NAT, для этого
выбираем в меню IP пункт Firewall

13. В
окне Firewall выбираем закладку NAT
и жмем синий плюс, на закладке General
выставляем как на картинке и переходим на закладку
Action

14. на
закладке Action выбираем masquerade
и жмем OK

15. Далее
нажмем на меню Bridge, в появившемся окне
на синий плюс и потом на OK

16. перейдем
на закладку Ports, и опять на синий плюс.
Выставить как на картинке и нажать OK.
Далее повторить тоже самое, выбирая в списке Interface:
ether3, ether4, wlan1

17. далее
выберем в меню IP пункт Addresses

18. в
появившемся окне нажмем на синий плюс, выставим все как на картинке и
нажмем ок

19. Далее в меню IP
выберем DHCP server

20. в
появившемся окне нажмем на кнопку DHCP setup, выберем
в списке bridge1 и нажимаем Next на
всех остальных этапах

21. далее в меню IP
выберем пункт DNS

22. выставить
галочку в обведенной опции и нажать OK

23. Далее
меню Wireless, на закладке Security
Profiles нажмем синий плюс. Выбрать опции как на
картинке и придумать пароль для вайфая

24. Переходим на закладку Interfaces,
и двойной клик по wlan1. Выставить
опции как на картинке, опцию SSID рекомендуется
придумать свою, это название сети

25. После завершении настройки,
перезагружаем роутер. Для перезагрузки в меню System
выбрать Reboot.