Http://www.tplinkrepeater.net/
Содержание:
- Cross Check your Cable and WiFi Connections
- Try to Reset your TP-Link WiFi Extender to default Configurations
- Try using Ping Command for your Home Network | www.tplinkrepeater.net
- Try to Clear Cache Memory for your Web Browser | http //tplinkrepeater.net login
- Switch to Use Different Web Browser | http //tplinkrepeater.net admin
- Disable Security for your System
- Make Sure that your Computer is Getting Correct IP Address
- Steps for Updating Firmware for TP-Link WiFi Repeater
- ДЛЯ ОБНОВЛЕНИЯ
- Steps for Updating Firmware for TP-Link WiFi Repeater
- How to Check Network Status for TP-Link WiFi Repeater?
- How to connect different wireless devices for tplink WiFi extender internet access?
- Here are the Steps for Channing the Default Login IP Address for your TP-Link WiFi Extender
- Как настроить tplinkrepeater.net и tplinkextender.net?
- How to connect Mac device with TP-Link WiFi repeater access?
- Анализ поисковых запросов сайта
- Archer C1900 Features
- Removing Existing Profile from your Windows XP
- Here are the Steps to Configure your TP-Link WiFi Device for Modem Devices | http:// tplinkextender.net Login
- How to login access for TP-Link WiFi extender smart setup wizard?
- TP-Link Archer C5400 v2 Review
- Steps for Updating Firmware for TP-Link WiFi Repeater
- Here are the Commonly Asked Questions for TP-Link RE650 Wi-Fi Range Extender
- Archer C1900 Features
- How to Make the Access Controls for TP-Link RE650 Wi-Fi Range Extender?
- TP-Link Archer C5400 v2 Review
- To extend another host network here follow the steps
- TP-Link WiFi extender status LED meaning
- Steps for Updating Firmware for TP-Link WiFi Repeater
- Steps for Accessing TP-Link Repeater Web Based Utility
- Here are the Commonly Asked Questions for TP-Link RE650 Wi-Fi Range Extender
- The adapter (tplinkrepeater net admin) is equipped with the following technologies:
- Make Changes for the TP-Link WiFi Repeater Configurations
- Here are the Commonly Asked Questions for TP-Link RE650 Wi-Fi Range Extender
Cross Check your Cable and WiFi Connections
If you are getting issues with TP-Link WiFi extender login page, you must make sure that your WiFi network is working properly. If you are using wired connections then you must make sure that your internet cable is connected accurately. If you are using WiFi connection then you must make sure that WiFi connections working accurately for your home network.
Try to Reset your TP-Link WiFi Extender to default Configurations
If you are getting issues with tp link extender setup page, you can also try to reset your TP-Link WiFi extender to default setting. You will need to press reset button located at the backside of your Linksys WiFi repeater. Once you press your WiFi extender reset button for few seconds your WiFi extender will get reset to default settings.
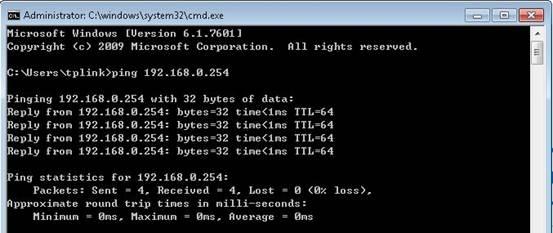
Try using Ping Command for your Home Network | www.tplinkrepeater.net
If you are getting issues with tp link extender configurar you can try using Ping command. Ping command is used to check whether two different networks are connected together or not.
Go for the command prompt and in the command window you will need to fill “Ping” with the IP address for the system.
Try to Clear Cache Memory for your Web Browser | http //tplinkrepeater.net login
If you are getting issues with tp link extender setup window you will need to clear the cache memory for your web browser. Clearing the cache memory for your web browser will help you accessing tp link extender configurar web utility accurately.
Switch to Use Different Web Browser | http //tplinkrepeater.net admin
If you are getting problems with http //tplinkrepeater.net login access, you can try using another web browser for your TP-Link WiFi access.
Disable Security for your System
If you can’t make login access for http //tplinkrepeater.net admin page, you must disable the firewall settings you are using. Sometimes these security measures can also restrict you using TP-Link WiFi extender page.
Make Sure that your Computer is Getting Correct IP Address
You have to make sure that your computer system is using accurate IP address. if you need to check the IP address for your computer system you will need to access the command prompt. From the command prompt you will need to access “ipconfig” command. Once you fill “ipconfig” to command prompt you will find IP address at the result.
Steps for Updating Firmware for TP-Link WiFi Repeater
- First you will need to access login page for TP-Link WiFi extender. You can access the login for TP-Link WiFi extender using http //tplinkrepeater.net login address.
- After accessing the login page for your TP-Link WiFi extender you will need to go for the “System Tools” under “Settings”.
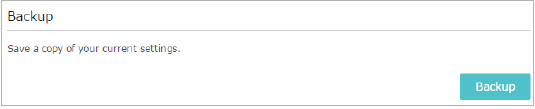
- Then, go for “Backup and Restore”.
- Once you click on “Backup” option current settings for your TP-Link WiFi extender will get saved in a form of file at your computer system. You should take the packup for your TP-Link WiFi extender so that you can make sure that you can reflect the same configurations to your device if firmware update gets failed.

- After taking the backup for your TP-Link WiFi extender, you will need to go for “Settings” option once again.
- From there you should choose “System Tools” and then go for “Firmware Update”.
- Once you click on the “Browse” button you will need to choose the firmware file you have downloaded at your system. You can download the firmware file for your device from the official website of TP-Link.

After choosing the file, click on “Upgrade” option.
Your device will start updating the firmware file so you have to make sure that you are not disturbing the firmware update process at all.
ДЛЯ ОБНОВЛЕНИЯ
ВАЖНО: Чтобы избежать проблем при обновлении ПО, пожалуйста, прочитайте следующую информацию по процедуре обновления. Проверьте соответствие аппаратной версии и версии ПО
Установка неправильной версии ПО может повредить ваше устройство и аннулировать гарантию. (Обычно V1.x =V1)
Проверьте соответствие аппаратной версии и версии ПО. Установка неправильной версии ПО может повредить ваше устройство и аннулировать гарантию. (Обычно V1.x =V1)
НЕ рекомендуется устанавливать версию ПО, не предназначенную для вашего региона. Нажмите здесь для выбора региона и загрузите наиболее актуальную версию ПО.
- НЕ отключайте питание во время процесса обновления, поскольку это может нанести урон маршрутизатору
- НЕ обновляйте ПО маршрутизатора по Wi-Fi, за исключением тех случаев, когда это является единственно возможным способом.
- Рекомендуется, чтобы все пользователи прекратили использовать все интернет-приложения на компьютере или отключили сетевой кабель от клиентских устройств перед обновлением.
Примечание: Конфигурационные файлы могут быть некорректно установлены на новые версии встроенного ПО, требующие сброса на заводские настройки.
Рекомендации по обновлению ПО: Wi-Fi роутер, Wi-Fi роутер с модемом ADSL2+, Усилитель Wi-Fi сигнала
| TL-WA850RE(RU)_V7_200731 | ||
|---|---|---|
| Дата публикации: 2020-08-17 | Язык: Многоязычный | Размер файла: 1.74 MB |
|
| TL-WA850RE(RU)_V7_200514 | ||
|---|---|---|
| Дата публикации: 2020-05-25 | Язык: Многоязычный | Размер файла: 1.60 MB |
|
Steps for Updating Firmware for TP-Link WiFi Repeater
- First you will need to access login page for TP-Link WiFi extender. You can access the login for TP-Link WiFi extender using http //tplinkrepeater.net login address.
- After accessing the login page for your TP-Link WiFi extender you will need to go for the “System Tools” under “Settings”.
- Then, go for “Backup and Restore”.
- Once you click on “Backup” option current settings for your TP-Link WiFi extender will get saved in a form of file at your computer system. You should take the packup for your TP-Link WiFi extender so that you can make sure that you can reflect the same configurations to your device if firmware update gets failed.
- After taking the backup for your TP-Link WiFi extender, you will need to go for “Settings” option once again.
- From there you should choose “System Tools” and then go for “Firmware Update”.
- Once you click on the “Browse” button you will need to choose the firmware file you have downloaded at your system. You can download the firmware file for your device from the official website of TP-Link.
After choosing the file, click on “Upgrade” option.
How to Check Network Status for TP-Link WiFi Repeater?
After installing TP-Link WiFi extender for your home network you will able to make access for high for high speed internet for your home network. If you need to know about the current network status for your TP-Link WiFi extender you can easily do this by accessing the http //tplinkrepeater.net login address. We are explaining the steps for getting information regarding network status for your home network. From the blog session you can get more information for http //tplinkrepeater.net, tplinkrepeater net, tplinkrepeater, http //tplinkrepeater.net login and tp link wireless repeater setup.
How to Get Network Information for TP-Link WiFi Extender using http //tplinkrepeater.net/ Web Address
Make login access for your TP-Link WiFi repeater login page using http //tplinkrepeater.net/ web address.

- You will need to open the web browser and in the address bar you will need to put tplinkrepeater.net web address.
- You will ask for the login details so fill the login user name and the password for your TP-Link WiFi repeater login. // http //tplinkrepeater.net
- Hit the enter key and you get redirect for TP-Link WiFi extender configuration page.
- Go for the “Status” option under “Settings”.
- If you find that your TP-Link WiFi extender is not connected with the home network and there no WiFi access, you will need to go for “Wireless” option under “Settings”.
- After that go for “Connect to Network” option.
Your TP-Link WiFi extender is now connected with the home network and you can enjoy trouble free WiFi connections for your home network.
These are the steps for knowing the current working status of your TP-Link WiFi extender using web based utility. // http //tplinkrepeater.net
How to connect different wireless devices for tplink WiFi extender internet access?
TP-Link WiFi extenders can serve you with high speed internet access for a number of advance devices. You will be able to access internet access for Windows XP, Windows 7, Windows 10 and Windows Vista.
We are going to explain the steps you will need to follow so that you can easily connect your advance devices with the TP-Link Extender WiFi access.
Connecting Windows XP with TP-Link WiFi Access
From the control panel you will need to select “Network Connections”.
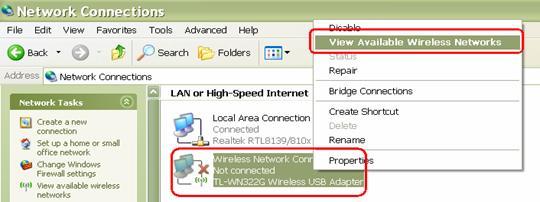
- After that, you will need to right click on “Wireless Network Connections”. Once you right click on that option you will need to select “View Available Wireless Networks” option.
- You will see a list of available WiFi networks. If you are not getting the WiFi network you are looking for, you will need to refresh the given list. Once you get the desired Wifi network you will need to double click the option and click on “Connect” option.
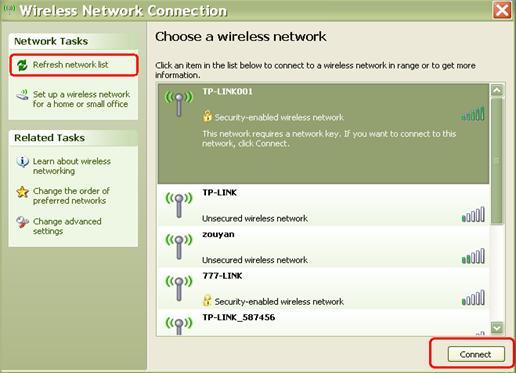
- You will ask for the password that is associated with the WiFi network access. You will need to make sure that the password you are using is correct. If the password is correct you will get connected with the WiFi network. //tplinkrepeater.net
- You will see “Connected” status if you get connected with the available network.
Here are the Steps for Channing the Default Login IP Address for your TP-Link WiFi Extender
- Open web browser at your computer system.
- In the address bar, fill login address http //tplinkrepeater.net and hit the enter key.
- You will need to fill the login user name and password for your TP-Link WiFi extender login page.

- After making login access for your TP-Link WiFi extender setup page you will need to click on “Network” option.
- From there you can easily change the default login IP address for your TP-Link WiFi extender.

- After changing the IP address for your TP-Link WiFi extender you will need to click on “Save” button.
- After that you will need to reboot your device for once.
These are the simple steps for changing the default login IP address for your TP-Link WiFi extender and you can enjoy the login for your TP-Link WiFi extender using this new IP address.
Как настроить tplinkrepeater.net и tplinkextender.net?
Итак, перед тем, как подключаться к репитеру TP-Link, необходимо выполнить элементарную настройку на компьютере, с которого вы хотите войти в панель администратора. Если у вас Windows 7, то проходим в раздел настроек конфигурации сетевого адаптера
- Пуск — Панель управления
- Сеть и Интернет
- Центр управления сетями и общим доступом
- Изменение параметров адаптера
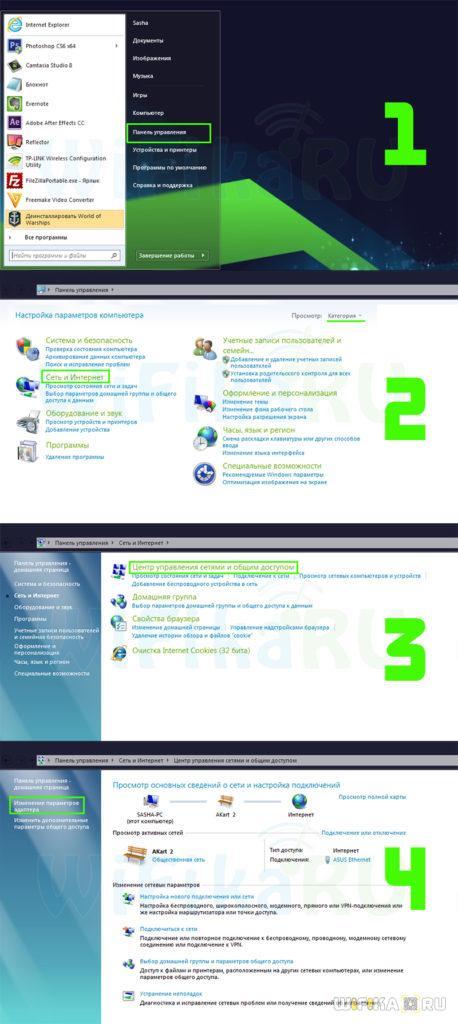
Правой кнопкой мыши кликаем на «Беспроводное соединение», выбираем «Свойства», после чего заходим в «Протокол интернета версии 4»

Здесь нужно установить все флажки на «Автоматическое получение» в графах «IP адрес» и «DNS сервера».
На Windows 10 путь немного короче:
- Кликаем правой кнопкой по иконке «Пуск» и заходим в «Сетевые подключения»
- Далее находим раздел «Настройки параметров адаптера» — и здесь уже делаем все то же самое, что и в Windows 7.

Сохраняем эти настройки кнопкой «ОК».
Теперь снова подключаемся к wifi сети, которую ретранслирует наш усилитель — она обычно называется что-то типа «TP-LINK Extender_123456».
После этого открываем браузер и в адресной строке (не перепутайте с полем ввода поискового запроса) вводим адрес http://tplinkrepeater.net или http://tplinkextender.net — один из двух, который указан на той самой наклейке, в зависимости от модели он может отличаться. Либо, как я уже говорил, можно использовать универсальный для всех повторителей ТП-ЛИНК ip 192.168.0.254.
How to connect Mac device with TP-Link WiFi repeater access?
If you are using a Mac device for your home network and you want to connect this device with the TP-Link WiFi extender device, you can do this easily. We are going to explain the steps you can follow if you want to connect your Mac device with the TP-Link WiFi repeater internet access.
Here are the Steps you will Need to Follow
- First you will need to get all required information for your network router. you will need to know about the IP address, SSID and the encryption type.
- You will need to assign the static IP address for your Mac device.

- From the home screen of your Mac device, you will need to click on “Apple” menu.
- After that, select “System Preferences”. | http //tplinkrepeater.net login
- From the given list you will need to click the option “Network”.

- After that select “Internet and Wireless” option.
- You will need to select “Ethernet” option then select the “Manually” option.
- There you will need to fill the IP address manually. You will need to fill 192.168.0.100 IP address. | http //tplinkrepeater.net login

Click on “apply” button and save all the settings you have made for your Mac device.
These are the simple steps for assigning the IP address manually for your Mac device. You can explore the pages and receive more option for http //tplinkrepeater.net admin, tp link extender setup, http //tplinkrepeater.net login and tp link extender configurar.
Анализ поисковых запросов сайта
Приведённый выше отчёт по частотности использования поисковых запросов, может быть использован оптимизаторами сайта при составлении его семантического ядра и подготовке контента т.н. «посадочных страниц». Статистика поисковых запросов — обобщённая сгруппированная информация по «обращениям» пользователей к поисковой системе по ключевым запросам (фразам).
В большинстве случаев, наш сервис показывает уже сгруппированную информацию, содержащую не только подборку самых популярных слов (фраз), но и словосочетания + синонимы. Собранная в данном разделе статистика показывает по каким «ключевым словам» (поисковым запросам) пользователи переходят на сайт tplinkextender.net.
Поисковый запрос – это слово или словосочетание, которое пользователь вводит в форму поиска на сайте поисковой системы, с учётом автоподбора и автоматического исправления в поиске ошибочного набора.
Archer C1900 Features
- Superfast Wi-Fi – This router is facilitated with 600Mbps on 2.4GHz and 1300Mbps on 5GHz totals 1.9Gbps Wi-Fi speeds.
- Maximum WiFi Range – To provide maximum omni-directional wireless coverage and reliability this router is equipped with 3 dual band detachable antennas.
- 1GHz Dual core Processor – The present 1GHz Dual core Processor ensures that there is no interruption even processing multiple wired or wireless tasks simultaneously.
- Beam forming Technology – This technology is helpful for delivering highly efficient wireless connections with stability.
- Tether App – Tether provided by TP-LINK provides the efficient way to access and manage your router on your iOS and Android devices.

Removing Existing Profile from your Windows XP
- From the control panel you will need to select “Network Connections”.
- You will get option “wireless network connections” you will need to right click on that option then click on “Properties” option.
- From there you will need to choose “Wireless Networks” tab.
- From the properties you will need to click on “Remove” option.

- At last click on “OK” button and the WiFi profile will be removed from the list.
- Once again right click on “Wireless Network Connections”. Simply right click on that option and find option “View Available Wireless Networks”.
- You will need to click on refresh button so that you will get a complete list of the available WiFi networks.
- From the list, you will find that the WiFi profile will be removed from the list.
- You can click on the WiFi network you want to get connect with.
- You will need to fill password once again if the network is WiFi protected.
Here are the Steps to Configure your TP-Link WiFi Device for Modem Devices | http:// tplinkextender.net Login
- Fill the tplink modem login user name and password for your device and go for the next step.
- Select option “Quick Setup”
- After that you will need to choose “Next” option.

- There you can easily change the account settings like user name that is associated to your account and password for your device.
- Using the radio button you will need to choose the “Client” option for your device.
- You can now manage the client mode settings for your account like you can choose wireless name for your device, MAC address for your device and type of the security that you want to manage for your tplink client mode access.
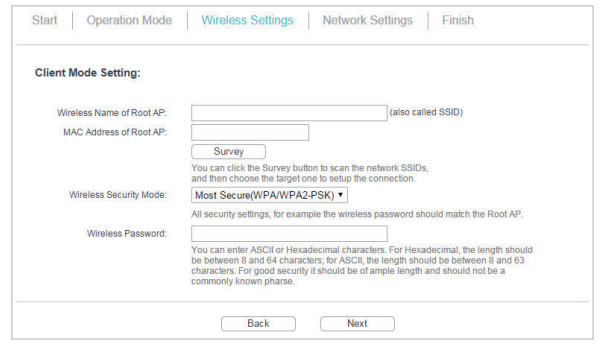
- Make sure to have a strong password for your wireless access.
- Using the drop down menu from next window you can manage the type of the IP settings that you want to manage for your device.
- Manage all these settings and then click on the save button.
How to login access for TP-Link WiFi extender smart setup wizard?
If you need to access the TP-Link WiFi extender smart setup wizard for your home network you will need to access web based utility for your home network. We are going to explain the steps for accessing TP-Link WiFi extender setup page using http //tplinkrepeater.net admin web address. From the blog session you will able to find the advance articles for tp link extender configurar, http //tplinkrepeater.net login, tplinkextender.net, tplinkrepeater and tplinkrepeater.net.
Accessing TP-Link WiFi Extender Smart Setup Wizard
- First you will need to connect your TP-Link WiFi extender with the computer system you are using, This connection will be made using Ethernet connections.
- After that you will need to configure your computer system so that you can assign static IP address to your computer system. | http //tplinkrepeater.net/

- Go for the “Control Panel” to your computer system and the you will need to select “Network and Sharing Center”.
- Go for the option “Change Adapter Settings”.
- Go for the “Properties” of “Local Area Network”.
- You will get a new window from where you will need to setup the IP address and the subnet mask for your device. | http //tplinkrepeater.net

- You will now need to access the login page for your TP-Link WiFi extender using the default login address. www.tplinkrepeater.net is the default login address that is used to access TP-Link WiFi extender login page.
- You will now need to fill the login name and password for accessing the TP-Link Wifi extender setup wizard. | tplinkrepeater net
- You will need to setup your computer so that it can obtain IP address automatically.
- Click on “OK” button so that all settings can get saved at last.
These are the steps you will need to follow so that you can easily access TP-Link WiFi extender smart setup wizard. After accessing TP-Link WiFi repeater page you will able to configure all advance settings for your device.
TP-Link Archer C5400 v2 Review
The other parts of the device are small access plate on bottom end provide a weatherproofed entry point for signal ether cable without it being visible.
Wifi performance goes were impressed connecting right next to router, download speeds of 74.3 Mbps on 5GHz band and 66 Mbps on 2.4GHz, the speed on the second floor of building and pleased to note even at distance the speeds of 5GHz network remained consistent at 74Mbps down 17.9 up, 2.4GHz band did from more significantly with 62Mbps down and 17MBps up.
The problem for any network infrastructure is equipment is needed there is no service specifically power, running a network cable is easy havingpower socket placed in roof space can be time-consuming and costly exercise there is a technology repeater tplink net called PoE here a limited amount of power can be piped the data down wires in the ethernet cable.
Steps for Updating Firmware for TP-Link WiFi Repeater
- First you will need to access login page for TP-Link WiFi extender. You can access the login for TP-Link WiFi extender using http //tplinkrepeater.net login address.
- After accessing the login page for your TP-Link WiFi extender you will need to go for the “System Tools” under “Settings”.
- Then, go for “Backup and Restore”.
- Once you click on “Backup” option current settings for your TP-Link WiFi extender will get saved in a form of file at your computer system. You should take the packup for your TP-Link WiFi extender so that you can make sure that you can reflect the same configurations to your device if firmware update gets failed.
- After taking the backup for your TP-Link WiFi extender, you will need to go for “Settings” option once again.
- From there you should choose “System Tools” and then go for “Firmware Update”.
- Once you click on the “Browse” button you will need to choose the firmware file you have downloaded at your system. You can download the firmware file for your device from the official website of TP-Link.
After choosing the file, click on “Upgrade” option.
Here are the Commonly Asked Questions for TP-Link RE650 Wi-Fi Range Extender

Can’t Access TP-Link Extender Net Login Page from a Computer Device
There can be a number of reasons that you can’t access TP-Link RE650 Wi-Fi Range Extender login page from your computer device. here we are explaining some tips for you and you can easily access tplinkextender.net login page.
- Reset your TP-Link RE650 Wi-Fi Range Extender and use http:// 192.168.0.1 IP address for accessing your device login page.
- Use correct login user name and password because if you fill incorrect login details for tplink extender login then you will definitely get login problems.
- From your computer device you have to make settings in such a way that your device can easily obtain IP address from your router device.
These are the tips that you can try to access the tplink wifi extender login page.

TP-Link RE650 Wi-Fi Range Extender Device is Providing Slow WiFi Connectivity
If you find that your tplink wifi extender device is not providing you best wifi network then here are some tips for all users.
- Update firmware for your tplink wifi extender device.
- Change the location of your device and place your tplink wifi extender device to center location of your home.
- Make sure that your TP-Link RE650 Wi-Fi Range Extender and router device can communicate to each other.
Archer C1900 Features
- Superfast Wi-Fi – This router is facilitated with 600Mbps on 2.4GHz and 1300Mbps on 5GHz totals 1.9Gbps Wi-Fi speeds.
- Maximum WiFi Range – To provide maximum omni-directional wireless coverage and reliability this router is equipped with 3 dual band detachable antennas.
- 1GHz Dual core Processor – The present 1GHz Dual core Processor ensures that there is no interruption even processing multiple wired or wireless tasks simultaneously.
- Beam forming Technology – This technology is helpful for delivering highly efficient wireless connections with stability.
- Tether App – Tether provided by TP-LINK provides the efficient way to access and manage your router on your iOS and Android devices.
How to Make the Access Controls for TP-Link RE650 Wi-Fi Range Extender?
- Connect your TP-Link RE650 Wi-Fi Range Extender with a computer. Using LAN cable you will connect your wifi extender and computer device. power supply must be cut for your device when you are connecting your devices.
- Fill http:// tplinkextender.net in address bar of web browser. Do not fill this address in the search bar.
- Type tplink extender setup page login user name and password.
- After that click on “Settings” button.

- Select “Advanced Settings” button.
- After that select “Access Control” button.
- Enable the access controls for TP-Link RE650 Wi-Fi Range Extender
- Click on “Blacklist” button and then you can fill the IP address of the devices that you want to block for wifi access. if you select “White list” button then you can fill the IP address of the devices that you want to allow internet connections.
- You will also need to fill the device name and each device will have a unique name at your network.
- After that select “Apply” button.
These are the steps for making access control settings for your TP-Link RE650 Wi-Fi Range Extender. In the same way you will make the parental controls for these extender devices from tplink extender setup page.
TP-Link Archer C5400 v2 Review
The other parts of the device are small access plate on bottom end provide a weatherproofed entry point for signal ether cable without it being visible.
Wifi performance goes were impressed connecting right next to router, download speeds of 74.3 Mbps on 5GHz band and 66 Mbps on 2.4GHz, the speed on the second floor of building and pleased to note even at distance the speeds of 5GHz network remained consistent at 74Mbps down 17.9 up, 2.4GHz band did from more significantly with 62Mbps down and 17MBps up.
The problem for any network infrastructure is equipment is needed there is no service specifically power, running a network cable is easy havingpower socket placed in roof space can be time-consuming and costly exercise there is a technology repeater tplink net called PoE here a limited amount of power can be piped the data down wires in the ethernet cable.
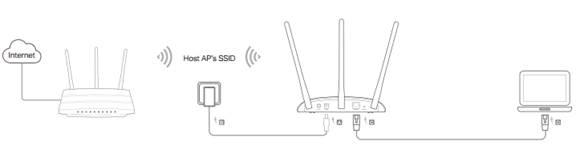
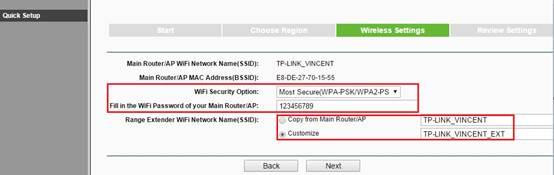
To extend another host network here follow the steps
- Go to the settings then wireless and click on connect to the network.
- To find available network here click on the wireless scanner.
- Now you have to select the 2.4 GHz network which you want to extend.
- Once the host network is selected then SSID and security type will be automatically filled in. Enter the password in the password field if you found that selected network is encrypted here.
- Click on the save button to save the settings.
To change the wireless network name SSID
- Go to the settings>wireless>extended network.
- Create a new SSID here in the extended 2.4 GHz SSID or click Copy HOST SSID.
- Click on the save to save all the settings you have made here.
Note:- You will be a disconnect from the network after applying the settings if you have changed the settings with the wireless device. Make sure to write down the SSID for future references.
To hide the SSID of the extended network on tp link extender setup.
TP-Link WiFi extender status LED meaning
Each device that comes with status LED will help you to know about the correct working state of your device. TP-Link WiFi extenders or repeaters also comes with status LED and using this status LED you will able to know about current working status of your TP-Link WiFi extender.

TP-Link WiFi Extender Status LED for WPS Configurations
WPS or WiFi Protected Setup for TP-Link WiFi Extender allows you to connect your TP-Link WiFi extender with existing network without even accessing the http //tplinkrepeater.net admin page. If you are using WPS configurations for your TP-Link WiFi extender your status LED should start blinking. If the status LED for your TP-Link WiFi extender is not blinking at all that means something is wrong with your TP-Link WiFi extender configurations. If you are using TP-Link WiFi extender WPS configurations you find that status LED is not blinking at all, you have to perform the WPS configurations once again.
Steps for Updating Firmware for TP-Link WiFi Repeater
- First you will need to access login page for TP-Link WiFi extender. You can access the login for TP-Link WiFi extender using http //tplinkrepeater.net login address.
- After accessing the login page for your TP-Link WiFi extender you will need to go for the “System Tools” under “Settings”.
- Then, go for “Backup and Restore”.
- Once you click on “Backup” option current settings for your TP-Link WiFi extender will get saved in a form of file at your computer system. You should take the packup for your TP-Link WiFi extender so that you can make sure that you can reflect the same configurations to your device if firmware update gets failed.
- After taking the backup for your TP-Link WiFi extender, you will need to go for “Settings” option once again.
- From there you should choose “System Tools” and then go for “Firmware Update”.
- Once you click on the “Browse” button you will need to choose the firmware file you have downloaded at your system. You can download the firmware file for your device from the official website of TP-Link.
After choosing the file, click on “Upgrade” option.
Your device will start updating the firmware file so you have to make sure that you are not disturbing the firmware update process at all.
Steps for Accessing TP-Link Repeater Web Based Utility

After connecting your TP-Link WiFi extender with the computer system, you will need to provide power supply to your device.
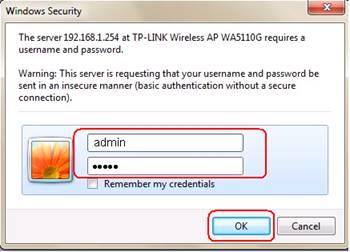
- Now, you will need to open the web browser you are using and in the address bar of your web browser you will need to fill http //tplinkrepeater.net login address.
- Once you hit the enter key after filling the TP-Link extender login address in the address bar, you will get redirect to the login screen. You will need to fill the login user name and the password there.
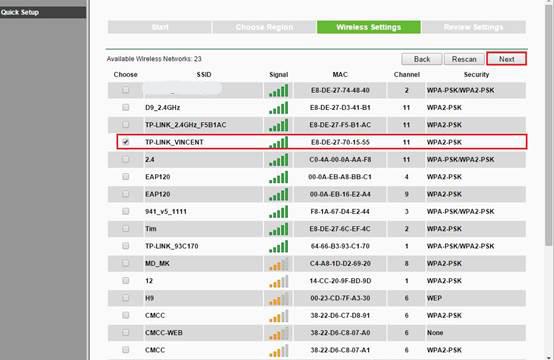
- Once you make login access for your TP-Link WiFi repeater login page you will need to choose “Next” button after selecting the “Quick Setup”.
- There, you will need to select the region in which you are currently living.
These are the steps for accessing the TP-Link extender login page using web based utility. After accessing the confutation page for your TP-Link WiFi extender you can make all advance configurations for your device very easily.
Here are the Commonly Asked Questions for TP-Link RE650 Wi-Fi Range Extender
Can’t Access TP-Link Extender Net Login Page from a Computer Device
There can be a number of reasons that you can’t access TP-Link RE650 Wi-Fi Range Extender login page from your computer device. here we are explaining some tips for you and you can easily access tplinkextender.net login page.
- Reset your TP-Link RE650 Wi-Fi Range Extender and use http:// 192.168.0.1 IP address for accessing your device login page.
- Use correct login user name and password because if you fill incorrect login details for tplink extender login then you will definitely get login problems.
- From your computer device you have to make settings in such a way that your device can easily obtain IP address from your router device.
These are the tips that you can try to access the tplink wifi extender login page.
TP-Link RE650 Wi-Fi Range Extender Device is Providing Slow WiFi Connectivity
If you find that your tplink wifi extender device is not providing you best wifi network then here are some tips for all users.
- Update firmware for your tplink wifi extender device.
- Change the location of your device and place your tplink wifi extender device to center location of your home.
- Make sure that your TP-Link RE650 Wi-Fi Range Extender and router device can communicate to each other.
The adapter (tplinkrepeater net admin) is equipped with the following technologies:
- Remote N PCI Express 2.0(x1) Adapter TL-WN881ND enables you to interface a personal computer to a remote system and access fast Internet association. Agree to IEEE 802.11n, they give remote accelerate to 300Mbps, which is useful for the internet gaming or even HD video spilling.
- MIMO (Multiple input, multiple output antenna) technology indicates more brilliant capacities of moderating information loss over long separations and through hindrances in a little office or an expansive loft, even in a steel-and-solid building. Most importantly, you could undoubtedly get the remote system amid long-separate association where inheritance 11g items may not!

- Clear Channel Assessment (CCA) naturally maintains a strategic distance from channel clashes utilizing its unmistakable channel choice component and completely understands the benefits of channel authoritative, enormously improved the remote execution.
- WPA/WPA2 encryption norms guarantee your remote association is sheltered from gatecrashers.
- Either utilizing the streamlined User Interface and setup wizard or the CD (included) setup wizard will enable you to get ‘on the web’ rapidly and effortlessly.
Make Changes for the TP-Link WiFi Repeater Configurations
If you are getting issues with your TP-Link WiFi repeater device you must make sure that advance configurations for your TP-Link WiFi repeater should not conflict with other devices. You can make changes for the default settings from the “Wireless Settings” under “Wireless” option. For this, you will need to access the TP-Link WiFi repeater login page using http //tplinkrepeater.net default address.
Remove the Physical Conflicts in the Path
You will face issues with your TP-Link WiFi extender performance if there are any kind of physical conflicts in between your TP-Link WiFi repeater device and receivers. You must remove any kind of electronic devices that are placed near your TP-Link WiFi extender.
Choose a Best Location for Placing your TP-Link WiFi Repeater
The place you are going to place your TP-Link WiFi extender also matters a lot because a bad location for your TP-Link WiFi extender can disturb the performance for your TP-Link WiFi repeater. The antennas for your TP-Link WiFi extender should also need to be attached very carefully. These antennas can boost the WiFi coverage area for your device.

These are the troubleshooting tips you can try if you are getting slow internet issues with your device. you can also explore the blog session if you need to know more about tp link wireless repeater setup, http //tplinkrepeater.net login, tp link extender setup, http //tplinkrepeater.net admin, http //tplinkrepeater.net login and http //tplinkrepeater.net admin
Here are the Commonly Asked Questions for TP-Link RE650 Wi-Fi Range Extender
Can’t Access TP-Link Extender Net Login Page from a Computer Device
There can be a number of reasons that you can’t access TP-Link RE650 Wi-Fi Range Extender login page from your computer device. here we are explaining some tips for you and you can easily access tplinkextender.net login page.
- Reset your TP-Link RE650 Wi-Fi Range Extender and use http:// 192.168.0.1 IP address for accessing your device login page.
- Use correct login user name and password because if you fill incorrect login details for tplink extender login then you will definitely get login problems.
- From your computer device you have to make settings in such a way that your device can easily obtain IP address from your router device.
These are the tips that you can try to access the tplink wifi extender login page.
TP-Link RE650 Wi-Fi Range Extender Device is Providing Slow WiFi Connectivity
If you find that your tplink wifi extender device is not providing you best wifi network then here are some tips for all users.
- Update firmware for your tplink wifi extender device.
- Change the location of your device and place your tplink wifi extender device to center location of your home.
- Make sure that your TP-Link RE650 Wi-Fi Range Extender and router device can communicate to each other.